Hackaday And Adafruit Launch The Pi Zero Contest

Hackaday and Adafruit are teaming up to bring you the Pi Zero Contest. Unless you’ve been hiding out in your workshop for the past month or so, you probably already know The Pi Zero is the $5 Linux-based computer which has been taking the world by storm. Think you have the next great project for this single-board computer? Enter it for a chance to take home one of three $100 gift certificates to the Hackaday Store. We know Zeros have been hard to find, so we’ll be giving away 10 of them before the contest is over. Even if you don’t have a Pi Zero, read on!

This is all about documenting quality projects to Hackaday.io. We’re looking for well thought out, well documented builds intended for the Pi Zero. Any project submitted to this contest can also be rolled over to the 2016 Hackaday Prize. Think of it as getting a head start.

Here are the details:

  • From February 2nd, to February 20th, Lady Ada will make 10 ‘From the Desk of Lady Ada’ broadcasts focusing on this contest. During each broadcast she will present an idea for a Pi Zero Project. You don’t have to build Lady Ada’s projects, they’re starter ideas to get your wheels turning. If you don’t have a Raspberry Pi Zero, don’t worry! You can prototype with a Raspberry Pi Model B, or a Pi 2. There are also 10 Pi Zero boards up for grabs before the contest is over.
  • The deadline for winning a Pi Zero is 12:00am PST February 25th, 2016. The judges will pick the 10 most well thought out and well documented projects.
  • On February 29th, the judges will announce the winners of 10 Raspberry Pi Zero boards.
  • The grand prize for this contest is one of three $100 gift cards to the Hackaday store. The deadline to enter is 12:00 am PST March 14th, 2016.

Entering is easy.  All you have to do is submit your project. Just click the “Submit to” drop down list on your project page. Then select Adafruit Pi Zero Contest.

So fire up your soldering irons, warm up your 3D printers, and load up your favorite code editor. It’s time to start hacking!

Yet Another Pi Zero USB Hub

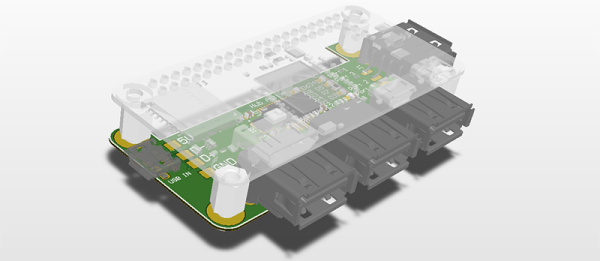
The Raspberry Pi Zero was back in stock at Adafruit this week – for about eight minutes. That means a few more people get Pi Zeros, many more will put them up on eBay, and everyone is working on their own version of a Pi Zero USB hub. The latest version of a Pi Zero hub comes from [Nate], and he’s doing this one right. His Pi USB adapter adds four USB ports and features not found in other DIY USB hubs like fuses and ESD protection.

As with other Pi Zero USB hub add-ons, this build relies on a USB hub controller, a few passives, and not much else. The chip used in this hub is the FE1.1s chip, a highly integrated 4-port hub controller that can be found through the usual Chinese resellers. This hub controller doesn’t require much, just a 12MHz crystal, a few passives, and four USB jacks.

Of particular interest is how [Nate] is connecting this hub to the Pi Zero. He’s left the option open for using either a USB cable, or soldering the USB’s differential pairs directly between the Pi and the hub. In either case, the hub should work, and with the addition of the zeners, fuses, and other parts that keep the hub from frying itself, [Nate] might have a very nice project on his hands.

Hackaday Links: December 27th, 2015

PCBs can be art – we’ve known this for a while, but we’re still constantly impressed with what people can do with layers of copper, fiberglass, soldermask, and silkscreen. [Sandy Noble] is taking this idea one step further. He took C64, Spectrum, and Sinclair PCBs and turned them into art. The results are incredible. These PCBs were reverse engineered, traced, and eventually turned into massive screen prints. They look awesome, and they’re available on Etsy.

$100k to bring down drones. That’s the tagline of the MITRE Challenge, although it’s really being sold as, “safe interdiction of small UAS that pose a safety or security threat in urban areas”. You can buy a slingshot for $20…

[styropyro] mas made a name for himself on Youtube for playing with very dangerous lasers and not burning his parent’s house down. Star Wars is out, and that means it’s time to build a handheld 7W laser. It’s powered by two 18650 cells, and is responsible for more than a few scorch marks on the walls of [styropyro]’s garage.

Everybody is trying to figure out how to put Ethernet and a USB hub on the Pi Zero. This means a lot of people will be launching crowdfunding campaigns for Pi Zero add-on boards that add Ethernet and USB. The first one we’ve seen is the Cube Infinity. Here’s the thing, though: they’re using through-hole parts for their board, which means this won’t connect directly to the D+ and D- USB signals on the Pi Zero. They do have a power/battery board that may be a little more useful, but I can’t figure out how they’re doing the USB.

[Keith O] found a fascinating video on YouTube and sent it into the tips line. It’s a machine that uses a water jet on pastries. These cakes start out frozen, and come out with puzzle piece and hexagon-shaped slices. Even the solution for moving cakes around is ingenious; it uses a circular platform that rotates and translates by two toothed belts. Who would have thought the latest advancements in cutting cakes and pies would be so fascinating?

It’s time to start a tradition. In the last links post of last year, we took a look at the number of views from North Korea in 2014. Fifty-four views, and we deeply appreciate all our readers in Best Korea. This year? For 2015, we’ve logged a total of thirty-six views from the Democratic People’s Republic of Korea. That’s a precipitous drop that deserves an investigation. Pyongyang meetup anyone?

Firing Up A Raspberry Pi Zero

I ordered a Raspberry Pi Zero from Adafruit in their Startup Pack right after they were released. There are a few Greater Than Zero Pis (GTZPi) already on my workbench so my purchase was driven by curiosity, not necessity. With no rush on delivery it eventually got here, and I finally got around to looking at it. My experience with the Pi family began with the Pi B+ and, shortly after that, the Pi 2. The speed difference between them was noticeable so I decided to dive in and further test the performance of the Zero.

Continue reading “Firing Up A Raspberry Pi Zero”

Solder More USB Ports To The Raspberry Pi Zero

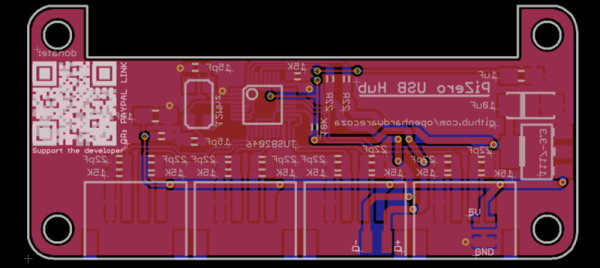
Slowly, Raspberry Pi Zeros are falling into the hands of everyone who wants one. Quickly, though, it was realized that one USB port wasn’t enough, and having a single USB OTG port was only just the most economical solution. The Pi Zero does have a lot of test points exposed on the back, and [Peter van der Walt] is clever enough to come up with a 4-port hub you can solder directly to the Pi Zero.

[Peter] has a bit of experience with USB ports on the Pi, and the test points available on the bottom of this cheap and wonderful board provide everything you need to break out the single USB OTG port to a USB hub. We’ve seen this done before with a few tenuous solder connections between the Zero and an off-the-shelf USB hub. [Peter]’s build does it by soldering a USB hub directly to the Pi through these test points. It’s the first purpose built bit of hardware designed for the express purpose of giving the Pi four USB ports while only making it a sliver thicker.

The chip [Peter] is using for the build is the TI TUSB2046B, a device that turns a single USB port into a 4-port hub. This is a part that only costs about $2 in quantity, and the USB connectors themselves are only about $0.60 if you want to build a thousand of these solderable USB hubs. Now you see why the Pi Foundation didn’t include a whole host of ports on the Pi Zero, but it does mean you should be able to pick this board up for under $10 when it’s inevitably cloned in China.

[Peter] doesn’t have this board working yet. In fact, he’s only just sent the Gerbers off to the PCB fab. There will be an update once [Peter] gets the boards back and solders up the tiny but tolerable 0603 parts.

Shoving A Raspberry Pi Zero Into An Xbox Controller

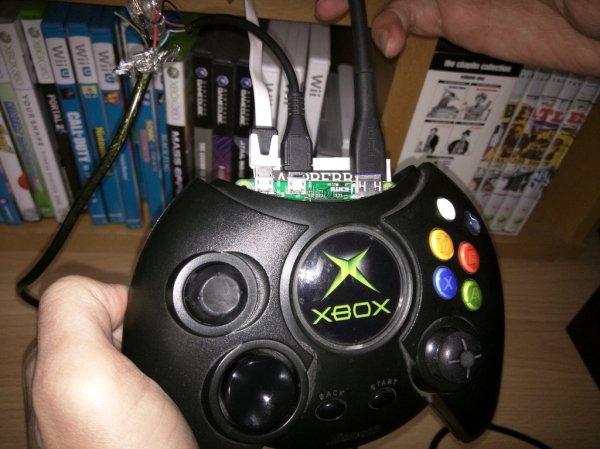
With the release of the Raspberry Pi Zero last month, we’ve been waiting in excitement to see the first creative hacks to come out, making use of its tiny size; which if you didn’t know, is smaller than a business card. [Terence Eden] hopped to it and made what might be the first Raspberry Pi Zero emulator: inside an Xbox controller.

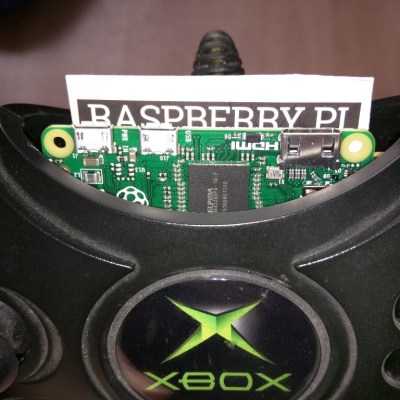
10-Pi-Cardboard-insulatorThanks to its small size it’s actually a fairly straight forward hack with minimal modification to the controller in order to make it fit. In fact, you only need to remove the memory card holder from the controller and snip one bit of plastic in order to make it fit right in the middle — awesome.

Now it does stick out a bit as you can see in the pictures, but we’re sure it won’t take someone long to make a 3D printed part that snaps into the controller giving it a more stock appearance. Unfortunately since HDMI can’t carry a power source to the Pi, [Terence] is using a micro-USB to power it — but there is enough space inside the controller for a battery pack if you wanted to make it truly portable.

Continue reading “Shoving A Raspberry Pi Zero Into An Xbox Controller”

Pi Zero HackChat With Lady Ada

This Thursday, December 3rd, join us for a Live HackChat about the Raspberry Pi Zero with special guest [Limor Fried]. You may know [Limor] as [Lady Ada], the founder of Adafruit Industries. Adafruit has been on the forefront of the Pi Zero release. The $5 single board computer was announced one week ago by the Raspberry Pi Foundation.

Join in the chat to discuss the Raspberry Pi Zero. Limor has done a lot of work with the board already, including hacking analog audio back into the form factor. This is a great opportunity to ask questions, talk about your own plans for the hardware, and to find collaborators for future projects.

Pi Zero HackChat starts Thursday at 5pm PST (here’s a timezone cheat sheet if you need it). Participating in this live chat is very simple. Those who are already part of the Hacker Channel can simply click on the Team Messaging button. If you’re not part of the channel, just go to the hacker Channel page, scroll to the bottom of the “TEAM” list in the left sidebar and click “Request to join this project”.

HackChat takes place in the Hacker Channel every few weeks and is a friendly place to talk about engineering and the projects you’re working on.