Turning A Pi Into A PDP

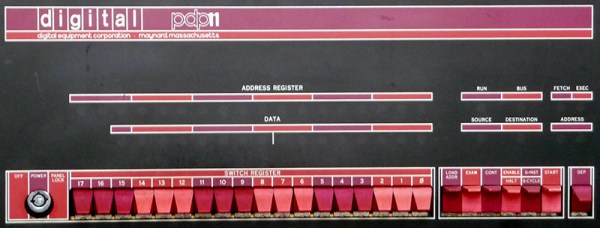
There’s no better way to learn how to program a computer than assembly, and there’s no better way to do assembly than with a bunch of blinkenlights and switches. Therefore, the best way to learn programming is with a PDP-11. It’s a shame these machines are locked up in museums and the garages of very cool people, but you can build your own PDP-11 with a Raspberry Pi and just a few extra components.

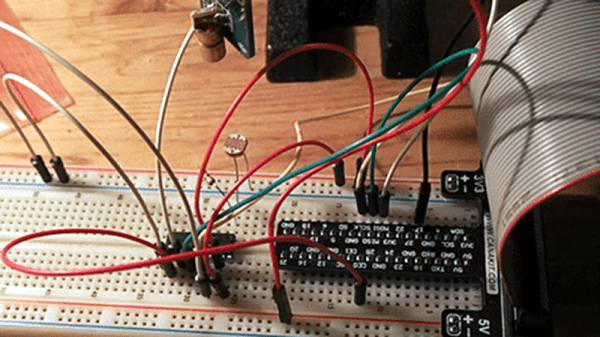
[jonatron] built his own simulated version of the PDP-11 with a lot of LEDs, a ton of switches, and a few 16-bit serial to parallel ICs. Of course the coolest part of any blinkenlight simulator are the front panel graphics, and here [jonatron] didn’t skimp. He put those switches and LEDs on a piece of laser cut acrylic with a handsome PDP11 decal. The software comes with a load of compiler warnings and doesn’t run anything except for very simple machine code programs. That’s really all you can do with a bunch of toggle switches and lights, though.

If this project looks familiar, your memory does not deceive you. The PiDP-8/I was an entry in this year’s Hackaday Prize and ended up being one of the top projects in the Best Product category. We ran into [Oscar], the creator of the PiDP-8, a few times this year. The most recent was at the Hackaday SuperConferece where he gave a talk. He’s currently working on a replica of the king of PDPs, the PDP-11/70.

Video below.

Continue reading “Turning A Pi Into A PDP”

Piezoelectric Transformers Are A Thing, Have You Used One?

Cheap piezo buzzers are everywhere. They’re so cheap that they can be used in novelty birthday cards. Applying an alternating voltage across a piezo crystal makes it expand and contract, and fixing this crystal to a metal disk gives the piezo speaker its characteristic tinny sound that is anything but pleasant.

The piezoelectric effect works the other way too, and piezo elements are very useful as vibration sensors. Simply put one of your voltmeter leads on each of the piezo element’s wires and touch the element with your hand or knock it against your bench. You should see a voltage spike on your voltmeter which will change in magnitude with the amount of force you use when touching the element.

This ability to change shape when a voltage is applied and to create a voltage when they’re deformed is the basis of the piezoelectric transformer (PZT). While searching for a high voltage/low current transformer, Hackaday reader [Josh] was surprised to find a piezoelectric solution. He didn’t say whether he decided to use a PZT in his project but he did link us to a decent PDF on the subject.

piezo_transformerIn a PZT, two piezo elements sit next to each other. The primary is made up of multiple thin layers that expand horizontally and press on a single secondary piezo element. The more and the thinner the primary layers, the more force is exerted on the secondary, and the more voltage it develops. There are a few equations involved which you can check out in the PDF linked above that go over this concept in painful detail if you’re into that sort of thing.

If you have never played with piezo element you should add one to your next parts order. They are cheap and easy to experiment with. We have seen piezo elements used in DIY speakers, sonar projects, and even as the sensor for an atomic force microscope, but we have yet to see a piezoelectric transformer in a hack. Surely someone has used one in a project they worked on, leave us a link in the comments if you’re the person we’re talking about.

Raspberry Pi Communication Via LASER

[Nick Touran] wanted to make two Raspberry Pi’s communicate wirelessly. There are lots of options, but [Nick] used a LASER and a photoresistor, along with Morse code. If you don’t find Morse code fancy enough, you could always refer to it as OOK (on/off keying). The circuit uses a common LASER module and an ordinary photoresistor that varies in resistance based on light. A resistor forms a voltage divider with the photoresistor and an external A/D reads the resulting voltage.

The circuit works, but we couldn’t help but notice a few items. Not all photoresistors are as sensitive to the same light wavelengths, so for the maximum range you’d want to pick a particular photoresistor.  While the analog to digital converter is certainly workable, we couldn’t help but wonder if you couldn’t set up the divider to use the inherent threshold of the Raspberry Pi’s input pins for a simpler circuit. Of course, if you used the same technique with an Arduino, you could use the built-in A/D converter, and the A/D converter is probably easier to get working.

Continue reading “Raspberry Pi Communication Via LASER”

Solder More USB Ports To The Raspberry Pi Zero

Slowly, Raspberry Pi Zeros are falling into the hands of everyone who wants one. Quickly, though, it was realized that one USB port wasn’t enough, and having a single USB OTG port was only just the most economical solution. The Pi Zero does have a lot of test points exposed on the back, and [Peter van der Walt] is clever enough to come up with a 4-port hub you can solder directly to the Pi Zero.

[Peter] has a bit of experience with USB ports on the Pi, and the test points available on the bottom of this cheap and wonderful board provide everything you need to break out the single USB OTG port to a USB hub. We’ve seen this done before with a few tenuous solder connections between the Zero and an off-the-shelf USB hub. [Peter]’s build does it by soldering a USB hub directly to the Pi through these test points. It’s the first purpose built bit of hardware designed for the express purpose of giving the Pi four USB ports while only making it a sliver thicker.

The chip [Peter] is using for the build is the TI TUSB2046B, a device that turns a single USB port into a 4-port hub. This is a part that only costs about $2 in quantity, and the USB connectors themselves are only about $0.60 if you want to build a thousand of these solderable USB hubs. Now you see why the Pi Foundation didn’t include a whole host of ports on the Pi Zero, but it does mean you should be able to pick this board up for under $10 when it’s inevitably cloned in China.

[Peter] doesn’t have this board working yet. In fact, he’s only just sent the Gerbers off to the PCB fab. There will be an update once [Peter] gets the boards back and solders up the tiny but tolerable 0603 parts.

How Y Combinator Brings Hardware Startups To Life

The world is more used to software startups than hardware startups. Luke Iseman is here to help. He is the Director of Hardware at Y Combinator and discusses some details that need to be kept in mind when starting up your own hardware company. Take a look at the talk he presented at the 2015 Hackaday SuperConference and then join us after the break to cover a few key points of his discussion.

Continue reading “How Y Combinator Brings Hardware Startups To Life”

3D-Printing The Most Ornate Room

It’s no secret that we like 3D printing, but Artist and architect [Michael Hansmeyer] really likes 3D printing. So much so that he’s based his entire career around exploring the artistic possibilities of what he calls “computational architecture”.

live9We first fell in love with [Michael]’s work “Columns” because it was both daring and relatively low-budget at the same time. He made a series of architectural-sized columns out of cross-sections of laser-cut cardboard. Why cardboard? Because his goal was to make the columns as complex as possible and the current range of 3D printers couldn’t give him the resolution he wanted.


installation3Fast-forward to “Digital Grotesque”. Now [Michael] has access to a large-scale sand printer, and the license to go entirely nuts. He makes a space reminiscent of a Rococo grotto, but full of so much detail that you can’t really take it all in: it’s nearly fractal. Some stats: 11 tons of printed sandstone, 260 million surfaces, 30 billion voxels. We’re stoked that we don’t have to dust it!


arabesque_wall11His latest piece, “Arabesque Wall” is partly organic and elegant, and part Aliens. If we can play art critic, we think it’s beautiful. Go click through the portfolio. (And although they never got printed, we really like some of the “Voxels” series of cellular-automata pieces.)

From new paint materials opening up new color possibilities to new instruments enabling entirely different types of music, art, and technology mutually inform each other much more than we often appreciate. In ten years time, we’ll be looking back on this work and saying “this piece looks good” and “that piece looks bad” instead of “wow, amazing tech!”. But for now, we’re also content to wallow in the “wow”.

Squash Your ESP-8266 Bugs With ESP-gdbstub

We hope we’re not insulting you by suggesting this, but it’s possible that even the best among us may be faced with bugs in our embedded code from time to time. And while we’re great fans of printf debugging over the serial port, and its high-speed equivalent — flipping a GPIO pin — there’s a time when your bug is so deep that having a real debugger is the best way to dig it out.

[slaff] has been doing some great work documenting C/C++ programming on the ESP-8266, mostly using Eclipse and some of the Arduino libraries. In the fourth part of his series of posts, he walks through using a couple debugger options for the ESP. What makes this all work is the ESP-gdbstub code from Espressif themselves. gdbstub looks great — it works both with the standard SDK as well as with FreeRTOS, so you can debug your ESP-8266 code whether it’s in an OS or on the bare metal. And all this just using the standard serial connection that’s used for programming.

Now, this still may not help with timing-related bugs. ESP-gdbstub uses the serial port, after all. But having the ability to set breakpoints and interactively inspect what’s going on in the chip’s memory is priceless, and doing so with no extra hardware connections is brilliant.

Continue reading “Squash Your ESP-8266 Bugs With ESP-gdbstub”