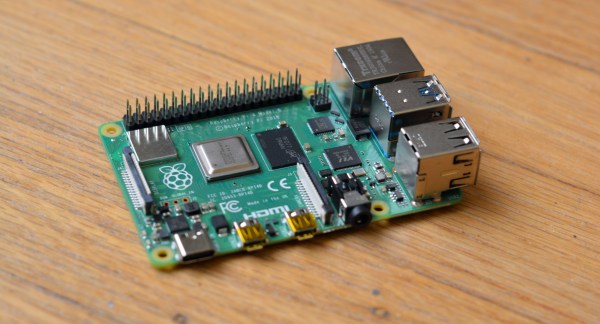
How To Time Drone Races Without Transponders

Drone racing is nifty as heck, and a need all races share is a way to track lap times. One way to do it is to use transponders attached to each racer, and use a receiver unit of some kind to clock them as they pass by. People have rolled their own transponder designs with some success, but the next step is ditching add-on transponders entirely, and that’s exactly what the Delta 5 Race Timer project does.

A sample Delta 5 Race Timer build (Source: ET Heli)

The open-sourced design has a clever approach. In drone racing, each aircraft is remotely piloted over a wireless video link. Since every drone in a race already requires a video transmitter and its own channel on which to broadcast, the idea is to use the video signal as the transponder. As a result, no external hardware needs to be added to the aircraft. The tradeoff is that using the video signal in this way is trickier than a purpose-made transponder, but the hardware to do it is economical, accessible, and the design is well documented on GitHub.

The hardware consists of RX508 RX5808 video receiver PCBs modified slightly to enable them to communicate over SPI. Each RX508 RX5808 is attached to its own Arduino, which takes care of low-level communications. The Arduinos are themselves connected to a Raspberry Pi over I2C, allowing the Pi high-level control over the receivers while it serves up a web-enabled user interface. As a bonus, the Pi can do much more than simply act as a fancy stopwatch. The races themselves can be entirely organized and run through the web interface. The system is useful enough that other projects using its framework have popped up, such as the RotorHazard project by [PropWashed] which uses the same hardware design.

While rolling one’s own transponders is a good solution for getting your race on, using the video transmission signal to avoid transponders entirely is super clever. The fact that it can be done with inexpensive, off the shelf hardware is just icing on the cake.

Raspberry Pi Counts Down To The Last Bitcoin

Even though it might appear to be pretend Internet money, by design, there are a finite number of Bitcoins available. In the same way that the limited amount of gold on the planet and the effort required to extract it from the ground keeps prices high, the scarcity of Bitcoin is intended to make sure it remains valuable. As of right now, over 80% of all the Bitcoins that will ever exist have already been put into circulation. That sounds like a lot, but it’s expected to take another 100+ years to free up the remaining ones, so we’ve still got a way to go.

Even though his device will probably no longer exist when the final Bitcoin hits the pool, [Jonty] has built a ticker that will count down as the final coins get mined from the digital ground. The countdown function is of course a bit tongue-in-cheek, but the gadget also shows slightly more pertinent information such as the current Bitcoin value, so you can always remember what a huge mistake it was not to invest while they were still worth pennies.

On the hardware side, this is a pretty simple project. The enclosure is laser cut 5 mm MDF, and it holds a Raspberry Pi 3, a MAX7219 32×8 LED dot matrix display, and a 10 mm white LED with accompanying resistor. The white LED is placed behind an acrylic diffuser to give the Bitcoin logo on the side of the display a soft pleasing glow when the device is powered up. There are no buttons or other controls on the ticker, once the software has been configured it just gets plugged in and away it goes.

As for the software, it takes the form of a Python script [Jonty] has created which uses Requests and Beautiful Soup to scrape the relevant data from bitcoinblockhalf.com. The script supports pulling any of the 19 variables listed on the site and displaying it on the LED matrix, which range from the truly nerdy stats like daily block generation to legitimately useful data points that anyone with some Bitcoin in their digital wallets might like to have ticking away on their desks.

The first decade of Bitcoin has been a pretty wild ride, not only monetarily, but in the wide array of hardware now involved in cryptocurrency mining and trading. From Bitcoin traffic lights to custom-made mining rigs that are today more useful as space heaters, it takes a lot of hardware to support these virtual coins.

Continue reading “Raspberry Pi Counts Down To The Last Bitcoin”

The Tiniest RetroPie

The RetroPie project is a software suite for the Raspberry Pi that allows the user to easily play classic video games through emulators. It’s been around for a while now, so it’s relatively trivial to get this set up with a basic controller and video output. That means that the race is on for novel ways of implementing a RetroPie, which [Christian] has taken as a sort of challenge, building the tiniest RetroPie he possibly could.

The constraints he set for himself were to get the project in at under 100 mm. For that he used a Pi Zero loaded with the RetroPie software and paired it with a 1.44″ screen. There’s a tiny LiPo battery hidden in there, as well as a small audio amplifier. Almost everything else is 3D printed including the case, the D-pad, and the buttons. The entire build is available on Thingiverse as well if you’d like to roll out your own.

While this might be the smallest RetroPie we’ve seen, there are still some honorable mentions. There’s one other handheld we’ve seen with more modest dimensions, and another one was crammed into an Altoids tin with a clamshell screen. It’s an exciting time to be alive!

Continue reading “The Tiniest RetroPie”

Raspberry Pi’s Latest Upgrade: The Compute Module 3+

We’ve become so used to the Raspberry Pi line of boards that have appeared in ever-increasing power capabilities since that leap-year morning in 2012 when the inexpensive and now ubiquitous single board computer was announced and oversold its initial production run. The consumer boards have amply fulfilled their mission in providing kids with a pocket-money computer, and even though they are not the most powerful in the class of small Linux boards they remain the one to beat.

The other side of the Pi coin comes with the industrial siblings of the familiar boards, the Compute Module. This is a version of the Pi meant to be built into other products, utilizing a SODIMM connector as the hardware interface. Today brings news of a fresh addition to that range: the Compute Module 3+.

As you might expect from the nomenclature this brings the Broadcom BCM2837B0 processor from the Raspberry Pi 3B+ to the barebones SODIMM-style Pi, but unexpectedly they have also made it available with a range of different size eMMC devices installed. In place of the 4 GB capacity of previous offerings are 8, 16, and 32 GB devices, with an intriguing new “lite” variant that has no onboard storage at all.

Perhaps the saddest thing from a Hackaday reader’s perspective is that as the Pi blog post notes due to commercial sensitivities they have little idea what products many of the Compute Modules they sell end up in — a mystery we’d really like to solve. No doubt there are some fascinating applications just waiting do be discovered by hardware hackers in a decade’s time as units enter the surplus market, but for now we’ll have to be content with community offerings. This stereoscopic camera is a recent one, or perhaps one of several handheld game consoles.

Running OpenCL On A Raspberry Pi GPU

This is an interesting development for media users and machine learning hackers: [doe300] has implemented OpenCL on the Raspberry Pi 3 Model B+called VCFCL That’s big news because the Pi 3+ has a Graphics Processing Unit (GPU) built into the processor that has been generally underutilized. The VideoCore IV GPU is built into the Broadcom BCM2837B0 and is surprisingly capable for a low-power chip. Although this GPU is well documented, it hasn’t been used that widely because you have to code specifically for this class of GPU. Adding in support for a high-level framework like OpenCL will make it much easier to run and adapt existing packages.

Continue reading “Running OpenCL On A Raspberry Pi GPU”

Raspberry Pi Jukebox Hits All The Right Notes

We (and by extension, you) have seen the Raspberry Pi crammed into nearly every piece of gear imaginable. Putting one inside a game console is so popular it’s bordering on a meme, and putting them into old stereos and other pieces of consumer electronics isn’t far behind. It’s always interesting to see how hackers graft the modern Raspberry Pi into the original hardware, but we’ll admit it can get a bit repetitive. So how about somebody scratch building an enclosure for their jukebox project?

[ComfortablyNumb] took the road less traveled when he created this very nice wooden Raspberry Pi enclosure in the shape of an eighth note. Stained and varnished and with a nice big touch screen in the middle to handle the controls, it’s an attractive and functional piece of home audio gear that we imagine most people would be happy to hang on their wall.

The process starts by printing out the desired shape on a piece of paper to use as guide, and then gluing together strips of wood to create the rough outline. Then the surface was thoroughly sanded to bring all of the strips of wood to the same level, and the final design was cut out. On the back of the note, [ComfortablyNumb] boxed out an area to hold the Waveshare seven-inch touch screen panel and the Raspberry Pi itself.

Having seen so many projects where the Pi is rather unceremoniously shoehorned into another device, it’s refreshing to see the results of a purpose-built enclosure. Since [ComfortablyNumb] was able to build the electronics compartment to his exact dimensions, the final result looks exceptionally clean and professional. Not a drop of hot glue to be seen. It also helps that this build only required the Pi and the display; as the device is meant to be plugged into an existing audio setup, there’s no onboard amplifier. The audiophiles out there might recoil in horror, but adding a dedicated digital to analog converter (DAC) would be easy enough to add if the stock audio on the Pi isn’t good enough for you.

The project is finished off with stain and several coats of varnish to get that deep and rich color. We don’t often find ourselves working with dead trees around these parts, but we’ve got to admit that the final product does look quite handsome. Certainly beats the LEGO cases many of our Pi projects live in.

If you’re looking for more wooden-encased Pi jukeboxes, you might enjoy this somewhat abstract magstripe-based take on the concept. Of course, we’ve also seen our fair share of actual jukeboxes receive a Raspberry infusion over the years.

[via /r/raspberry_pi]

Sly Guy Nabs Pi Spy

When one of [Christian Haschek’s] co-workers found this Raspberry Pi tucked into their network closet, he figured it was another employee’s experiment – you know how that goes. But, of course, they did the safe thing and unplugged it from the network right away. The ensuing investigation into what it was doing there is a tour de force in digital forensics and a profile of a bungling adversary.

A quick check of everyone with access to that area turned up nothing, so [Christian] shifted focus to the device itself. There were three components: a Raspberry Pi model B, a 16GB SD card, and an odd USB dongle that turned out to be an nRF52832-MDK. The powerful SoC on-board combines a Cortex M4 processor with the RF hardware for BLE, ANT, and other 2.4 GHz communications. In this case, it may have been used for sniffing WiFi or bluetooth packets.

The next step was investigating an image of the SD card, which turned out to be a resin install (now called balena). This is an IoT web service that allows you to collect data from your devices remotely via a secure VPN. Digging deeper, [Christian] found a JSON config file containing a resin username. A little googling provided the address of a nearby person with the same name – but this could just be coincidence. More investigation revealed a copyright notice on some mysterious proprietary software installed on the Pi. The copyright holder? A company part-owned by the same person. Finally, [Christian] looked into a file called resin-wifi-01 and found the SSID that was used to set up the device. Searching this SSID on wigle.net turned up – you guessed it – the same home address found from the username.

But, how did this device get there in the first place? Checking DNS and Radius logs, [Christian] found evidence that an ex-employee with a key may have been in the building when the Pi was first seen on the network. With this evidence in hand, [Christian] turned the issue over to legal, who will now have plenty of ammunition to pursue the case.

If you find the opportunity to do some Linux forensics yourself, or are simply interested in learning more about it, this intro by [Bryan Cockfield] will get you started.