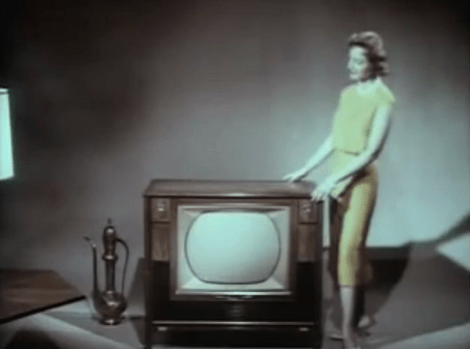
The RC Transmitter That Does Everything

[Demetris] sent in a project he’s been working on over the last year. It’s called the Open Source Radio Control, and promises to be a modular platform for every imaginable remote control transmitter need. If you’d like to control a bipedal android or a 3D aerobatic model plane, the OSRC can do it while transmitting video from the cockpit down to your hands.

Last summer, we caught wind of the OSRC project to build an extensible and open source remote control radio that would do anything; from displaying video from the cockpit to serving as the brain of a UAV rig, the OSRC promised to do everything.

A fully decked out OSRC can be had for about $1400, putting it in the upper echelon of remote control radios. For that price, though, you get a fully customizable radio with your choice of shoulder buttons and a 4.8 inch LCD that receives a video feed from the cockpit of your favorite model. The base unit starts out around $700; still very expensive for a remote control radio, but reasonable when you consider all the possible upgrades.

[Demetris] and the rest of the team put together an outrageously long yet surprisingly beautiful video showing off a few features of the OSRC. You can check that out after the break.

Continue reading “The RC Transmitter That Does Everything”

ATtiny44 Drop-in Replacement For Ikea Dioder’s Stock PIC Controller

The Ikea Dioder is an LED light sold at the big blue and yellow building that lets you mix your own colors using a simple button and wheel controller. [Marco Di Feo] looked at all of the other projects out there that alter the controller and figured out that the IC can be directly replaced with an ATtiny44 microcontroller. With that chip soldered onto the board he added IR control so that he can change colors using his universal remote control (translated).

[Marco] removed the potentiometer normally responsible for selecting the color. This frees up one pin on the microcontroller which he then uses to receive signals from a TSOP1736 IR receiver. The video after the break shows the device, which illuminates the back of his home entertainment center, reacting to commands from his remote control.

Of course this can be done without the chip swap as the PIC 16F684 that comes with it can be reprogrammed in place. But [Marco] didn’t have a PICkit or other programmer on hand. Continue reading “ATtiny44 Drop-in Replacement For Ikea Dioder’s Stock PIC Controller”

Workout Timer Has Its Own Fight Bell

This workout timer turned out great. We think [Douglas] managed to end up with a professional look and a full range of features even though he was doing a lot of learning along the way.

He wanted a clock that was capable of counting up or down to time different segments of his workout. In order to be really useful it needed to have a remote control and a way to signal when time had run out. He grabbed an Arduino and started prototyping with an LED marquee at first, but after adding a second Arduino to deal with the display scanning issues he finally switched over to these LED segment displays.

The timer includes an IR receiver so that it can be controlled with a handheld remote. The large red bell to the side has a heck of a ding and is used to signal the start and end of timing. Perhaps the driver for that bell could be incorporated into the home automation project from Wednesday. Once the hardware decisions were finalized [Douglas] set out to build an enclosure that he could be proud of (mission accomplished!). Don’t miss the video after the break where he walks through all various aspects of the user interface. Continue reading “Workout Timer Has Its Own Fight Bell”

Monitoring And Controlling Your Garage Door From Afar With An IP Camera

remote-control-garage-door

Last year, [Mark Simonelli’s] wife asked him if he could design something that would allow her to remotely check if their garage door had been left open. [Mark] jumped at the chance to tinker with electronics and designed a system around an old TrendNet IP camera. When remotely connected to the camera using IP Cam Viewer Pro for his Android phone, [Mark] could watch the video stream and also trigger the garage door opener via a small relay circuit he built.

His remote opener worked well, but his camera unfortunately lacked any sort of IR vision/low light capabilities. Since his camera wasn’t very useful in the dark, he decided that he needed to add some way to trigger a light when remotely monitoring his garage. He figured the best way to do this would be to control a power strip-connected light using a circuit similar to the one he built to open the garage door itself.

He stopped by the hardware store and picked up a cheap power strip, disassembling it and removing the power toggle once he got home. He fitted it with a small 5v relay, which he connected to the camera’s terminal block. While he admits that it might not be the absolute safest solution, he can easily control both the light and the garage door with a simple swipe of his phone’s screen.

Continue reading to see his remote controlled power strip in action, and be sure to swing by his site to see more details about his camera-controlled garage door opener.

Continue reading “Monitoring And Controlling Your Garage Door From Afar With An IP Camera”

WAV Playback With An ATmega32

[Vinod Stanur] just finished another hobby project by building a WAV audio player using a microcontroller. He had started development a while back using a PIC microcontroller. But the chip he was using didn’t have enough SRAM to allocate as a playback buffer. When he got his hands on an ATmega32 his mind turned back to the project and he saw it through to the end.

He takes advantage of what he learned on several earlier builds. He’s using a TV remote as input, just like his Snake game did. Storage is provided by an MMC card, a trick he perfected with this voice recorder project. Instead of using a FAT library, he uses his own code to read the linked-list (File Allocation Table) for sector addresses, then he parses the WAV header and processes the file accordingly.

Playback uses two 512 byte buffers. One is feeding the output while the other is being populated from the memory card. When the output buffer is exhausted the two are swapped and the process continues. You’ll find [Vinod’s] demo of the project after the break.

Continue reading “WAV Playback With An ATmega32”

Hackaday Links: February 8, 2012

Most useless machine

We love ’em, and we hope you do too. Here’s [Phase2plus’] take on the most useless machine.

Scratching like it’s 1989

[Nick] spent three bucks at the thrift store and ended up buying days worth of fun with this cassette player. He hacked it to scratch like vinyl.

3D printed jawbone

This lady now has her own 3D-printed jawbone. We’re not talking about the Bluetooth headset… it’s an actual bone replacement! And yes, the skeleton for the Terminator was 3D printed… we’re that much closer now. [Thanks Steve]

Hexbug superbowl

Why not let robots decide our sports gambling choices? [Eric] let this slew of HexBugs battle it out as an early indicator for who would win the Super Bowl. Seems he has no shortage of the little toys, all of which received an MSP430 upgrade. The firmware actually implements obstacle avoidance, but he makes a poke at the Chicago Bears who seem to have the same mission.

Foil fix for worn out remotes

[Viktor] found an interesting repair tip. If you’ve got remote controlers whose buttons are not working so well anymore you may be able to fix them with tin foil. He uses a single-hole punch to clip out circles which are attached to the underside of the misbehaving button. Worth a try!

Flexible Web Interface Makes The Universal Remote Nearly Perfect

[Fall Deaf] built an Arduino based universal remote control system. It uses a shield which has both an IR receiver and transmitter. This gives it the tools to learn codes from your existing remotes and play them back in order to control the devices. This functionality is really nothing new, but we think the user interface he developed for the system is absolutely fantastic!

Software is web-based. You can simply point a remote at the Arduino and push a button. The receiver will store the code which can later be assigned to a virtual button. The image above shows the channel-up option being created; it will be added to the list once confirmed. From there any web enabled device – smart phone, tablet, netbook, etc – can be used as the remote for the system. The only feature we think is missing is the ability to alter the layout of the buttons, with larger areas for the most frequently used commands.

After the break you can see a demonstration of this system, as well as the one extra feature we haven’t touched on yet. [Fall Deaf] included a Piezo element in the hardware design which lets him knock on his coffee table to use the remote if a smart-device isn’t close at hand.

Continue reading “Flexible Web Interface Makes The Universal Remote Nearly Perfect”