Hackaday Links: December 15, 2013

hackaday-links-chain

Want to get a hold of a gaming controller attachment for iOS at a rock bottom price? [Dark GOD] learned that Amazon is closing out the Gameloft DUO Gamer hardware for $6 because the hardware is no longer supported by the operating system. He shows how to make it work using a Cydia app. [Thanks ProMan]

[Frank Zhao] had a cheap HDMI switch which had problems with a sagging power rail. His solution was to hack in a USB port to inject some power.

This security hack uses an Arduino with LCD screen to display a QR code. Scan it with an Android device and you no longer need keys! Here’s the code repo and a demo video.

It’s interesting to see how many places the WS28xx pixels are popping up. Here’s a crowdfunding campaign that uses a matrix of the pixels as a portable gaming display. Look somewhat familiar? We’ve seen [Retro Brad’s] earlier hardware (made to play Super Pixel Bros.) that used an LED module instead. This is probably a lot easier to drive since it uses serial data instead of multiplexing.

Next is some robot building inspiration. [IronJungle] has been hard at work building a rover that uses compass bearings for navigation.

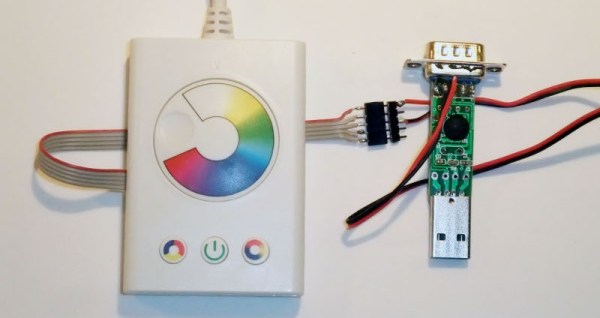
We liked seeing a drop-in replacment uC for Ikea Dioder projects, but if you need more power under the hood, take command of those colored lights with a Raspberry Pi.

Those lucky enough to have access to a laser cutter will find this Inkscape extension for living hinges useful.

Finally, POTUS threw down the gauntlet, encouraging everyone to learn how to program by pointing them toward the Hour of Code program. We’ve long thought that everyone should have some level of coding education. Do you agree with us? Of course, getting something like this into schools is a monumental challenge, so it’s nice to see extra-curricular offerings. We also believe that Hackerspaces are among the best driving forces for getting kids a tech education. [via Adafruit]

Ikea Dioder Ambilight Hack

There are a lot of hacks out there for Ikea’s Dioder LED light set. [Lambertus] wanted to create an easy and affordable ambilight while keeping the hardware modifications to a minimum. He also wanted anyone to be able to easily duplicate his work. He recently wrote in to share his successful solution.

The customizations boil down to three main steps: solder the ICSP connector wires to the test points on the Dioder PCB, connect a PIC programmer to the ICSP port (and reprogram), and attach a 5V RS-232 device to the ICSP port. The software was the most difficult part of the procedure for [Lambertus]. The PIC16F684 didn’t contain the required UART and PWM controllers, so he had to get crafty. Fortunately he’s done all the work for us, and lists the necessary .hex file he created on his site.

By adding support to boblight, his new ambilight is working with his media center very nicely. There’s a little demo video after the break.

Continue reading “Ikea Dioder Ambilight Hack”

ATtiny44 Drop-in Replacement For Ikea Dioder’s Stock PIC Controller

The Ikea Dioder is an LED light sold at the big blue and yellow building that lets you mix your own colors using a simple button and wheel controller. [Marco Di Feo] looked at all of the other projects out there that alter the controller and figured out that the IC can be directly replaced with an ATtiny44 microcontroller. With that chip soldered onto the board he added IR control so that he can change colors using his universal remote control (translated).

[Marco] removed the potentiometer normally responsible for selecting the color. This frees up one pin on the microcontroller which he then uses to receive signals from a TSOP1736 IR receiver. The video after the break shows the device, which illuminates the back of his home entertainment center, reacting to commands from his remote control.

Of course this can be done without the chip swap as the PIC 16F684 that comes with it can be reprogrammed in place. But [Marco] didn’t have a PICkit or other programmer on hand. Continue reading “ATtiny44 Drop-in Replacement For Ikea Dioder’s Stock PIC Controller”

Adding HTTP To Ikea DIODER

[Alex] sent in a neat Ikea DIODER build that controls strings of RGB LEDs with HTTP requests.

We’ve seen Ikea DIODERs controlled wirelessly and over USB, but using the Internet with a DIODER is new to us. For his build, [Alex] used a Nanode, a small Arduino-like board that has built-in web connectivity.

The hardware portion of the build is very simple. A MOSFET controls each LED strip on the DIODER. The stock controller of the DIODER was ditched, meaning [Alex] needed to figure out how to convert an RGB color space to a Hue, Saturation, and Lightness color space “for super-classy fading.” Once that was figured out, [Alex] implemented a 1D Perlin noise function to blend between two colors.

Finally, the great EtherCard library was used to turn HTTP requests into dancing LEDs. [Alex] is thinking about building a JQuery webpage so he won’t have to muck around with entering commands like 192.168.1.25/hsl?i=0&h=135&s=90&l=50 into a browser. Without a nice web interface, it’s not as futuristic as [Alex] would like, but it’s still cool to us.

Minimalist DIODER Hack Requires No External Microcontroller

pic_dioder_hack

Hackaday reader [chrysn] picked up a 3-button RGB model DIODER light from IKEA and thought he might as well take it apart to see what he could do with it. Having seen several DIODER hacks featured here, he knew it was easily hackable, but he didn’t want to simply rehash what other had already done.

All of the DIODER hacks we have come across thus far incorporate some sort of AVR chip or add-on board to expand its capabilities. [chrysn] saw that the controller already had a PIC16F684 inside, and thought that installing his own firmware onto the existing hardware would be a far more simple solution. He installed a small programming cable onto the DIODER’s control board, and using his PICkit2 programmer, flashed the chip with a custom firmware image.

His modifications worked great, and [chrysn] says that there is plenty potential in the existing hardware to have all sorts of fun with it. Even so, he notes that there are several AVR-flavored drop-in replacements that can be used if that happens to be your microcontroller family of choice.

Controlling Dioder Light Strips Wirelessly

dioder_universal_io

[SeBsZ] does a lot of work in home automation, using Xbee modules, LEDs, and other home lighting systems. Naturally, people look to him for help with different electronics projects, but one thing he has been asked time and time again is if he can make a simple mood lighting solution that can be easily installed.

He has always been interested in playing around with RGB LEDs, but he wasn’t looking to reinvent the wheel with this project. Instead he based his work off the Ikea Dioder product, an off-the-shelf set of adjustable LED strips. As we’ve seen before, the control module for these LEDs leaves a bit to be desired, so he removed the Dioder’s onboard PIC and wired up a controller of his own. His “Universal IO Board” uses an Atmega88 for control and has all the pins required to attach an Xbee wireless module. With everything wired up, he now has full wireless control of the Dioder light strips, without a ton of fuss.

Although he’s selling a few different hardware kits, the schematics for his IO board are freely available on his site, should you want to make your own. The only thing that we didn’t see was the code for the Atmega, but we’re guessing he has that posted somewhere as well.

Adding USB Control For Ikea RGB LED Strips

Here’s an altered PCB that gives USB control to an Ikea Dioder. This is a $50 product that comes with four strips each containing nine RGB LEDs. The stock controller has a color selection wheel and a couple of buttons. [Rikard Lindström] wanted to use it to match ambient light to the colors of his computer monitor — yes, it’s another ambilight clone.

Since he already had a bunch of AT90USB162 chips on hand he chose that route. These chips have native USB support (he’s using the LUFA package which is a popular choice), but no on-board ADC. That means no need for the potentiometer from the original controller because there’s no easy way to read its value. Removing it made plenty of room for his add-on PCB. He also depopulated the PIC microcontroller that originally drove the unit, soldering to the empty pads in order to connect is own board. The finished product fits back in the original case, with the addition of a USB cable as the only visible alteration. Now he can dial in colors using a program he wrote.

In case you’re wondering, it looks like this is a newer version of control circuitry when compared to the original Dioder hack we covered.