Recovering A Corrupted EEE PC BIOS

recovering_eeepc_bios

[Jeremy] had an ASUS EEE PC 1000HE netbook on his hands which had succumbed to a corrupted BIOS. In most situations, people replace a motherboard when the BIOS is damaged beyond repair, but considering the price of motherboards, especially those built for portable devices, he simply refused to go that route.

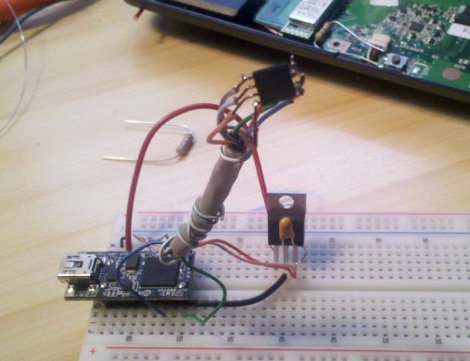
Instead, he took it apart and did a little investigation to find out what SPI flash chip ASUS used in the netbook. With that information in hand, he put together an SPI flash programmer using a breadboard and a DLP-USB1232H USB to UART module. He couldn’t program the flash chip in-circuit, so he had to desolder it and deadbugged it onto his programmer. Using a few Linux-based flashing tools, he was able to reprogram the chip with a functioning BIOS in short order, saving him from a costly motherboard replacement.

While some motherboard manufacturers have built in secondary BIOS chips to prevent the need for this sort of recovery, it’s nice to know that the process is relatively straightforward, provided you have some basic soldering and Linux skills.

This also isn’t the first time we’ve seen someone recover an EEE PC from the brink – if you’re looking for an Arduino-based alternative, be sure to check this out.

Unbricking And Upgrading An ASUS Wl520 Router

unbricking_upgrading_asus_wl520

[Andrew] has an ASUS wl520-gU router that he is pretty fond of, despite its numerous problems. CPU clock bug aside, the router only has 16MB or memory like many others on the market. While tooling around with the bootloader he bricked the device, so he decided it was time for an overhaul.

After some searching online, he found that the router could be unbricked by shorting out one of the pins on its flash chip. With an emergency unbrick button installed on the board, he can now reset it in seconds by power cycling the device.

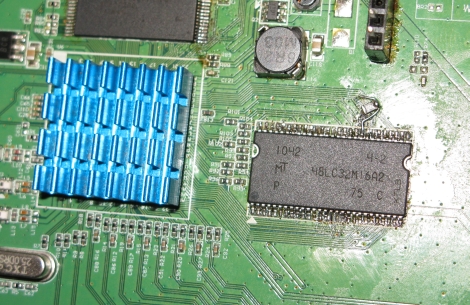
Now that he had a working router again, he proceeded to remedy his initial gripe – the lackluster amount of memory. He soldered in a 512Mbit (64MB) module in the original chip’s place, crossed his fingers and booted the router. It started up just fine, so he ran a few commands to instruct the router to recognize the new memory capacity. After rebooting, he found that it only recognized 32MB of RAM, which was remedied by soldering a 22 Ohm resistor to one of the module’s pins.

It did take a bit of careful soldering to get things upgraded and working, but we think it was well worth the effort.

Building Your Own Replacement Refrigerator Thermostat

refrigerator_thermostat_repair

[Ron’s] refrigerator broke shortly after he came home from his weekly grocery trip, and since this was his second dead fridge in three years, he wanted to fix it rather than buy a new one…again. It turns out that the thermostat was toast, and a replacement would cost him $80. That was well more than he was willing to pay, but his groceries were starting to get warm, so he had to do something.

Being the tinkerer he is, he figured he could rig up his own thermostat that would work at least as well as the one that died on him. He scavenged an ATmega328 from a failed project, and after digging around online, put together the most barebones Arduino setup he could find. The microcontroller is tucked away in the back of the refrigerator where the old thermostat used to live, and takes input from a TMP36 temperature sensor, triggering a relay to start the refrigerator’s compressor whenever the the temp goes above 4°C.

[Ron] says his fix is just about the “worst kludge ever”, but as he saved $80 in parts and $150 in labor, we’re inclined to think it’s a job well done.

Repairing The Blue Canary In The Outlet By The Light Switch

blue_canary_in_the_outlet_by_the_lightswitch

[Vince] and his wife are big fans of [They Might be Giants], so when they were perusing their local Target one evening and stumbled upon a blue canary nightlight, they bought it immediately. While the nightlight was easy for his toddler to use, the LEDs inside started to dim after about a month, and eventually they started flickering like mad as you can see in the video below. A battery swap didn’t remedy the problem, and instead of returning it, [Vince] decided to try fixing it himself.

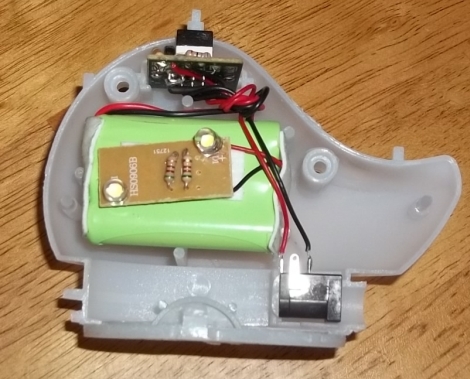
After poring over the device’s simple circuit, he couldn’t figure out any reason why the nightlight would start behaving like it did. He did notice that a resistor was left out of the device, likely as a cost-cutting measure, so he added one in before replacing both of the nightlight’s LEDs.

With his simple tweak, the nightlight was better than new, saving him from what would likely be a string of annoying merchandise exchanges.

Continue reading “Repairing The Blue Canary In The Outlet By The Light Switch”

A Simple Fix To Resurrect Your Broken Iclicker

simple_iclicker_battery_fix

If you are currently attending college, the odds are that you are familiar with iclicker classroom remotes. If you have one of these, you might also be aware that they tend to be flaky at times, particularly when it comes to powering on. [Todd] received a few “broken” iclickers lately and has found an easy to fix design issue that might possibly save yours (and others) from the trash heap.

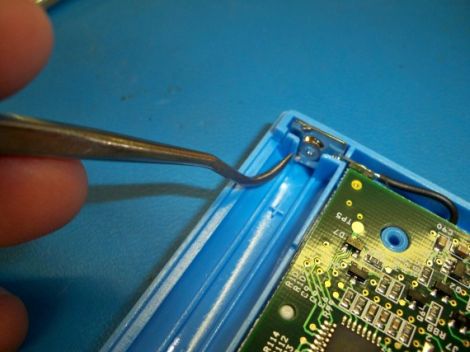
When he started pulling the units apart to diagnose them, he noticed that something with the battery contacts was not quite right. They are held in place by the device’s plastic shell which is pretty common, however in the iclicker, the portion of the plastic case that holds the positive battery contact is too big, preventing some batteries from making a complete circuit.

Now you might be thinking to yourself that AA batteries are all the same, but they are not necessarily created equal. Through a small bit of testing, [Todd] found that many different batteries experienced intermittent connectivity issues depending on the height of the positive terminal, and that due to their design, Duracell batteries flat out didn’t work. With the careful removal of a portion of the plastic surrounding the positive contact, [Todd] was able to fix each of his “broken” remotes.

He hopes that this information helps some people resurrect their non-functioning units, because a few minutes work sure beats buying another $30 iclicker.

Repairing An Old Pick And Place Machine

repairing_juki_placemat_360

Professional-grade pick and place machines are quite pricey, so when the crew at Null Space Labs picked up an old Juki Placemat 360 for only $1,200, they were stoked. When they finally got it in-house however, they realized that the seller’s definition of “working” was a bit different than theirs. The machine’s compressor is busted, and there are all sorts of other bits that require some TLC before they can get things up and running again. They have put together a “build log” showing off their work as the machine is taken from an ancient, mostly-working relic to a lean, mean, picking and placing machine.

So far, they have torn the thing down and inspected the upgrades and damage the machine has been subjected to over the years. The crew started making a few small repairs, and have even replaced the unit’s laser with machine vision, which seems to be working well thus far during testing.

While you might not have any similar machinery in your workshop, it’s still fun to watch as they tear it down and revamp it, bit by bit.

Who Knew Thinkpad Batteries Require A Jump Start?

Lithium battery packs reaching the end of their life usually have a lot of kick left in them. That’s because they’re made up of multiple cells and it only takes the failure of one to bork the entire battery. One of the most interesting examples we’ve heard of this is in the Toyota Prius, but that’s a story for another time. In this case, [Mika] wanted to resurrect the battery from his IBM Thinkpad T40. He identified the offending cell and replaced it, but couldn’t get any juice out of the battery after the repair.

He was measuring 0V on the output, but could measure the cells instead of the control circuitry and was getting over 11V. Clearly, the control circuit wasn’t allowing an output. We completely understand the concept here (think about that really bad press about exploding laptop batteries). It seems there’s a lockout mechanism when the control circuit loses power. [Mika] managed to get past this by shorting voltage into the control circuit, a method he likes in the video after the break to jump starting a car.

We’ve seen similar cell replacement for power tools, like a Dremel or a Makita drill.

Continue reading “Who Knew Thinkpad Batteries Require A Jump Start?”