LED Ring Brings The Bling

We’ve seen our share of light-up jewelry over the years, but for some reason — probably power — it’s almost always earrings or necklaces. So when we saw [ROBO HUB]’s LED ring, we had to check it out. It involves a bit of behind-the-scenes action in the form of a battery holder that you palm, but the end effect is quite cool.

Essentially, this is a 3D printed ring with SMD LEDs painstakingly soldered together in parallel along a pair of thin copper wires. The ring itself is in two parts: a base, and a cover to diffuse and protect the LEDs. A pair of wires run out from the ring and connect to a printed coin cell holder.

Continue reading “LED Ring Brings The Bling”

A Hair-Raising Twist On Infinity Mirrors

Just when we thought we’d seen it all in the infinity mirror department, [FieldCrafting] blazed a tiny, shiny new trail with their electroplated infinity mirror hair pin. We’d sure like to stick this in our French twist. Fortunately, [FieldCrafting] provided step-by-step instructions for everything from the 3D printing to the copper electroplating to the mirror film and circuitry application.

And what tiny circuitry it is! This pin is powered by a coin cell and even has a micro slider switch to conserve it. The stick parts are a pair of knitting needles, which is a great idea — they’re pointy enough to get through hair, but not so pointy that they hurt.

[FieldCrafting] was planning to solder 1206 LEDs to copper tape and line the cavity with it, but somehow the CAD file ended up with 0603, so there wasn’t enough space for two tape traces. We think it’s probably for the better — [FieldCrafting]’s solution was to use two-conductor wire, strategically stripped, which seems a lot less fiddly than trying to keep two bare tape traces separated and passing pixies.

Don’t have enough hair for one of these? Surely you could use some handsome infinity coasters to round out that home bar setup.

Alfa Romeo Gauge Cluster Gets A Fresh Set Of LEDs

On older vehicles, if you noticed that the lights had gone out behind one of your gauges, you knew it was time to snake your hand back there and replace the little incandescent bulb that had given up the ghost. But what are you supposed to do if you’re seeing the same problem on a modern vehicle that’s already made the leap to LED dash lighting? That’s what [Tysonpower] recently had to find out when the fuel indicator on his Alfa Romeo Giuletta QV went dark.

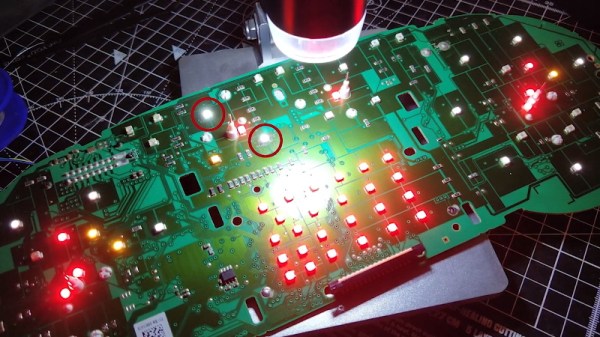
In the video after the break, [Tysonpower] details how to remove the instrument cluster from the Giuletta’s dash, which we imagine would be a useful little tutorial for anyone who owns the same vehicle. Once he has it out on the bench, he strips it down to the bare PCB and starts (literally) poking around.

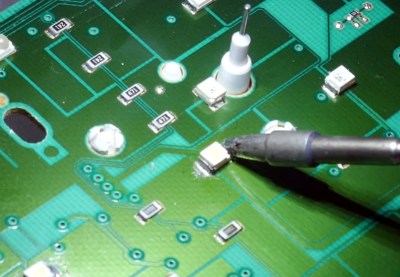
He eventually noticed that if he pushed on the board near the fuel indicator he could get the appropriate 3528 SMD LED to light up, but touching up the solder joints didn’t seem to fix the issue. Assuming the LED must be defective internally, he simply replaced it and all was good again.

Well, not exactly. The light produced by the new part didn’t match the color or brightness of the other dozen or so white LEDs that were installed on the board, so [Tysonpower] decided to just dive in and replace them all. While it obviously took a lot more time and effort, he says the end result is that the instrument cluster looks noticeably brighter and crisper when driving at night. Not bad for an afternoon’s work and a couple bucks worth of LEDs.

Most of the time, when we see somebody messing around behind the dash it’s because they intend on replacing the original instruments with something more capable. But projects like this, which add just a touch of refinement to the existing hardware, prove that stock components aren’t always a disappointment.

Continue reading “Alfa Romeo Gauge Cluster Gets A Fresh Set Of LEDs”

An Easier Way To Roll Your Own LED Ball

Yes, circuit sculptures are amazing. But the patience and skill required puts most of the designs we’ve seen fairly far out of reach of the average beginner. We totally understand — not everyone finds fun in fiddly, structural soldering.

[Hari Wiguna] was captivated by the LED ball that [Jiří Praus] made last Christmas and figured there had to be less painful ways to cover a sphere in blinkenlights than printing a negative to use as a soldering jig. Turns out there is at least one way — just design the structure to use PCBs in place of brass rod, and fit everything together like a 3D puzzle made of FR4.

This SMD LED ball is almost ready for prime time. [Hari] wants this to be accessible for everyone and completely parametric, so he’s still working out the kinks. Check out the current form after the break as [Hari] rolls the ball through the various display modes using an Arduino and talks about the failures along the way, like having to file out the LED slots because they were designed too tightly the first time. [Hari] is also working on the friction fit of the pieces so the ball is easier to assemble, especially at the beginning.

3D prints as circuit sculpture soldering jigs are great tools, don’t get us wrong. How else are you gonna solder brass rod together on a curve?

Continue reading “An Easier Way To Roll Your Own LED Ball”