A New Handle For An Old Soldering Station

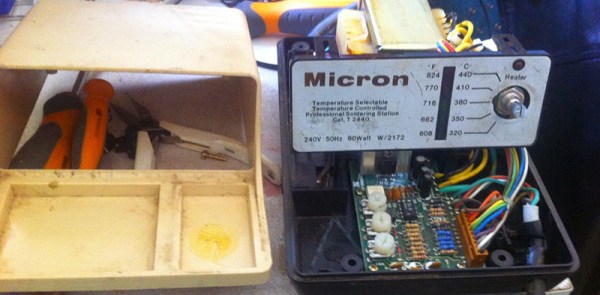
About 20 years ago, [Simon] spent a few week’s pay on a soldering station, a Micron W/2172. It served him well for the past few decades, but lately he hasn’t been able to find a supply of new tips for it. The Micron went into a cupboard and he upgraded to a newer Hakko soldering station.

The old Micron was still sitting in the cupboard when [Simon] realized both stations use a 24V supply for the heater, and you can buy replacement Hakko handle for a few bucks. Having two soldering stations would be handy, so [Simon] set out to convert the old Micron station to accept Hakko handles.

The only technical challenge for this modification was to figure out how the old circuit board in the Micron would read the thermistor  in the new handle. The original circuit used a dual op-amp, with one side used to amplify the thermocouple and the other to compare it to the temperature set point. After measuring the set point and a bit of Excel, [Simon] had a small circuit board that would replace the old op-amp. After that it was only a matter of wiring the new handle into the old station, calibrating the temperature settings, and enjoying the utility of two soldering stations.

Name of the game

Repairing And Reviewing A 1976 PONG Clone

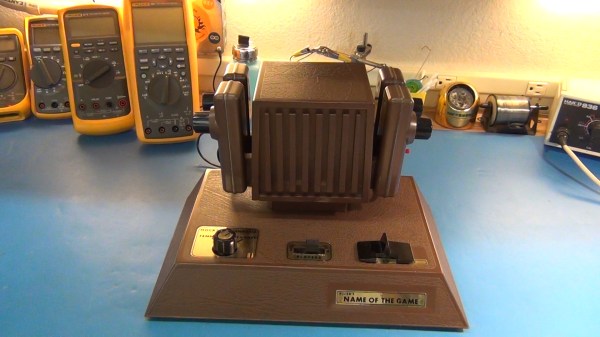
Hackaday alum [Todd] has been searching for an old PONG clone for the last two years. This variant is called, “The Name of the Game”. [Todd] has fond memories of playing this game with his sister when they were young. Unfortunately, being the hacker that he is, [Todd] tore the game apart when he was just 14 to build his own Commodore 64 peripherals. He’s been wanting to make it up to his sister ever since, and he finally found a copy of this game to give to his sister last Christmas.

After opening up the box, [Todd] quickly noticed something strange with the power connector. It looked a bit charred and was wiggling inside of the enclosure. This is indicative of a bad solder joint. [Todd] decided he’d better open it up and have a look before applying power to the device.

It was a good thing he did, because the power connector was barely connected at all. A simple soldering job fixed the problem. While the case was still opened, [Todd] did some sleuthing and noticed that someone else had likely made repairs to several other solder joints. He also looked for any possible short circuits, but everything else looked fine. The system ended up working perfectly the first time it was started.

The end of the video shows that even after all this time, simple games like this can still capture our attention and be fun to play for hours at a time. [Todd] is working on part 2 of this series, where he’ll do a much more in-depth review of the system. You can watch part 1 below. Continue reading “Repairing And Reviewing A 1976 PONG Clone”

tweeter

Repairing Burnt Speakers With A Steady Hand

[Martin] seems to have a knack for locating lightly damaged second-hand audio gear. Over the years he’s collected various types of gear and made various repairs. His most recent project involved fixing two broken tweeter speakers.

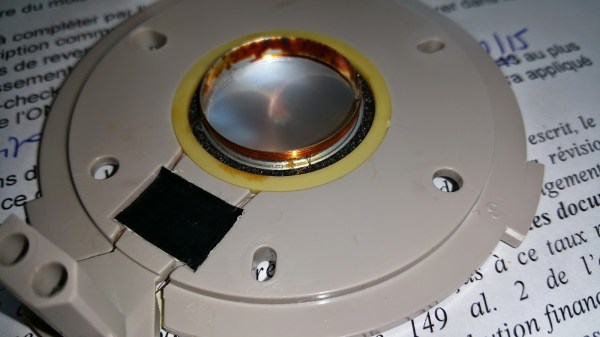
He first he needed to test the tweeters. He had to remove them from the speaker cabinet in order to gain easier access to them. The multimeter showed them as an open-circuit, indicating that they had likely been burned. This is an issue he’s seen in the past with this brand of speaker. When too much power is pumped through the speaker, the tiny magnet wire inside over heats and burns out similar to a fuse.

The voice coil itself was bathing in an oily fluid. The idea is to help keep the coil cool so it doesn’t burn out. With that in mind, the thin wire would have likely burned somewhere outside of the cooling fluid. It turned out that it had become damaged just barely outside of the coil. [Martin] used a sharp blade to sever the connection to the coil. He then made a simple repair by soldering the magnet wire back in place using a very thin iron. We’ve seen similar work before with headphone cables.

He repeated this process on the second tweeter and put everything back together. It worked good as new. This may have ultimately been a very simple fix, but considering the amount of money [Martin] saved on these speakers, it was well worth the minimal effort.

mobilesolderingworkstation

Mobile Soldering Workstation Sets Up Quickly, Lets You Get To Work

Who here hasn’t put off soldering up a project because pulling out and setting up all your soldering gear is a pain? A lot of hobbyists don’t have a dedicated workbench for such activities and their gear may even be packed away somewhere inconvenient. [laxap] has come up with a solution using a plastic toolbox as a base for his Mobile Soldering Workstation.

[laxap] started with a regular off the shelf toolbox that has a lid and three drawers on the bottom. Although the Weller soldering iron base fit nicely in the bottom drawer, it did necessitate ditching the middle drawer for clearance. The compartmentalized top drawer is unmodified and holds parts and supplies in an orderly fashion.

Lifting up the lid of the box reveals a removable tray, which as intended, is a great spot to store tools such as a multimeter and wire strippers. The area under the removable tray is reserved for a power strip and power cord storage. A hole drilled in the side of the toolbox allows quick access to the power strip’s plug, a quick pull out and plug in is all that is necessary to get this workstation powered up.

That front flip up panel was made specifically for this project. Not only does it help keep the drawers from sliding open during transport, it also holds a lamp to aid in seeing what you’re doing! A bent aluminum strip acts as a latch to keep the panel in position.

It’s a pretty simple idea but it certainly gets the job done and makes soldering a whole bunch more convenient. If you like mobile workbenches, you may want to check out this all-wooden shelf style or one that features integrated solderless breadboards.

Hackaday Links, September 14, 2014

Photonicinduction is back! The Brit famous for not setting his attic on fire has built a 20,000 Watt power supply. It connects directly to England’s national grid with huge connectors. Impeccable fabrication and triple servo controlled variacs, and apparently this will be used for making a lot of hydrogen and oxygen through electrolysis of water.

In case you missed it, there’s a group buy for Flir’s Lepton thermal imaging module. Here’s the breakout board.

Need to solder something away from an outlet, and all you have is a disposable lighter? There’s a fix for that.

A Raspberry Pi case designed to be compatible with Lego. Now we need a hat/shield for NXT connectors.

Need another channel in your RC remote? Here’s this. It uses the gyro gain channel on a receiver. If someone wants to figure out how this works, wee do have a rather cool project hosting site.

0x06 0x1f1 CHSJOXWA OM YUFJPAI XFADBLY GIKQB CRZ MIXRB JRWV NN LZVOD XRI TBJKKVX MYYGID BLS LWNY XJVS FJO PYXBM MW D ELX ZG BIM CWMG JF PKI TKI ESZ WBME LKNLI BL 1407981609

Here’s something impossibly cool: The Macintosh PowerBop. It’s a Powerbook 170 with the floppy drive replaced with the radio in a cordless phone. It was part of France’s BiBop network, and you could buy private base stations for use at home. It is technically possible to use the radio as a wireless link to a modem, but [Pierre] couldn’t get PPP or a sufficiently ancient browser working. Plus ten points for taking it to an Apple store, and another twenty for trying to connect to our retro edition.

Chicken Lips. [Fran] and our very own [Bil Herd] are hanging out a bunch and recalling [Bil]’s time at Commodore. For this little featurette, [Bil] brought out his very own Commodore LCD. There are three of those in the world. Also included: tales of vertical integration, flipping bits with photons, and 80s era ERC.

Solderdoodle Is An Open Source, USB Rechargable Soldering Iron

solderdoodle

Battery powered soldering irons are nothing new, but what about a soldering iron that can recharge via USB? [Solarcycle] realized that it might be handy to be able to recharge a portable soldering iron using such a ubiquitous connector and power source, so he developed the Solderdoodle.

The core component of the Solderdoodle is a Weller BP645 Soldering Iron. The heating element is removed from the Weller and placed into a custom case. The case is designed to be 3d printed. The STL files for the case are available if you want to make your own.

The Solderdoodle does away with large, disposable batteries and replaces them with a lithium ion battery pack. The battery contains no built-in protection circuitry in order to save space. Instead, this circuit is added later. [Solarcycle] appears to be using a circuit of his own design. The schematic and Gerber’s are available on his website.

The Instructable walks through all of the steps to build one of these yourself if you are so inclined. If you don’t have the spare time, you can fund the project’s Kickstarter and pre-order a production model. It’s always great to see a new commercial product with an open design.

[via Reddit]

3D Printed Trays For Your Pick And Place Machine

3dprintedPNPTray Pick and Place machines are one of the double-edged swords of electronics.They build your boards fast, but if you don’t have everything setup perfectly, they’ll quickly make a mess. A pick and place can’t grab a resistor from a pile and place it – so far only humans can pull that one off. They need parts organized and oriented in reels or trays.

[Parker Dillmann] had to load some parts, but didn’t have a tray for them, so he 3D printed his own. [Parker] works at a small assembly house in Texas. He’s working on a top secret design which includes FFC connectors. Unfortunately, the connectors shipped in pick and place unfriendly tubes rather than reels. If he couldn’t find a tray, [Parker] would have to hand place those connectors as a second operation, which would increase the time to build each board and leave more chances for mistakes.

Rather than place each part by hand, [Parker] got in touch with his friend [Chris Kraft] who is something of a 3D printing guru. [Chris] confirmed that a 3D printed tray would be possible, though the PLA he prints with was not static safe. That was fine for the connectors, but [Parker] was hoping to save some tray space by putting his PSOC4 chips in the printed tray as well.

[Parker] used SketchUp to design a tray that would fit his Madell DP2006-2 pick and place. He left .15mm clearance around the parts – just enough to cover any inaccuracies during printing, but not enough to throw off parts placement. He sent the STL file over to [Chris] who used Simplify3D to a create a Gcode file. [Chris] printed the tray at .2 mm layer height on his MakerGear M2 printer, and the results looked great. Would they be good enough for the pick and place machine?

[Parker] received the printed trays in the mail and loaded them with parts. The pick and place had no problem finding and placing the connectors, making this job a huge success. [Parker] even left room for the PSOC4 chips.He plans to paint the tray with anti-static paint before giving them at try.

We really like this story – it’s a perfect example of how 3D printers can speed up processes in manufacturing. Now that the basic design is done, creating new trays is a snap. Nice work [Parker] and [Chris]! Continue reading “3D Printed Trays For Your Pick And Place Machine”