X-Ray Everything!

We’re not 100% sure why this is being done, but we’re 110% happy that it is. Someone (under the name of [The X-Ray Playground]) is putting interesting devices under an X-ray camera and posting videos of them up on YouTube. And he or she seems to be adding a few new videos per day.

Want to see the inner workings of a pneumatic microswitch? Or is a running pair of servo motors more your speed? Now you know where to look. After watching the servo video, we couldn’t help but wish that a bunch of the previous videos were also taken while the devices were being activated. The ball bearing wouldn’t gain much from that treatment, but the miniature piston certainly would. [X-Ray Playground], if you’re out there, more working demos, please!

How long the pace of new videos can last is anyone’s guess, but we’re content to enjoy the ride. And it’s just cool to see stuff in X-ray. If we had a postal address, we know we’d ship some stuff over to be put under the lens.

We don’t have as many X-ray hacks as you’d expect, which is probably OK given the radioactivity and all. But we have seen [MikesElectricStuff] taking apart a baggage-scanner X-ray machine in exquisite detail, and a DIY fluoroscope (yikes!), so we’re not strangers. Who needs Superman? We all have X-ray vision these days.

Thanks [OiD] for the tip!

Automatic Pneumatic Harmonica

A wise man once said “If all you’ve got is a cute desktop compressor and some solenoid valves, everything looks like a robotic harmonica.” Or maybe we’re paraphrasing. Regardless, [Fabien-Chouteau] built a pneumatic, automatic harmonica music machine.

It’s actually an offshoot of his other project, a high-speed candy sorting machine. There, he’s trying to outdo the more common color-sensor-and-servo style contraptions by using computer vision for the color detection and a number of compressed-air jets to blow the candy off of a conveyor belt into the proper bins.

Continue reading “Automatic Pneumatic Harmonica”

Avoid Procrastination With This Phone Lock Box

Smart phones are great. So great that you may find yourself distracted from working, eating, conversing with other human beings in person, or even sleeping. [Digitaljunky] has this problem (not surprising, really, considering his name) so he built an anti-procrastination box. The box is big enough to hold a smart phone and has an Arduino-based time lock.

The real trick is making the box so that the Arduino can lock and unlock it with a solenoid. [Digitaljunky] doesn’t have a 3D printer, so he used Fimo clay to mold a custom latch piece. A digital display, a FET to drive the solenoid, and a handful of common components round out the design.

Continue reading “Avoid Procrastination With This Phone Lock Box”

Electronic Float Valve Keeps The Horse’s Feet Dry

[Bob] built this simple device that can best be described as an electronic float valve. He was wasting a lot of water from overflowing water troughs and buckets around his farm. He would usually put the hose in the container, turn on the water valve and carry on with his work. By the time he remembered to come back, the area would be flooded. It’s obvious that there’s many different ways to solve a problem. For example, a simple mechanical float valve might have worked, but it’s not horse friendly and liable to get damaged soon.

The electronics is unabashedly minimal. An ATtiny85 controls a relay via a common variety NPN transistor. The relay in turn switches the solenoid valve. A push-button tells the microcontroller to start the water flowing, and when the water level gets high enough that it touches two hose clamps, the micro shuts it off again.

There’s some ghetto engineering going on here. The electronics is driven by a 9V battery, although the relay and the solenoid valve that [Bob] used are both rated for 12V. He’s not even using any sort of voltage regulation for the ATtiny, but instead dropping the voltage with a resistor divider. (We wonder about battery life in the long run.)

He built all of it on perf board and stuffed it inside a small enclosure, with two wires coming out for the level sensor and another two for the solenoid, and it seems to work. Check the video below where [Bob] walks through his build.

While some may point out the many short comings in this build, [Bob] found the one solution that works for him. Sometimes the right solution is what you’ve got on hand, and we’re glad he’s hacking away and sharing his work. And check out this wireless water level sensor that he built some time back.

Continue reading “Electronic Float Valve Keeps The Horse’s Feet Dry”

Robot Clock Writes Time Over And Over And Over

We’ve seen quite a few clocks that write the time out with a pen or marker. If you think about it, this really isn’t a great solution; every whiteboard marker will dry out in a day or two, and even if you’re using a pen, that’s still eventually going to run out of ink.

[ekaggrat] wanted a drawing clock that didn’t have these problems, and after taking a look at a magnetic drawing board, was struck with inspiration. The result is a clock that will perpetually write the time. It’s a revision of one of his earlier builds and looks to be much more reliable and mechanically precise.

A clock that writes time needs some sort of surface that won’t degrade, but can be written to over and over again. Whiteboards and glass won’t work, and neither will anything with ink. The solution to this problem was found in a ‘magnetic writing board’ or a Magna Doodle. These magnetic writing boards have a series of cells encapsulating iron filings. Pass a magnet over one side of the board, and a dot of filings appear. Pass a magnet over the opposite side of the board, and the filings disappear.

[ekaggrat]’s time-writing robot consists of a small Magna Doodle display, a robotic arm controlled by two stepper motors, and two solenoids on the end of the arm. The kinematics come from a helpful chap on the RepRap forums, and with the ATmega644 and two stepper drivers, this clock can write the time by altering the current flowing through two solenoids.

A video is the best way to experience this project, and you can check that out below.

Continue reading “Robot Clock Writes Time Over And Over And Over”

Radial Solenoid Engine Is Undeniably Cool

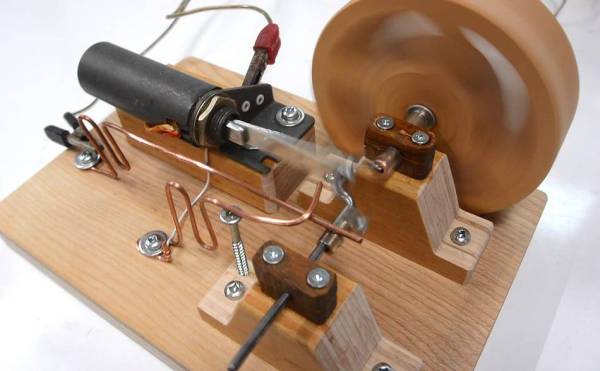
Radial engines are just plain cool – it’s inarguable that any tech that originated with early aviation is inherently awesome. But, what do you do when you want to build a radial engine in your dorm where a combustion engine would be inadvisable? For University of Washington students [Jeffrey Weng] and [Connor Lee] the answer was to power it with solenoids in place of the pistons.

The easiest way to approach a project like this would have been to use a microcontroller. A simple program running on an Arduino could have easily provided the timing to switch power to each solenoid in succession. [Jeffrey Weng] and [Connor Lee], however, took a much more interesting approach by controlling timing via a simple distributor. This works in the same way a spark distributor on a combustion engine would have worked, except it’s actually providing the power to actuate the solenoids instead of providing just an ignition spark.

Also impressive is what they were able to accomplish with such basic tools. Those of us who are lazy and have access to more expensive tools would have just 3D printed or CNC cut most of the parts. Either [Jeffrey Weng] and [Connor Lee] didn’t have access to these, or they wanted to increase their machining street cred, because they created all of the parts with simple tools like a band saw and drill press. We’ve seen some beautiful engine projects before, but what this build lacks in objective beauty it makes up for in ingenuity.

Continue reading “Radial Solenoid Engine Is Undeniably Cool”

Irrighino, An Arduino Yun Based Watering System

There are many different ways to keep your plants watered on a schedule. [Luca Dentella] just created a new one by building the irrighino watering system. He used standard off the shelf, hardware to keep it simple. Irrighino is a complete watering system based on the Arduino Yun, featuring a user friendly AJAX interface. This allows scheduling in a manner similar to creating appointments in Outlook. It’s also possible to manually control the various water solenoids. The code is fully customizable and open source, with code available from [Luca’s] github repository. The web interface is divided in to three tabs – “runtime” for manual control, “setup” to configure the scheduling, and “events” to view system logs.

The Arduino Yun activates solenoid valves via a relay shield. A switch panel has indicator Status LED’s and three position switches. These allow the outputs to be switched off or on manually, or controlled via the Yun when in auto mode. [Luca] describes how to read three states of the switch (On-Off-On) when connected to a single analog input of the Arduino. He’s also got another tutorial describing how to connect a USB WiFi adapter to the Yun. This is handy since the Yun is mounted inside an enclosure where the signal strength is very weak. While the Yun has on-board WiFi, there is no possibility to attach an external antenna directly to the test SMA socket.

One interesting part is the commercial rain sensor. It’s a switch surrounded by a spongy material. When this material absorbs rain water, it begins to expand and triggers the switch. The Arduino sees the sensor as a simple digital input.

Check a short demo of his system in the video after the break.

Continue reading “Irrighino, An Arduino Yun Based Watering System”