Web Controlled Sprinkler Automation

[Doug] needed to update his watering system to comply with his city’s new water saving ordinance. The old system wasn’t capable of being programmed to water only on even or odd calendar days. Rather than purchase a replacement he decided to build his own sprinkler controller. It needed to switch 12V solenoids, a job that’s not too hard to design for. Rather than re-invent the wheel, he modified a previous controller design. It is basically an Arduino and Ethernet shield on a his own etched board. In addition to the ATmega328 and an ENC28J60 (for ethernet connectivity) there is a bank of transistors to drive the watering solenoids. Now he has a web interface that controls the watering schedule and is fully in compliance with the new city code.

If you need another way to save when watering your grass you should take a look at the sidewalk-avoiding sprinkler.


Replacing The Driver Board In An Old-school Door Chime

[Dan Kouba’s] parents replaced their doorbell button with one that lights up and found that the chime wouldn’t stop sounding after the button was pushed. These lighted buttons use an incandescent bulb in parallel with the button (a piece of hardware we’ve hacked in the past). It draws a small amount of current which isn’t enough to trigger the chime, but it is just enough that the chime unit reacts as if the button press never stopped. His parents asked what he could do about this and after some investigation he build a replacement board for the chime unit based around an ATtiny26L. The board monitors the voltage drop across a resistor in the doorbell circuit. When the comparator on the AVR detects a rise in the voltage drop across the resistor it rings the chimes, actuating the solenoids with a set of PNP transistors. [Dan] sent us all of the details which you can check out after the break.

Continue reading “Replacing The Driver Board In An Old-school Door Chime”

IPhone Drum Machine Isn’t Synthesized

There was a time when a drummer would grab some sticks and lay out a groove using the items around him as instruments. [Lsa Wilson] would rather not work quite that hard and has chosen to do the same thing by tapping on an iPhone screen. As you can see in the clip after the break, many of the items in the room around him have been fitted with solenoids. Each is connected to an Arduino which is then controlled by Open Sound Control and interfaced with the iPhone via TouchOSC. We love the sounds being created and can’t help being reminded of the Multixylophoniomnibus.

Holy Robin Trap Batman!

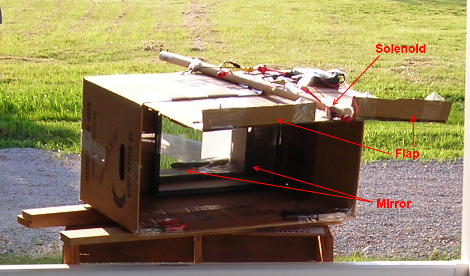
[Matt Meerian] introduced us to his kludge of cardboard, tape, mirrors, and electronics in the form of a clever non lethal robin trap. Whenever a pesky robin would enter the box, a sensor is triggered, the solenoid drops a lid, and the bird is contained (and we assume taken far away after that).

Of course the plan backfired; we wont spoil what happened, but you can click the link above to find out.

Related: Arduino Mouse Trap

Lunkenheimer Steam Whistle, Doorbell

We’re going to straight out agree with [Pete] on how surprisingly quiet doorbells are now a days, and if we had it our way we would put his Lunkenheimer train whistle doorbell in every home*. The setup he uses is surprisingly simple, opting for a pre-built wireless doorbell that signals a microcontroller which in turn drives a relay and solenoid. While he does include a video, we felt it didn’t quite show the intensity of these whistles.

*HaD is not responsible for hearing loss and subsequent melted brains.

Solenoid Motor From A VCR Head

[youtube=http://www.youtube.com/watch?v=3nHX-66PGN0]

Here’s a solenoid motor you can build from a VCR head and some common components. It uses an LED and a light sensor, paired with an LM311 comparator to manage the switching of the motor. As the head turns, the LED shines on the sensor through a hole and triggers a TIP120 transistor to turn on the motor during the power stroke. Once the beam of light is broken, the transistor turns off the motor and the momentum carries it through its revolution until the next power stroke is activated.

We often say that “why” is the wrong question. [Bd5940] must feel the same way because he ends the video by saying: “it has no use, but definitely a conversation piece”. Yep, we’ve seen that before.

[Thanks James]

Cannihilator Can Crusher

This box will crush your cans and deposit them in the bin below. Branded the Cannihilator, [Jeff Walsh] built this with his two sons, [Jake] and [Ryan]. Early hacking eduction is important if they want their future projects to be regular Hackaday features.

The crushing power is provided by a solenoid pneumatic ram. As seen in the video after the break, the can goes in the door on the left, is crushed, then drops through a slot. [Jeff] had fingers and hands in mind when designing this and included a few safety features. The “crush” button is locate on the opposite end from the can slot, there is a kill switch to disable the solenoid, and a keyed switch to shut the whole apparatus down. A Basic Stamp 2 microcontroller handles the electronics with the help of a daughter-board to manage the load switching. This is a nice addition to the creative can crushers out there.

Continue reading “Cannihilator Can Crusher”