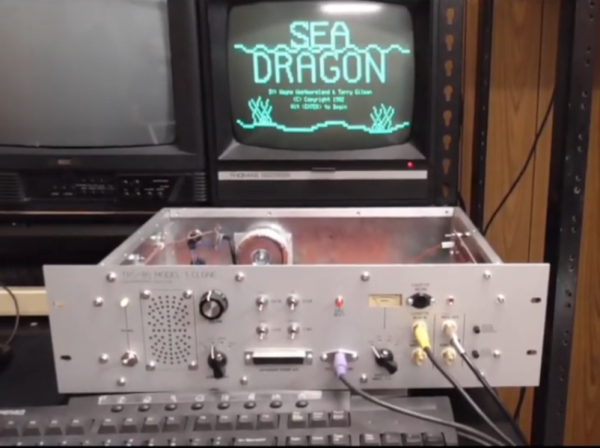
Before RadioShack decided the best business model for an electronics store was to harass its customers into buying overpriced batteries and cellphones, it was a great one-stop shop for most discrete components, knobs, resistors, radio equipment, and even a popular computer. That computer, the TRS-80, is a popular one in the retrocomputing world and if you can’t get original parts to restore one, you can always build your own clone.
This build comes to us from [Glen] aka [glenk] who is known for retrocomputing builds like this classic PET we featured a little over a year ago, and this TRS-80 is his latest project. He really gets into the weeds on the hardware, too. This isn’t an FPGA or Raspberry Pi running a TRS-80 on lookalike hardware. [Glen] has completely redesigned the computer from the ground up using modern CMOS components in order to make a modern, perfectly functional replica of the RadioShack classic.
Because of the level of detail [Glen] goes into, this one is a must-read for anyone interested in computing hardware (as opposed to the software, which you could learn about through a more simple emulator) and retrocomputing in general, and also brings most of us back to a more nostalgic, simpler time where a trip to RadioShack was fun and interesting.
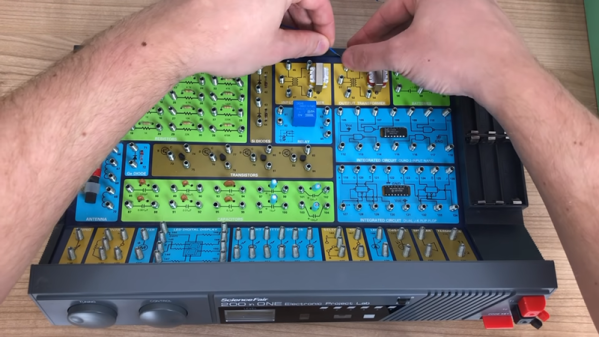
If you grew up in the latter part of the 20th century, you didn’t have the Internet we have today — or maybe not at all. What you did have, though, was Radio Shack within an hour’s drive. They sold consumer electronics, of course, but they also sold parts and kits. In addition to specific kits, they always had some versions of a universal kit where lots of components were mounted on a board and you could easily connect and disconnect them to build different things. [RetoSpector78] found a 200-in-1 kit at a thrift store that was exactly like the one he had as a kid and he shares it with us in the video below.
This was a particularly fancy model since it has a nice looking front panel with a few knobs and displays. The book shows you how to make the 200 different projects ranging from metronomes to rain detectors. The projects really fell into several categories. There were practical circuits like radio receivers, test equipment, and transmitters. Then there were games or circuits even the manual called “silly.” In addition, there were circuits to build simply to understand how they work, like flip flops or counters.
The Golden Age of Radio Shack was probably sometime in the mid-1970s, a time when you could just pop into the local store and pay 49 cents for the resistors you needed to complete a project. Radio Shack was the place to go for everything from hi-fi systems to CB radios, and for many of us, being inside one was very much a kid in a candy store scenario.
That’s not to say that Radio Shack was perfect, but one thing it did very well was the education and grooming of the next generation of electronics hobbyists, primarily through their “Science Fair” brand. Some of us will recall the P-Box kits from that line, complete projects with all the parts and instructions in a plastic box with a perfboard top. These kits were endlessly entertaining and educational, and now [NetZener] has recreated the classic neon “Goofy Light” P-Box project.
As it was back in the day, the Goofy Light is almost entirely useless except for learning about DC-DC converters, multivibrators, RC timing circuits, and the weird world of negative resistance. But by using the original Science Fair instructions, compiling a BOM that can be filled from Mouser or Digikey, and making up a reasonable facsimile of the original P-Box chassis, [NetZener] has done a service to anyone looking for a little dose of nostalgia.
It would be interesting if someone brought back the P-Box experience as a commercial venture, offering a range of kits with circuits like the originals. If that happens, maybe some of the offerings will be based on that other classic from Radio Shack’s heyday.
Where did you buy the parts for your first electronic project? That’s a question likely to prompt a misty-eyed orgy of reminiscences from many Hackaday readers, if ever we have heard one. The chances are that if you are from North America or substantial parts of the English-speaking world, you bought them from a store that was part of the Radio Shack empire. These modestly sized stores in your local mall or shopping centre carried a unique mix of consumer electronics, CB radio, computers, and electronic components, and particularly in the days before the World Wide Web were one of very few places in which an experimenter could buy such parts over the counter.
Sadly for fans of retail electronic component shopping, the company behind the Radio Shack stores faltered in the face of its new online competition over later years of the last decade, finally reaching bankruptcy in 2015. Gone are all but a few independently owned stores, and the brand survives as an online electronics retailer.
The glory days of Radio Shack may be long gone, but its remaining parts are still capable of turning up a few surprises. As part of the company’s archives they had retained a huge trove of Radio Shack products and memorabilia, and these have been put up for sale in an online auction.
If you are interested in any of the Radio Shack lots, you have until the 3rd of July to snap up your personal piece of retail electronic history. Meanwhile if you are interested in the events that led to this moment, you can read our coverage of the retail chain’s demise.
There was a time when Radio Shack offered an incredible variety of supplies for the electronics hobbyist. In the back of each store, past the displays of Realistic 8-track players, Minimus-7 speakers, Patrolman scanners, and just beyond the battery bin where you could cash in your “Battery of the Month Club” card for a fresh, free 9-volt battery, lay the holy of holies — the parts. Perfboard panels on hinges held pegs with cards of resistors for 49 cents, blister packs of 2N2222 transistors and electrolytic capacitors, and everything else you needed to get your project going. It was a treasure trove to a budding hardware hobbyist.
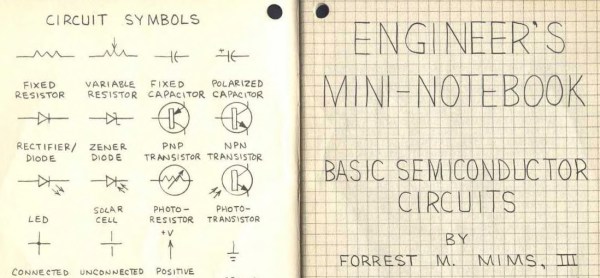
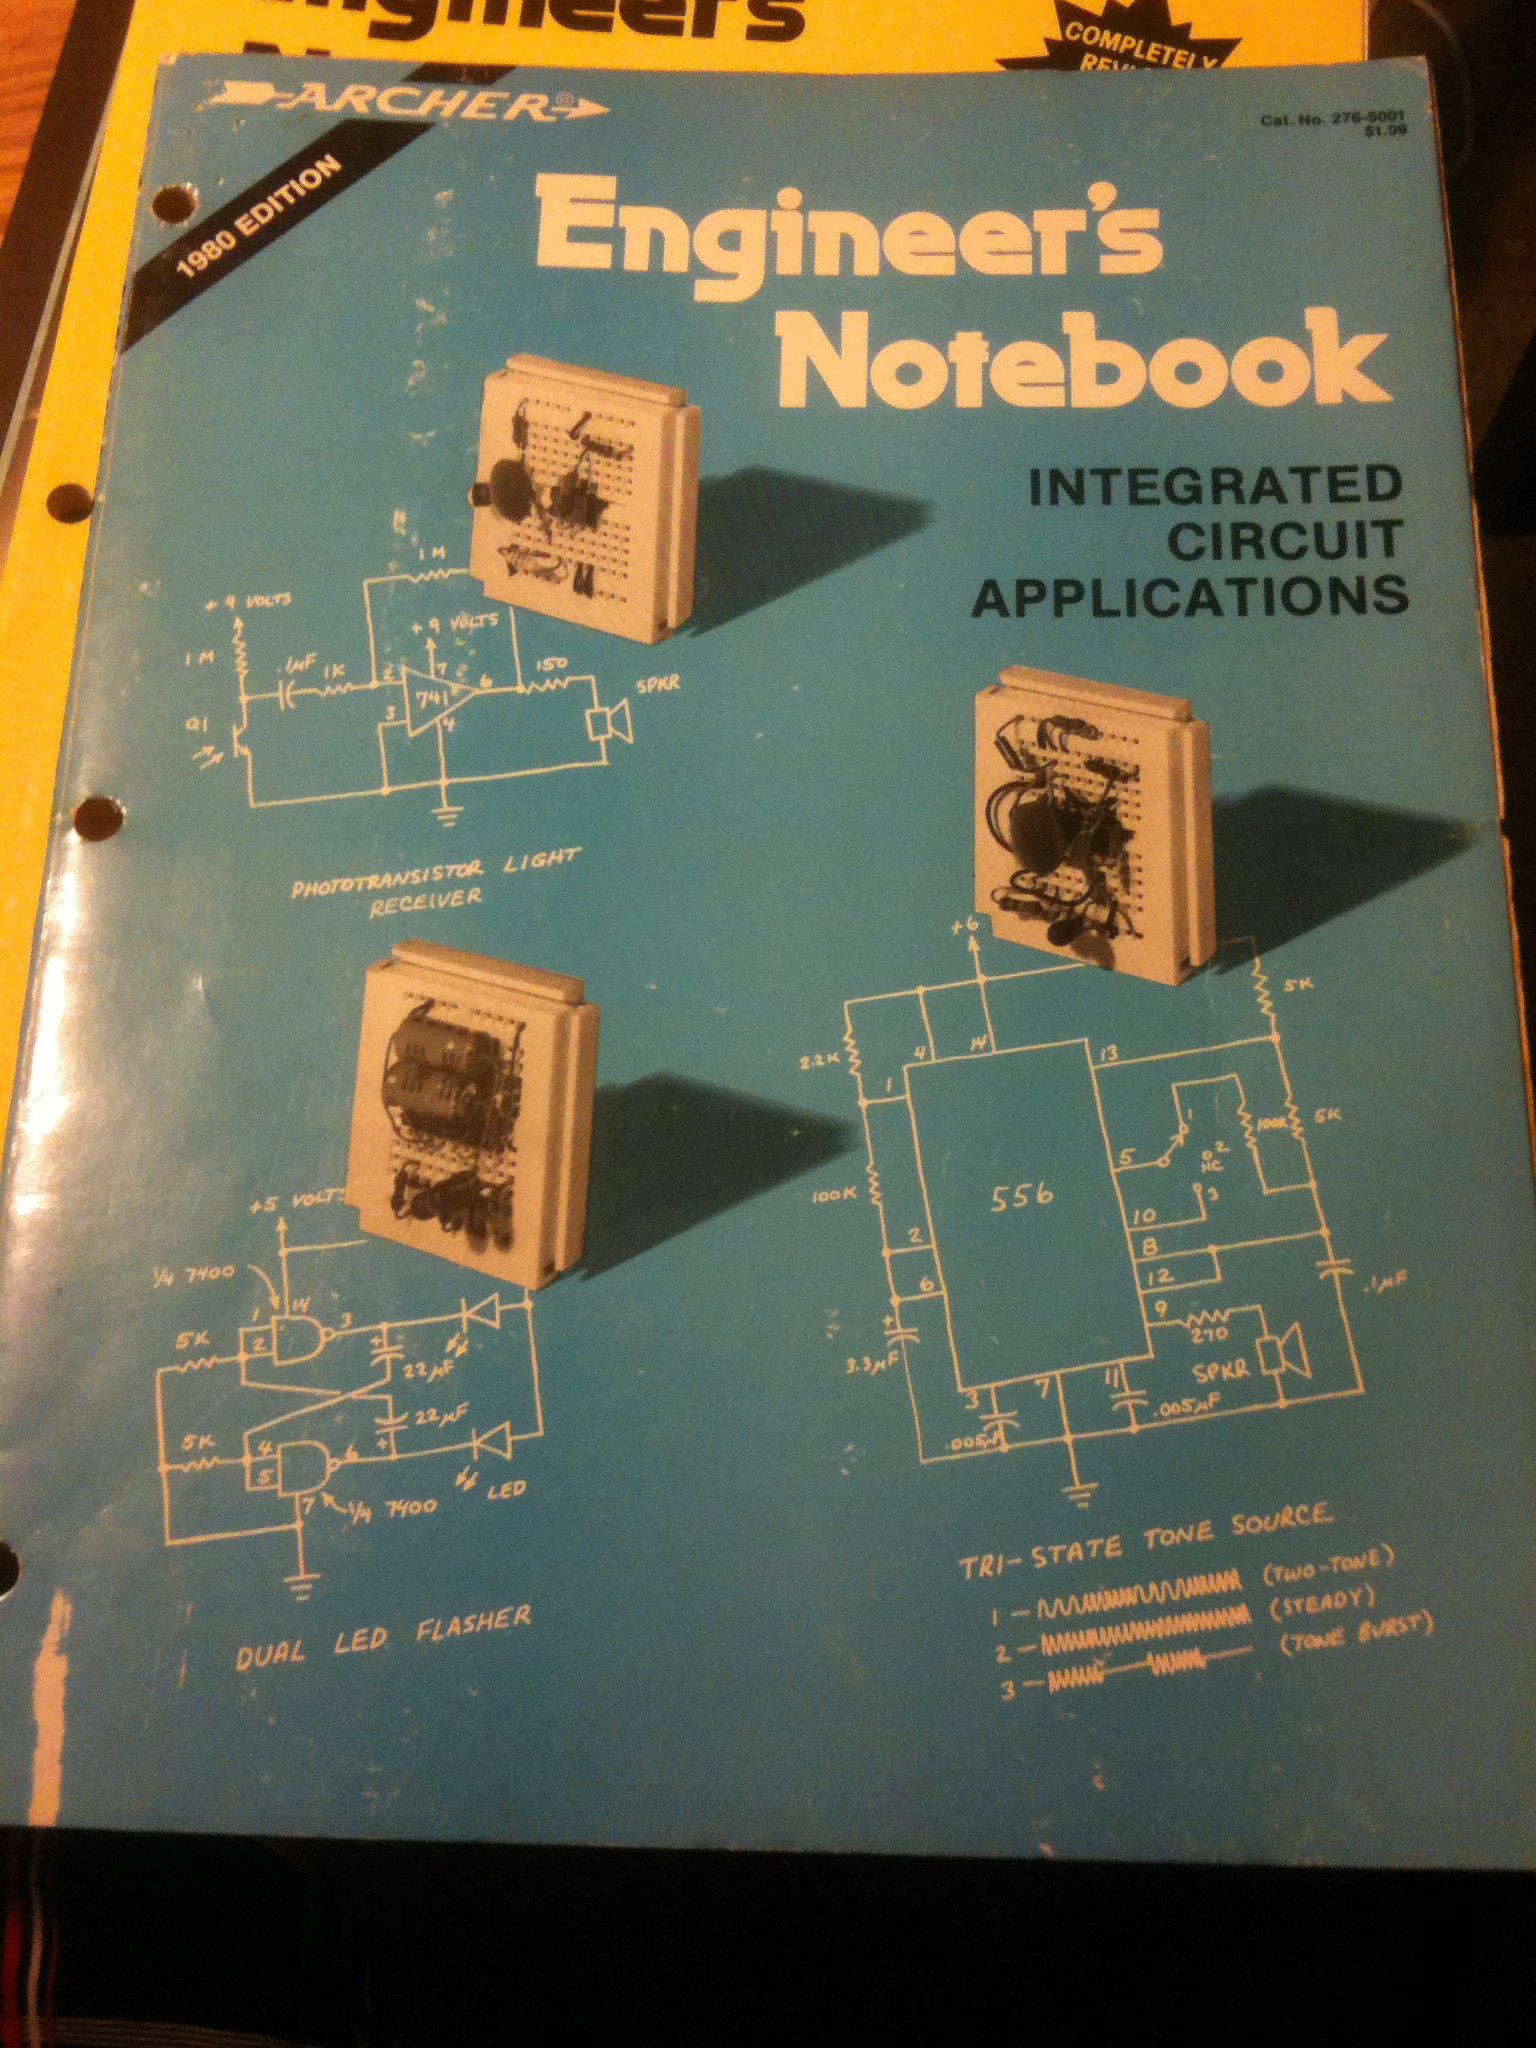
But over on the side, invariably near the parts, was a rack of books for sale, mostly under the Archer brand. 12-year old me only had Christmas and birthday money to spend, and what I could beg from my parents, so I tended to buy books — I figured I needed to learn before I started blowing money on parts. And like many of that vintage, one of the first books I picked up was the Engineer’s Notebook by Forrest M. Mims III.
Wish I could find my original copy from 1979. I just bought this one from Amazon.
Many years rolled by, and my trusty and shop-worn first edition of Mims’ book, with my marginal notes and more than one soldering iron burn scarring its pulp pages, has long since gone missing. I learned so much from that book, and as I used it to plan my Next Big Project I’d often wonder how the book came about. Those of you that have seen the book and any of its sequels, like the Mini-notebook Series, will no doubt remember the style of the book. Printed on subdued graph paper with simple line drawings and schematics, the accompanying text did not appear to be typeset, but rather hand lettered. Each page was a work of technical beauty that served as an inspiration as I filled my own graph-paper notebooks with page after page of circuits I would find neither the time nor money to build.
I always wondered about those books and how they came about. It was a pretty astute marketing decision by Radio Shack to publish them and feature them so prominently near the parts — sort of makes the string of poor business decisions that led to the greatly diminished “RadioShack” stores of today all the more puzzling. Luckily, Forrest Mims recently did an AMA on reddit, and he answered a lot of questions regarding how these books came about. The full AMA is worth a read, but here’s the short story of those classics of pulp non-fiction.
A few years ago, Roombas — everyone’s favorite robotic trash can — graced the pages of Hackaday with reverence. There was nothing this little robot couldn’t do, save for going up stairs. Roomba hacks have died off since then, and these little trash cans have been swallowed up by dumpsters. It’s all very sad, really.
[Mike] has had one of these Roombas around for a while, sitting in a closet, waiting for someone to make use of it. He recently dug it out, looked it over, and watched the LEDs light up after troubleshooting a problem with the batteries. Then the problem was how to control it.
He had wanted to connect it to a VIC-20, but the handy serial port on the Roomba only accepted baud rates between 19.2k and 57.6k. The VIC-20, with the ancient 6522 VIA, could only bitbang a serial port up to 2400bps. Then the idea hit him. In his closet of ancient technology, [Mike] had a Tandy 102, a slightly upgraded TRS-80 Model 100 that could easily drive a serial port at 19.2k.
When it comes to a mobile retro robotics platform, [Mike] couldn’t have found a better computer. The Tandy 102 has a display, a BASIC interpreter, enough RAM to run a Roomba, and is powered by a few AA batteries. He did need a little bit of level conversion for the serial port, but a MAX232 took care of that easily.
With everything put together, [Mike] had a robot and a computer that is at least as good as the old Heathkit HERO robot. You can check out a video of the Tandy bot below.
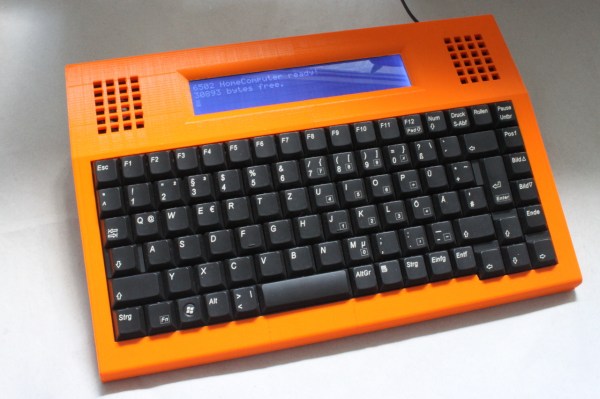
Over the years, we’ve seen a lot of DIY retro computers, but [Dirk Grappendorf] has created one of the most polished looking 6502 systems to date. His battery-powered portable machine utilizes a 4 line by 40 character LCD, and a modified USB keyboard. Cover all that in a slick 3D printed case, and you have a machine that reminds us quite a bit of the venerable TRS-80 Model 100.
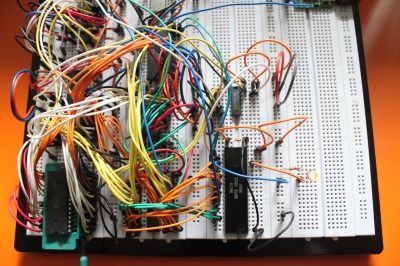
[Dirk] has some great documentation to go with his computer. He started with a classic MOS 6502 processor. He surrounded the processor with a number of support chips correct for the early 80’s period. RAM is easy-to -use static RAM, while ROM is handled by UV erasable EPROM. A pair of MOS 6522 Versatile Interface Adapter (VIA) chips connect the keyboard, LCD, and any other peripherals to the CPU. Sound is of course provided by the 6581 SID chip. All this made for a heck of a lot of wires when built up on a breadboard. The only thing missing from this build is a way to store software written on the machine. [Dirk] already is looking into ways to add an SD card interface to the machine.
The home building didn’t stop there though. [Dirk] designed and etched his own printed circuit board (PCB) for his computer. DIY PCBs with surface mount components are easy these days, but things are a heck of a lot harder with older through hole components. Every through hole pin and via had to be drilled, and soldered to the top and bottom layers of the board. Not to mention the fact that both layers had to line up perfectly to avoid missing holes! To say this was a lot of work would be an understatement.
[Dirk] designed a custom 3D printed case for his computer and printed it out on his Ultimaker. To make things fit, he created his design in halves, and glued the case once printing was complete.
If awesome hardware and a case weren’t enough, [Dirk] also spent time designing software for the machine. He wrote his own abbreviated BASIC interpreter along with several BASIC programs. You can find everything over on his GitHub repository.
We always love writing up well-documented, and just generally awesome projects like [Dirk’s]. If you know of any retro computers like this one, drop us a tip!


 [Dirk] has some great documentation to go with his computer. He started with a classic MOS 6502 processor. He surrounded the processor with a number of support chips correct for the early 80’s period. RAM is easy-to -use static RAM, while ROM is handled by UV erasable EPROM. A pair of MOS 6522 Versatile Interface Adapter (VIA) chips connect the keyboard, LCD, and any other peripherals to the CPU. Sound is of course provided by the 6581 SID chip. All this made for a heck of a lot of wires when built up on a breadboard. The only thing missing from this build is a way to store software written on the machine. [Dirk] already is looking into ways to add an SD card interface to the machine.
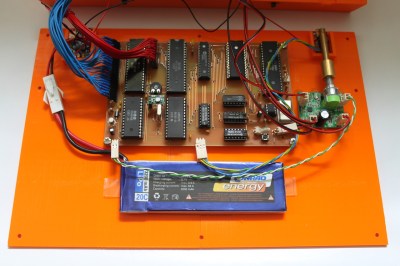 The home building didn’t stop there though. [Dirk] designed and etched his own printed circuit board (PCB) for his computer. DIY PCBs with surface mount components are easy these days, but things are a heck of a lot harder with older through hole components. Every through hole pin and via had to be drilled, and soldered to the top and bottom layers of the board. Not to mention the fact that both layers had to line up perfectly to avoid missing holes! To say this was a lot of work would be an understatement.
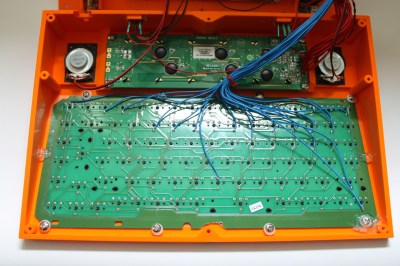 [Dirk] designed a custom 3D printed case for his computer and printed it out on his Ultimaker. To make things fit, he created his design in halves, and glued the case once printing was complete.


