OctoPrint On Router

Dumpster Dive Results In 3D Print Server Project

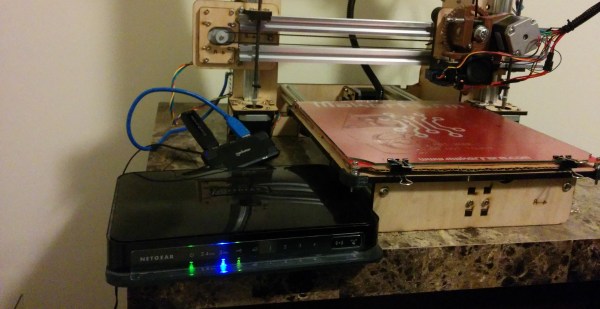
3D Printers are super convenient when you need a part quickly. However, they can be seriously inconvenient if the 3D printer has to be tethered to your computer for the duration of the entire print. [Matt] purchased a Makerfarm i3v printer and has been using it a bunch. The only thing he wasn’t crazy about was having it occupy his computer while printing objects. Then one day [Matt] was dumpster diving (don’t roll your eyes, we all do it) and found a Netgear WNDR3700v1 WiFi router. This particular router has a USB port and it made [Matt] think, “can I use this to run my printer?

[Matt] started by checking out 3D print server software OctoPrint and found out that it was entirely written in Python. He had a feeling that he could get Python running on that found Netgear router. The first step was to install OpenWrt to the router and configure it as a client. That was straight forward and went well.  The router only had one USB port so a hub was necessary in order to connect a USB drive and the printer. The USB drive was necessary because the router itself did not have enough memory for OctoPrint. Installing OctoPrint to the router was a little complicated and took a bit of trial and error but [Matt] figured out the best method and documented that on his site for anyone interested in doing the same. So now, [Matt] can use his computer’s web browser to access OctoPrint on the Netgear router, start a print and go back to using his computer without fear of a failed print. OctoPrint and the router are now solely responsible for controlling the printer.

If you’re interested in more ways to remotely control your printer, check this out.

BagAlarm

Motion Activated Alarm For Your Bag

Many of us carry around a bag with our expensive personal belongings. It can be a pain to carry a bag around with you all day though. If you want to set it down for a while, you often have to try to keep an eye on it to ensure that no one steals it. [Micamelnyk] decided to build a solution to this problem in the form of a motion sensing alarm.

The device is built around a Trinket Pro. The Trinket Pro is a sort of break out board for the ATMega328. It’s compatible with the Arduino IDE and also contains a USB port for easy programming. The Trinket is hooked up to a GY-521 accelerometer, which allows it to detect motion. When the Trinket senses that the device has been moved, it emits a loud high-pitched whine from a piezo speaker.

To arm the device, the user first holds the power button for 3 seconds. Then the user has ten seconds to enter their secret code. This ensures that the device is never armed accidentally and that the user always remembers the code before arming the device. The code is entered via four push buttons mounted to a PCB. The code and code length can both be easily modified in the Trinket software.

Once the code is entered, the status LED will turn solid. This indicates to the user that the device must be placed stationary. The LED will turn off after 20 seconds, indicating that the alarm is now armed. If the bag is moved for more than five seconds at a time, the alarm will sound. The slight delay gives the user just enough time to disarm the alarm. This parameter can also be easily configured via software.

Parts.io Aims At Better Component Discovery

Online parts search and ordering is a godsend compared to the paper-catalog days of yore. This is fact, there is no argument otherwise (despite [Dave Jones’] assertion that sourcing connectors is so much simpler if you have pages full of images). Just being able to search was a game changer. But how far do you think the concept has come since the transition online? [Chris Gammell] plans to spark a leap forward with Parts.io, an electronic component info delivery system that spans both manufacturers and distributors.

So what’s wrong with what we’re doing now? Nothing… unless you hate wasting time. Sourcing parts is time consuming. Certainly the parametric search on distributors’ sites like Mouser and Digikey have improved. Plus we’ve seen hacks that do things like automatically pull in stock data to a spreadsheet. But the real issue isn’t figuring out how to buy stuff, it’s figuring out what to use in a design. Surely there is opportunity for improvement.

Parts.io has its sights set on a better path to part discovery. Yes, this is parametric search but it will return data for all parts from all manufacturers. The distinction may not be completely obvious, but for example if you are searching on Element14 you’re only getting data on the parts that Element14 carries. Once you have drilled down to a reasonably manageable pool of components you get what you would expect: one-click datasheets and a roundup of pricing and availability from worldwide distributors. The presentation of the parts is grouped into families that differ in trailing parts designators, and I must say I am impressed at the interface’s ability to roll with you. It feels easier to find alternative parts after the drilldown where in my past searches I would have started completely over again.

The service started in private alpha in October but is now available for public use. You can search for a part without logging in, but a few features have been held back for those that sign up for a free account. Most notably this includes the ability to upload your BOM, add parts as favorites, and access their forums.

Is this a game changer? That’s for you to decide. You can give it a try yourself or watch [Chris’] feature walkthrough video found after the break.

Continue reading “Parts.io Aims At Better Component Discovery”

diy usb charger

DIY Phone Charger Born From Cyclone Disaster

As convenient as cell phones are, sometimes these power-hungry devices let us down right at the worst time. We’re talking about battery life and how short it is in modern cell phones. Sure that’s totally inconvenient sometimes but it could be way worse. For example: during a natural disaster. A cyclone hit [Ganesh’s] home city and the entire area had lost power for 10 days. He couldn’t plug in his phone to charge it even if he wanted to. After realizing how dependent we are on the electrical grid, he did something about and built a phone charger out of parts he had kicking around.

The charger is quite simple. The user cranks on a DC motor and the output power goes into a LM2596-based step-down voltage regulator. The output of the regulator is then connected to a female USB connector so that any USB cord can be plugged in. As long as the motor is cranked fast enough to put out at least 8vdc, a steady stream of 5v will be available at the USB connector. Max current output of the system has been measured at 550mA.

[Ganesh] admits this isn’t a practical every-day charger but in a pinch it will certainly do the trick. It is even possible to build a makeshift charger out of a cordless drill.

Continue reading “DIY Phone Charger Born From Cyclone Disaster”

Retrotechtacular: The Gossamer Condor

For centuries, human-powered flight eluded mankind. Many thought it was just an impossible dream. But several great inventions have been born from competition. Challenge man to do something extraordinary, offer him a handsome cash incentive, and he may surprise you.

In 1959, London’s Aeronautical Society established the Kremer Prize in search of human-powered flight. The rules of the Kremer Prize are simple: a human-powered plane must take off by itself and climb to an altitude of ten feet. The plane must make a complete, 180° left turn, travel to a marker one-half mile away, and execute a 180° right turn. Finally, it must clear the same ten-foot marker. While many tried to design crafts that realized this dream, man is, at his strongest, a weak engine capable of about half a horsepower on a good day.

Continue reading “Retrotechtacular: The Gossamer Condor”

Using HID Tricks To Drop Malicious Files

[Nikhil] has been experimenting with human interface devices (HID) in relation to security. We’ve seen in the past how HID can be exploited using inexpensive equipment. [Nikhil] has built his own simple device to drop malicious files onto target computers using HID technology.

The system runs on a Teensy 3.0. The Teensy is like a very small version of Arduino that has built-in functionality for emulating human interface devices, such as keyboards. This means that you can trick a computer into believing the Teensy is a keyboard. The computer will treat it as such, and the Teensy can enter keystrokes into the computer as though it were a human typing them. You can see how this might be a security problem.

[Nikhil’s] device uses a very simple trick to install files on a target machine. It simply opens up Powershell and runs a one-liner command. Generally, this commend will create a file based on input received from a web site controlled by the attacker. The script might download a trojan virus, or it might create a shortcut on the user’s desktop which will run a malicious script. The device can also create hot keys that will run a specific script every time the user presses that key.

Protecting from this type off attack can be difficult. Your primary option would be to strictly control USB devices, but this can be difficult to manage, especially in large organizations. Web filtering would also help in this specific case, since the attack relies on downloading files from the web. Your best bet might be to train users to not plug in any old USB device they find lying around. Regardless of the methodology, it’s important to know that this stuff is out there in the wild.

DIY 6502 Laptop Computer Looks And Works Great

Over the years, we’ve seen a lot of DIY retro computers, but [Dirk Grappendorf] has created one of the most polished looking 6502 systems to date. His battery-powered portable machine utilizes a 4 line by 40 character LCD, and a modified USB keyboard. Cover all that in a slick 3D printed case, and you have a machine that reminds us quite a bit of the venerable TRS-80 Model 100.

homecomputer-6502-v8-via-bread
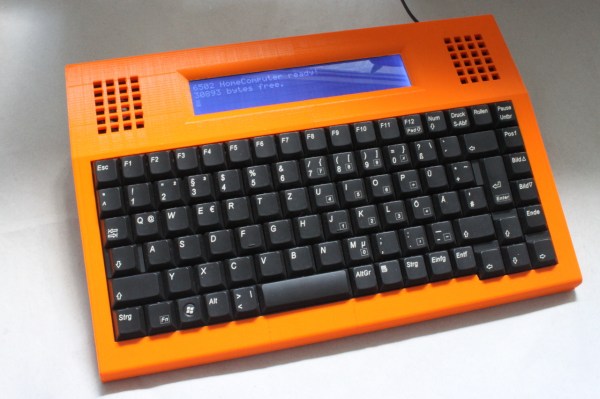
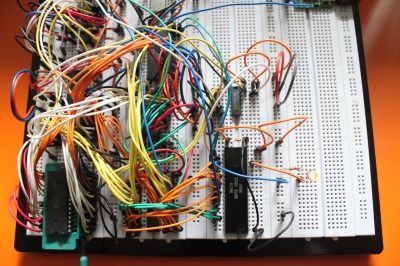
[Dirk] has some great documentation to go with his computer. He started with a classic MOS 6502 processor. He surrounded the processor with a number of support chips correct for the early 80’s period. RAM is easy-to -use static RAM, while ROM is handled by UV erasable EPROM. A pair of MOS 6522 Versatile Interface Adapter (VIA) chips connect the keyboard, LCD, and any other peripherals to the CPU. Sound is of course provided by the 6581 SID chip.  All this made for a heck of a lot of wires when built up on a breadboard. The only thing missing from this build is a way to store software written on the machine. [Dirk] already is looking into ways to add an SD card interface to the machine.

homecomputer-6502-final-4
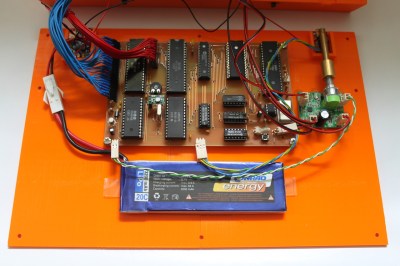
The home building didn’t stop there though. [Dirk] designed and etched his own printed circuit board (PCB) for his computer. DIY PCBs with surface mount components are easy these days, but things are a heck of a lot harder with older through hole components. Every through hole pin and via had to be drilled, and soldered to the top and bottom layers of the board. Not to mention the fact that both layers had to line up perfectly to avoid missing holes! To say this was a lot of work would be an understatement.

homecomputer-6502-final-5
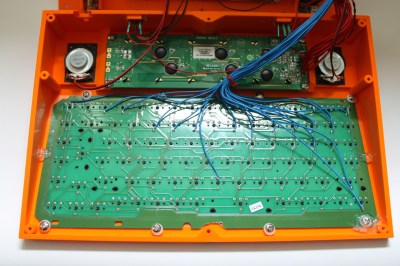
[Dirk] designed a custom 3D printed case for his computer and printed it out on his Ultimaker. To make things fit, he created his design in halves, and glued the case once printing was complete.

If awesome hardware and a case weren’t enough, [Dirk] also spent time designing software for the machine. He wrote his own abbreviated BASIC interpreter along with several BASIC programs. You can find everything over on his GitHub repository.

We always love writing up well-documented, and just generally awesome projects like [Dirk’s]. If you know of any retro computers like this one, drop us a tip!

[Thanks MicroHex!]