Hardware-in-the-Loop Continuous Integration

How can you tell if your software is doing what it’s supposed to? Write some tests and run them every time you change anything. But what if you’re making hardware? [deqing] has your back with the Automatic Hardware Testing rig. And just as you’d expect in the software-only world, you can fire off the system every time you update the firmware in your GitHub.

A Raspberry Pi compiles the firmware in question and flashes the device under test. The cool part is the custom rig that simulates button presses and reads the resulting values out. No actual LEDs are blinked, but the test rig looks for voltages on the appropriate pins, and a test passes when the timing is between 0.95 and 1.05 seconds for the highs and lows. Firing this entire procedure off at every git check-in ensures that all the example code is working.

So far, we can only see how the test rig would work with easily simulated peripherals. If your real application involved speaking to a DAC over I2C, for instance, you’d probably want to integrate that into the test rig, but the principle would be the same.

Are any of you doing this kind of mock-up hardware testing on your projects? Is sounds like it could catch bad mistakes before they got out of the house.

How Much Thrust Is Your Prop Really Making?

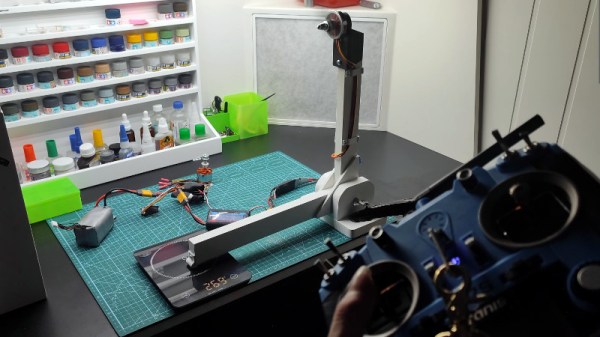
The problem of components not conforming to their claimed specification is one that must challenge engineers in all fields, including it seems, that of multi-rotors and remote controlled aircraft. A motor can boast an impressive spec on the website which sells it, but overheat or just not deliver when it’s on your bench. Thus [Valkyrie Workshop] has come up with a simple but ingenious rig to evaluate a motor and propeller combo without breaking the bank.

It tales the form of a L-shaped wooden bracket clamped to a pivot point at its corner with one arm pointing upwards, with motor and propeller in a 3D printed holder on the upwards arm. The other arm extends horizontally and lies on a digital kitchen scale the same distance from the pivot as the motor. The same force as is exerted by the motor is transmitted via the bracket to the kitchen scale, allowing a direct readout of the thrust in grams or kilograms. This is a first version of the rig, further work will move to a load cell and Arduino for more flexibility in measurement.

We’ve featured similar devices here in the past, including one version which can be mounted to an automobile so it can be tested at speed.

Continue reading “How Much Thrust Is Your Prop Really Making?”

Investigating The Fourth Passive Component

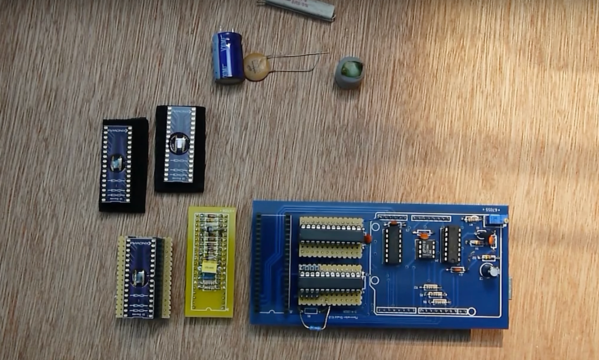
When first learning about and building electronic circuits, the first things all of us come across are passive components such as resistors, capacitors, and inductors. These have easily-understandable properties and are used in nearly all circuits in some way or another. Eventually we’ll move on to learning about active components like transistors, but there’s a fourth passive circuit component that’s almost never encountered. Known as the memristor, this mysterious device is not quite as intuitive as the other three, so [Andrew] created an Arduino shield to investigate their properties.

Memristors relate electric charge and magnetic flux linkage, which means that their resistance changes based on the current that passes through them. As their name implies, this means they have memory, and retain their properties even after power is removed. [Andrew] is testing three different memristors, composed of tungsten, carbon, and chromium, using this specialized test set. The rig is based on an Arduino Uno and has a few circuit components that can be used as references and generates data on the behavior of the memristors under various situations.

The memristors used here do exhibit expected behavior when driven with positive voltage signals, but did exhibit a large amount of variability when voltage was applied in a negative direction. [Andrew] speculates that using these devices for storage would be difficult and would likely require fairly bespoke applications for each type. But as the applications for these seemingly bizarre circuit components increase, we expect them to improve much like any other passive component.

Continue reading “Investigating The Fourth Passive Component”

A Budget Testing Rig For Low-Volume Production

It’s not unheard of for those who tinker in the land of electronics to suddenly find themselves with a project on their hands and potential customers clamoring at the door. Of course, the road to shipping a product is a long one, and requires a unique set of skills quite distinct from those required to build the initial prototype. In developing a product for Airsoft use, [bald greg] realized that a testing rig would be key to ensuring their hundreds of units left the building in working condition.

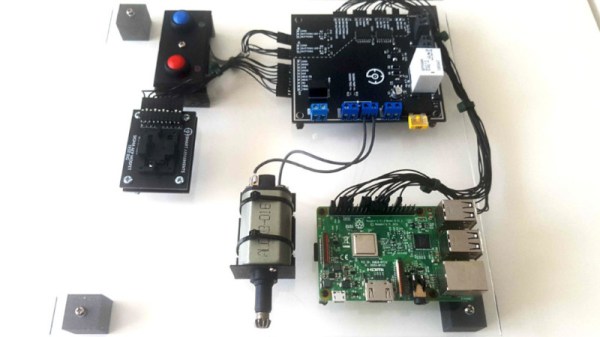
When shipping units in the hundreds rather than thousands, keeping overheads low is key to maintain a sustainable profit margin on each unit sold. Thus, [bald greg] built a rig that would allow for effective testing of devices rather than breaking the bank. The rig also handles programming, saving the cost of purchasing pre-programmed microcontrollers from the manufacturer. A Raspberry Pi runs the show, using its GPIO pins to program boards and saving test results and serial numbers for later reference. A bed of nails fixture is used to connect to each individual board. Additionally, to test each board as realistically as possible, hardware mimicking a real Airsoft electric pistol is used to properly load the hardware.

[bald greg]’s work is a great example of approaching QC on a budget, and we suspect he’ll sleep soundly knowing the boards in the mail are going to work first time. We’ve seen others take similar approaches, too. If you’re working on your own production testing rig, be sure to let us know!

Continue reading “A Budget Testing Rig For Low-Volume Production”