The assembled PCB on red foam, with both a USB-C connector and the ASM2464PD chip visible

Finally Taming Thunderbolt With Third-Party Chips

Thunderbolt has always been a functionally proprietary technology, held secret by Intel until “opening” the standard in a way that evidently wasn’t enough for anyone to meaningfully join in. At least, until last year, when we saw announcements about ASMedia developing two chips for Thunderbolt use. Now, we are starting to see glimmers of open source, letting us tinker with PCIe at prices lower than $100 per endpoint.

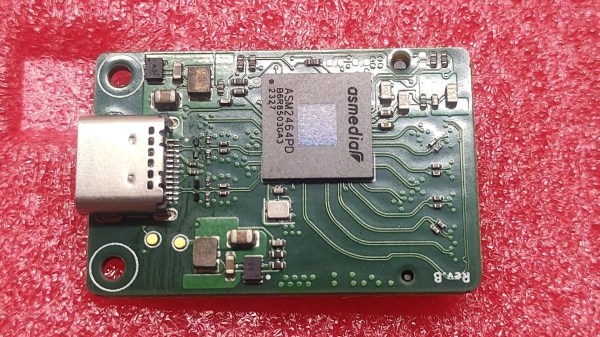
In particular, this board from [Picomicro] uses the ASM2464PD — a chipset that supports TB3/4/USB4, and gives you a 4x PCIe link. Harnessing the 40 Gbps power to wire up an NVMe SSD, this board shows us it’s very much possible to design a fully functional ASM2464PD board without the blessing of Intel. With minimal footprint that barely extends beyond the 2230 SSD it’s designed for, curved trace layout, and a CNC-milled case, this board sets a high standard for a DIY Thunderbolt implementation.

The main problem is that this project is not open-source – all we get is pretty pictures and a bit of technical info. Thankfully, we’ve also seen [WifiCable] take up the mantle of making this chip actually hobbyist-available – she’s created a symbol, fit a footprint, and made an example board in KiCad retracing [Picomicro]’s steps in a friendly fashion. The board is currently incomplete because it needs someone to buy an ASM2464PD enclosure on Aliexpress and reverse-engineer the missing circuitry, but if open-source Thunderbolt devices are on your wish list, this is as close as you get today – maybe you’ll be able to make an eGPU adapter, even. In the meantime, if you don’t want to develop hardware but want to take advantage of Thunderbolt, you can build 10 Gbps point-to-point networks.

TOMOS Moped Becomes Electric Beast

The TOMOS 50cc moped, a small motorcycle produced in Yugoslavia and the Netherlands, has for decades been a common sight on European roads and provided the first taste of transport independence for countless youngsters. Unfortunately the company went bankrupt a few years ago, but there are still plenty of them about, and it’s one of these that [Doctor D.S.] gives an electric conversion in the video below the break.

The electronics are a standard 5 kW off-the-shelf Chinese kit, but in this they aren’t the star of the show so much as the work on the bike. As with any old moped it’s a bit ropey, and he strips it down and reconditions every part of it alongside his work fabricating brackets, a battery box, and a seat. It’s a long video, but it’s one of those workshop sequences that you can become engrossed in.

The result appears to be a very practical, powerful (for a moped) and rideable bike, and it’s one we’d have for buzzing around town any day. We’d like to take a look at that battery box and seat combo on the interests of safety, but otherwise it’s pretty spot-on. Sit back and enjoy a bit of quality workshop video!

If you’re hungry for more, this is by no means the first road bike electric conversion we’ve brought you.

Continue reading “TOMOS Moped Becomes Electric Beast”

USB HID And Run Exposes Yet Another BadUSB Surface

You might think you understand the concept of BadUSB attacks and know how to defend it, because all you’ve seen is opening a terminal window. Turns out there’s still more attack surface to cover, as [piraija] tells us in their USB-HID-and-run publication. If your system doesn’t do scrupulous HID device filtering, you might just be vulnerable to a kind of BadUSB attack you haven’t seen yet, rumoured to have been the pathway a few ATMs got hacked – simply closing the usual BadUSB routes won’t do.

The culprit is the Consumer Control specification – an obscure part of HID standard that defines media buttons, specifically, the “launch browser” and “open calculator” kinds of buttons you see on some keyboards, that operating systems, surprisingly, tend to support. If the underlying OS you’re using for kiosk purposes isn’t configured to ignore these buttons, they provide any attacker with unexpected pathways to bypass your kiosk environment, and it works astonishingly well.

[piraija] tells us that this attack provides us with plenty of opportunities, having tested it on a number of devices in the wild. For your own tests, the writeup has Arduino example code you can upload onto any USB-enabled microcontroller, and for better equipped hackers out there, we’re even getting a Flipper Zero application you can employ instead. While we’ve seen some doubts that USB devices can be a proper attack vector, modern operating systems are more complex and bloated than even meets the eye, often for hardly any reason – for example, if you’re on Windows 10 or 11, press Ctrl+Shift+Alt+Win+L and behold. And, of course, you can make a hostile USB implant small enough that you can build them into a charger or a USB-C dock.

USB image: Inductiveload, Public domain.

Vibratory Rock Tumbler Bounces On Printed Spring

If you’re reading Hackaday, there’s a good chance you had a rock tumbler in your younger days. Hell, we’d put odds on a few of you having one rumbling away in the background as you read this. They’re relatively simple contraptions, and a common enough DIY project. But even still, this largely 3D printed rock tumbler from [Fraens] is unique enough to stand out.

To make a basic rock tumbler, all you really need to do is rotate a cylindrical chamber and let physics do its thing. Such contraptions are known as, unsurprisingly, rotary rock tumblers. But what [Fraens] has put together here is a vibratory tumbler, which…well, it vibrates. If this was Rockaday we might go farther down this particular rabbit hole and explain the pros and cons of each machine, but the short version is that vibratory tumblers are more mechanically complex and are generally better suited to fine finish work than rotary tumblers which take a brute force approach that tends to round off the rocks.

Continue reading “Vibratory Rock Tumbler Bounces On Printed Spring”

3D Navigator For Blender

If you work with high-end CAD workstations, you may have encountered a SpaceMouse or similar devices. Sort of a mouse with an extra dimension, they aren’t cheap. So [meisterodin1981] decided to build a do-it-yourself version for use with Blender. You can check it out in the video below.

The device uses an MPU6050 accelerometer and a spring. It also has some buttons for special features. The device uses a Teensy 2, although any controller that can provide an HID device could probably do the job. Of course, a nice 3D printed case is part of the design. A printed pair of plates holds a 3D printer bed spring to provide the device’s Z-axis movement. The wires to the encoder are routed through the center of the spring, so neatness counts.

We’ve seen other 3D mice like the Orbion. Your other option is to pick up the old-fashioned serial port versions and convert them. Until you can do your designs in virtual reality, these mice are just the ticket.

Continue reading “3D Navigator For Blender”

Ultimate Power: Lithium-Ion Batteries In Series

At some point, the 3.6 V of a single lithium ion battery just won’t do, and you’ll absolutely want to stack LiIon cells in series. When you need high power, you’ve either got to increase voltage or current, and currents above say 10 A require significantly beefed up components. This is how you’re able to charge your laptop from your USB-C powerbank, for instance.

Or maybe you just need higher voltages, and don’t feel like using a step-up converter, which brings along with it some level of inefficiency. Whatever your reasons, it’s time to put some cells into series. Continue reading “Ultimate Power: Lithium-Ion Batteries In Series”

How Much Thrust Is Your Prop Really Making?

The problem of components not conforming to their claimed specification is one that must challenge engineers in all fields, including it seems, that of multi-rotors and remote controlled aircraft. A motor can boast an impressive spec on the website which sells it, but overheat or just not deliver when it’s on your bench. Thus [Valkyrie Workshop] has come up with a simple but ingenious rig to evaluate a motor and propeller combo without breaking the bank.

It tales the form of a L-shaped wooden bracket clamped to a pivot point at its corner with one arm pointing upwards, with motor and propeller in a 3D printed holder on the upwards arm. The other arm extends horizontally and lies on a digital kitchen scale the same distance from the pivot as the motor. The same force as is exerted by the motor is transmitted via the bracket to the kitchen scale, allowing a direct readout of the thrust in grams or kilograms. This is a first version of the rig, further work will move to a load cell and Arduino for more flexibility in measurement.

We’ve featured similar devices here in the past, including one version which can be mounted to an automobile so it can be tested at speed.

Continue reading “How Much Thrust Is Your Prop Really Making?”