A Hydraulic Bench Vise, Made On The Bench

When we sit down to a build video and see that it’s from [Workshop From Scratch], we know it’ll be a good one, full of plenty of gratuitous metal-wrangling with the promise of an ingenious and useful take on a workshop essential at the end. The home made hydraulic bench vise is the latest from that particular workshop, so settle down with the video below the break for a treat.

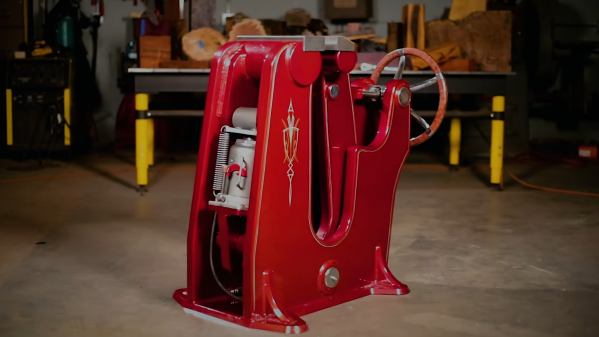
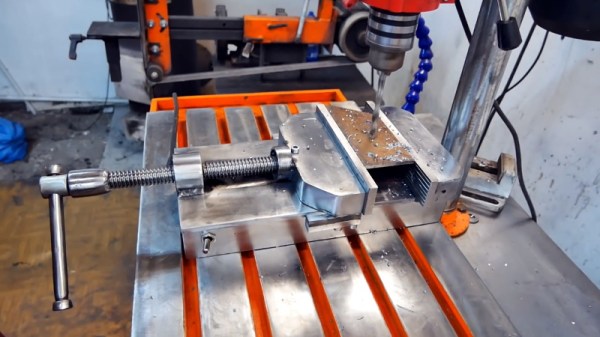
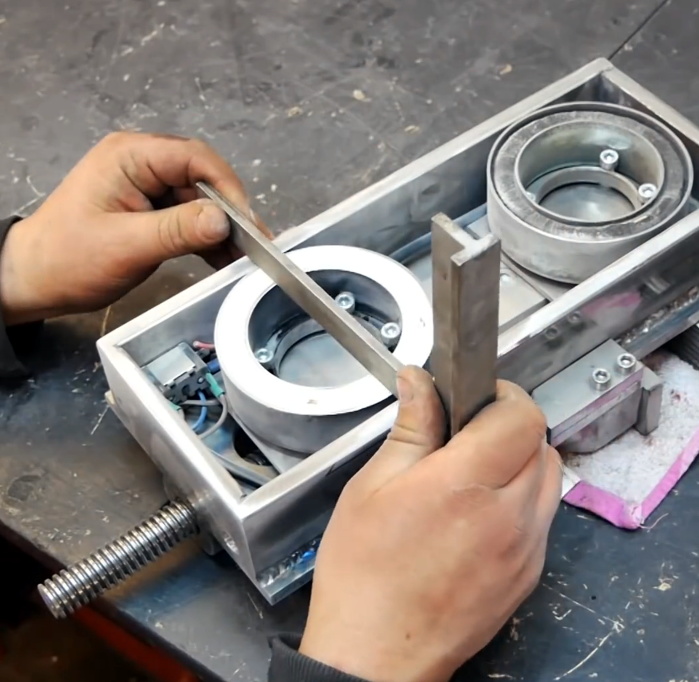
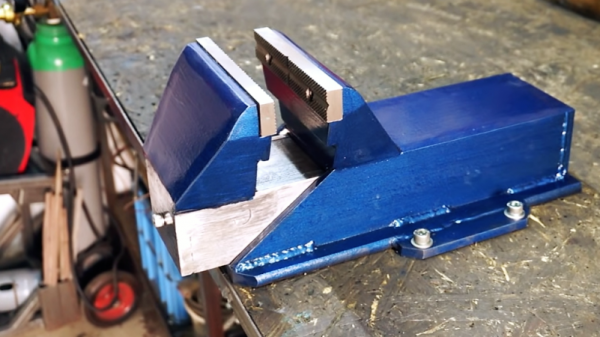
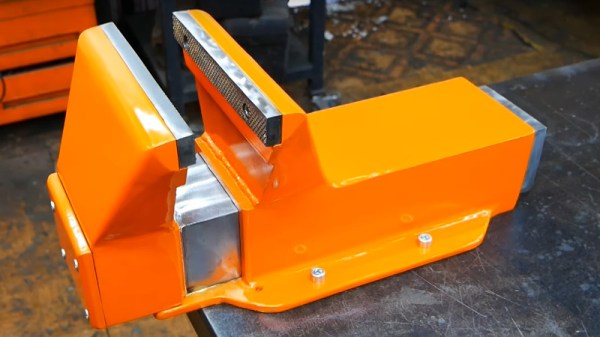
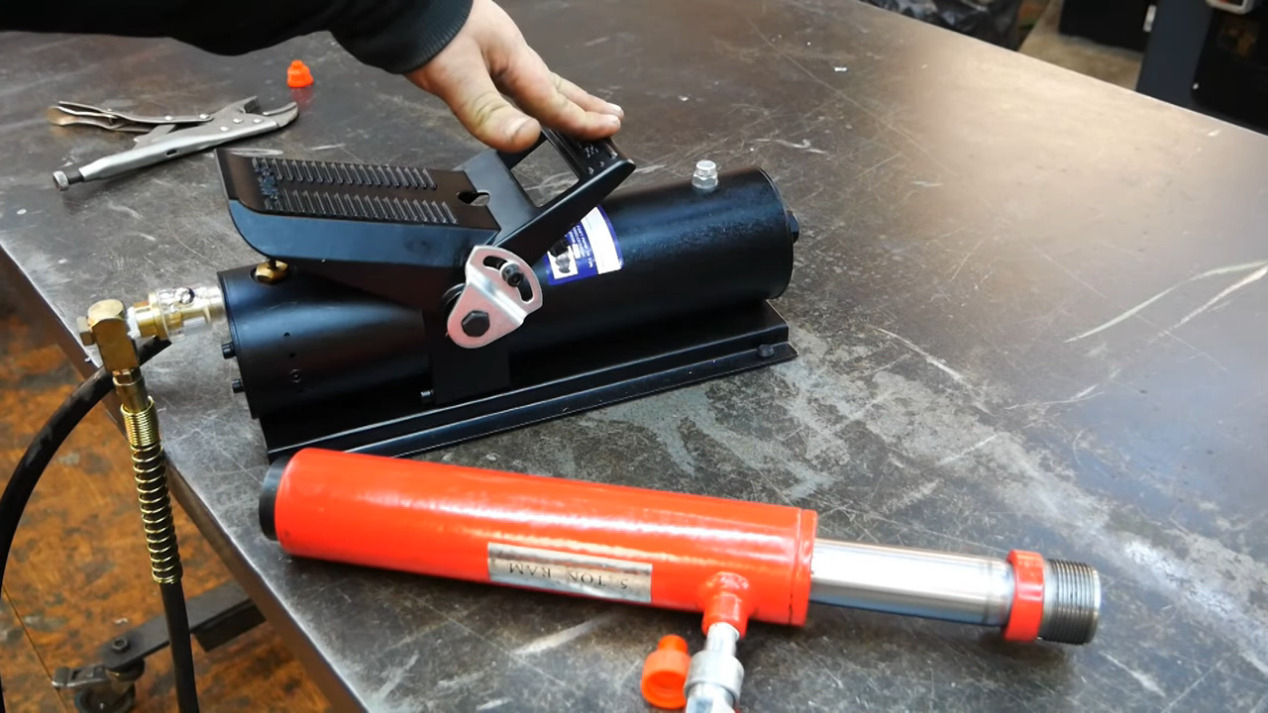
Unlike the lead screw we’d expect from a more conventional vise, this one uses a hydraulic pull cylinder and its associated compressor which is powered by compressed air. A substantial vise frame is constructed around the cylinder from thick steel plate, with some careful welding and grinding to ensure a smooth finish.  The result is substantial clamping force with a very smooth and quick action, which doesn’t overhang the edge of the bench in the way a more traditional one does. The hydraulic tube is tucked away through a hole in the bench, and the foot-operated pump lies out of sight on the floor.

Looking at this vise with blacksmith-trained eyes, it raises the question of how it might perform were something in it to be hammered. Overhanging vises are vulnerable to splitting when hammered, so there’s the possibility that this one with its flat mounting might fare a little better. Either way it would be an asset to any workshop.

When it comes to vises, [Workshop From Scratch] is where we saw that magnetic vise earlier last year.

Continue reading “A Hydraulic Bench Vise, Made On The Bench”

Giant Blacksmith Vise From Start To Finish

In any proper workshop you want to be able to securely hold a workpiece, whether it’s a tiny PCB or a heavy piece of forged steel. [Jason Marburger] from Fireball Tool needed a really large heavy-duty vise, so he built himself a massive 1490 lbs / 676 kg floor-standing blacksmith vise from scratch.

Blacksmith vises are designed to take a lot of heavy abuse, such as holding heavy pieces of steel that are being hammered. [Jason]’s vise stands about 3 feet tall, and the main frame components were cut from 1 5/8 inch (41.3 mm) steel with a water jet cutter. The jaws are operated with a large hand wheel connected to a lead screw. Bearings on the lead screw allow the hand wheel to be spun like a flywheel, allowing it to be quickly opened and closed. The weight of the moving jaw keeps the lead screw under tension, eliminating any backlash. This allows for really fine control over the holding force, which [Jason] demonstrates by carefully clamping a tiny screw. With the hand wheel alone the vise can exert 12880 lb / 5800 kg, but a hydraulic lift was also added, boosting the force to 30000 lbs. The deep throat allows a large object to be clamped, and the jaws can also be offset to clamp something to the side of the vise.

The vise was beautifully finished with powder coating and pin striping, which will no doubt wear over time if it’s properly used, but the vise itself should last a few lifetimes. While this isn’t something you can really build in a home workshop, it is always inspiring to see what is possible with a bit more tools, knowledge and skill. The build is documented in a 4 part series (link in first paragraph), but we’ve added a short highlights reel below for your viewing pleasure.

Continue reading “Giant Blacksmith Vise From Start To Finish”

A Geared Bench Vise To Clamp All The Things

On the eternal quest of workshop upgrades, [Alexandre Chappel] has combined woodworking and 3D printing to add a versatile 0.5 m wide vise with some clever internals to his workbench.

The challenge with such a wide vise is that it requires two timed lead screws on either end of the vise to prevent if from pulling skew under force. This can be done with a chain, belt, or [Alexandre]’s choice, gears. Inside the moving part of the vise he fitted series of 5 herringbone gears. By turning the center gear with a lever, it rotates the gears on the end which are fixed to tow lead screws. The external surfaces of the clamp are made with plywood, and the gears are printed with PLA and high infill percentage. [Alexandre] does say that he is not sure durable the gears are, but they definitely aren’t flimsy. He added an acrylic inspection window to the box section, which we think looks superb with the colored gears peaking through. The back of the vise is mounted inside the workbench, which keeps the look clean and doesn’t take up any bench space.

[Alexandre] does a lot of filming in his workshop, so recently he also built a very impressive and practical camera arm to avoid having to move tripods the whole time. A vise is a must-have tool in almost any workshop, so we’ve seen a few DIY versions, like magnetic base vise and one with a hydraulic vise.

Scratch Built Magnetic Vise Stays Where You Need It

For those who might not have run into one before, a magnetic vise is used when you want to quickly anchor something to a metal surface at an arbitrary position. They’re often used to hold the workpiece down when machining, and can be a real time saver if a lot of repositioning is involved.

[Workshop From Scratch] recently wanted to put together one of these handy pieces of gear, and as we’ve come to expect from his channel, the finished product is an absolute beast. Starting with little more than scraps of metal, the video after the break takes the viewer on a fascinating journey that ends with some demonstrations of the vise in action.

Conceptually, this build is relatively simple. Start with a vise, put a hollow base on it, and fit it with powerful electromagnets that will anchor it down once you flip the switch. Technically you could just build a magnetic base and bolt a commercially available vise onto it, but that’s not how [Workshop From Scratch] does things.

Every element of the build is done by hand, from the pattern cut into the jaws to the t-handle nut driver that gets adapted into a very slick crank. Of particular interest is how much effort is put into grinding down the surface of the electromagnets so they are perfectly flush with the base of the vise. Incidentally, these beefy electromagnets were salvaged from automotive air conditioning compressors, so you might want to add that to your junkyard shopping list.

Eagle-eyed readers might recognize the surface [Workshop From Scratch] uses the vise on as the custom drill press table he built a few months ago. These videos are not only reminders of what you can accomplish when you’ve mastered the use of a few common tools, but just how much design and thought goes into the hardware many of us take for granted.

Continue reading “Scratch Built Magnetic Vise Stays Where You Need It”

3D Printed Parts Let You Hold Work The Way You Want

Fixturing and work holding can be huge problems for hackers. Let’s face it – that $5, alligator clip-festooned “Helping Hand” is good for only the smallest of workpieces, and the problem only gets worse as the size scales up. One can jury rig fixtures for things like microscopes and lights, but a systematic approach like this 3D-Printed work fixturing Erector Set really appeals to our need for organization.

As [Tinkers Projects] explains it, the genesis of this project came from a need to mount a microscope firmly over a PCB. Rather than build a one-off fixture, the idea of a complete system of clamps and connectors seemed to make more sense. Based on 10-mm aluminum rods and a bewildering number of 3D-printed pieces, the set has just about everything needed to fixture pretty much anything. There’s a vertical element that acts as the central support, connectors for putting another rod perpendicular to that, plus neat attachments like a three-fingered clamp for small cylindrical objects and a couple of blocks that act like a stick-vise for PCBs and similar workpieces. And yes, there’s even a fixture with alligator clips. The whole thing seems very well thought out and has a little mad scientist vibe to it, but while some fixtures look as if they came right from the chemistry lab, we’d be cautious about chemical compatibility and use near heat sources.

[Elliot Williams] did a rundown of what people are using for helping hands a couple of years ago which made us covet articulating dial indicator arms for our bench. Still, [Tinkers Projects]’ approach has a lot of appeal and is probably cheaper and more versatile to boot.

Homemade Shop Vise Packs A Hydraulic Punch

It’s a sad day when one of the simplest and generally most reliable tools in the shop – the bench vise – gives up the ghost. With just a pair of beefy castings and a heavy Acme screw, there’s very little to go wrong with a vise, but when it happens, why not take it as an opportunity to make your own? And, why not eschew the screw and go hydraulic instead?

That’s the path [Darek] plotted when his somewhat abused vise reached end-of-life with an apparently catastrophic casting failure. His replacement is completely fabricated from steel bar and channel stock, much of it cut on his nifty plasma cutter track. The vice has a fixed base and rear jaw, with a moving front jaw. Hiding inside is a 5-ton single-acting hydraulic cylinder. A single acting cylinder won’t open the vise on its own, so [Darek] came up with a clever return mechanism: a pair of gas springs from a car trunk.

With a pair of hardened steel jaws, some modifications to the power cylinder to allow foot operation, and a spiffy paint job, the vise was ready for service. Check out the build in the video below; we’re impressed with the power the vise has, and hands-free operation is an unexpected bonus.

Yes, most people buy vises, but from the small to the large, it’s nice to see them built from scratch too.

Continue reading “Homemade Shop Vise Packs A Hydraulic Punch”

Dollar Store Helping Hands For Soldering

Although [I Love To Make] appears to have text in Chinese, their recent video (see below) is like a wordless workshop so it won’t matter if you are up on your Mandarin or not. The soldering vise looks like it mostly came from a dollar store (or perhaps a yaun store).

As far as we can tell, the assembly is two utility clips like you might use on a cork board or to seal up chips, a Micro SIM cutter, and TV rabbit ears. Oh, and a syringe. The rabbit ears get mostly destroyed in the build process. You have to do some cutting and plastic melting, too (we might have used a drill), but nothing you couldn’t do with some simple hand tools. They don’t show it, but apparently, they drilled a hole in the SIM cutter, so you’ll need a drill anyway.

Continue reading “Dollar Store Helping Hands For Soldering”