Building An Electric Scooter That’s Street Legal, Even In Germany

Sometimes a successful project isn’t only about making sure all the electrons are in the right place at the right time, or building something that won’t collapse under its own weight. A lot of projects involve a fair amount of social engineering to be counted as a success, especially those that might result in arrest and incarceration if built as originally planned. Such projects are often referred to as “the fun ones.”

For the past few months, we’ve been following [Bitluni]’s DIY electric scooter build, which had been following the usual trajectory for these things – take a stock unpowered scooter, replace the rear wheel with a 250 W hub motor, add an ESC, battery, and throttle, and away you go. Things took a very interesting turn, however, when his street testing ran afoul of German law, which limits small electric vehicles to a yawn-inducing 6 kph. Unwilling to bore himself to death thus, [Bitluni] found a workaround: vehicles that are only assisted by an electric motor have a much more reasonable speed limit of 25 kph. So he added an Arduino with a gyro and accelerometer module and wrote a program to only power the wheel after the rider has kicked the scooter along a few times – no throttle needed. The motor stops after a bit, needing another push or two to kick it back on. A brake lever kills the motor, as does laying the scooter on its side. It’s quite a clever design, and while it might not keep the Polizei at bay, you can’t say he didn’t try.

[Bitluni] has quite a range of builds, from software-defined television to bad 3D-scanners to precision wine glass whacking. You should check out his stuff. Continue reading “Building An Electric Scooter That’s Street Legal, Even In Germany”

Homemade Shop Vise Packs A Hydraulic Punch

It’s a sad day when one of the simplest and generally most reliable tools in the shop – the bench vise – gives up the ghost. With just a pair of beefy castings and a heavy Acme screw, there’s very little to go wrong with a vise, but when it happens, why not take it as an opportunity to make your own? And, why not eschew the screw and go hydraulic instead?

That’s the path [Darek] plotted when his somewhat abused vise reached end-of-life with an apparently catastrophic casting failure. His replacement is completely fabricated from steel bar and channel stock, much of it cut on his nifty plasma cutter track. The vice has a fixed base and rear jaw, with a moving front jaw. Hiding inside is a 5-ton single-acting hydraulic cylinder. A single acting cylinder won’t open the vise on its own, so [Darek] came up with a clever return mechanism: a pair of gas springs from a car trunk.

With a pair of hardened steel jaws, some modifications to the power cylinder to allow foot operation, and a spiffy paint job, the vise was ready for service. Check out the build in the video below; we’re impressed with the power the vise has, and hands-free operation is an unexpected bonus.

Yes, most people buy vises, but from the small to the large, it’s nice to see them built from scratch too.

Continue reading “Homemade Shop Vise Packs A Hydraulic Punch”

One Man’s Quest To Build His Own Speakers

Why build your own stereo speakers? Some people like to work on cars in their garage. Some people build fast computers. Others seek the perfect audio setup. The problem for a newcomer is the signal to noise ratio among audiophile experts. Forums are generally filled with a vocal group of extremists obsessing on that last tiny improvement in some spec.  It can be hard for a beginner to jump in and learn the ropes.

[Ynze] had this problem. He’d finished a custom amplifier and decided to build his own speakers. He found a lot of spirited debates about what was important for good speakers. He tried to wade through the discussions and determine which things had real practical value. The results and his speaker build are documented in a post that you’ll want to check out if you would like to design and build your own speakers.

Some of the topics ranged from solder type to capacitor construction and 700 Euro capacitors. [Ynze’s] goal was to build something that sounded good while keeping costs in line. He claims he spent about 250 Euro and wound up with speakers equivalent to 750 Euro store-bought speakers.

Continue reading “One Man’s Quest To Build His Own Speakers”

Racing The Beam And Dropping Some Beats

The heart of the Atari 2600 wasn’t the 6502 (or the 6507 for the pedants), it was the TIA chip. This is the chip responsible for drawing graphics on the display, racing the beam, and extremely limited support for sound generation. We haven’t seen many attempts of using the Atari 2600 for chiptunes, but that doesn’t mean it can’t be done. [John Sutley]’s Syndrum, a take on an Atari 2600 drum machine is nearly a work of art. It’s a custom cartridge for the wood-paneled Atari, and an impressive input device that turns this classic console into a beat machine

Did the Atari 2600 ever come with a drum machine cartridge? Maybe. Probably not. [John] originally built this project to experiment with the TIA chip, but found it was less tonal than a kazoo. That struck ‘Atari synthesizer’ off the list and replaced it with an ‘Atari drum machine’. There are two key parts of the build here, the first being a repurposed Asteroids cartridge that had the PROM replaced with a ZIF socket. This allows [John] to easily burn new code to an EEPROM, stuff it in the socket, and run it on the Atari. All the code was developed with batari Basic, a BASIC-inspired language that spits out .bin files for the Atari.

But running code on the Atari is just one half of this build. To do a drum machine, you somehow need to tell the Atari when to play each sound. Given the lack of expansion capabilities for the Atari, [John] turned to the controller port. The Syndrum uses Arduino Nano to bridge the DE9 controller connector to a MIDI port. Yes, it’s real MIDI, on a machine that could probably never do MIDI natively (although we’d love to see someone try).

Need a video of this mind-blowing hack in action? Here you go:

Continue reading “Racing The Beam And Dropping Some Beats”

The Spirit Of The 80s Lives On In A MIDI Harmonica

In the 1980s, there was a synthesizer that you could play like a harmonica. This device was called the Millioniser 2000. It utilized HIP (Harmonica In Principle) technology. The Millioniser 2000 was a breath controller wrapped in chrome-colored plastic embossed with its logo in an odd, pre-vaporwave aesthetic, and connected to a gray and green sheet metal enclosure loaded up with DIN jacks. The Millioniser 2000 is absolutely the pinnacle of late 70s, early 80s design philosophy. If it were painted brown, the Universe would implode.

Because of the rarity and downright weirdness of a harmonica synthesizer from the 80s, prices on the used market are through the roof. Musicians are a weird bunch. However, this does give someone the opportunity to recreate this bizarre instrument, and that’s exactly what [John Lassen] did for his entry for the Hackaday Prize.

While this isn’t as complex as the Millioniser 2000, it does have the same basic user interface. There’s a pressure sensor that measures how much you’re blowing. There’s a slider to change which notes are played, and there are a few buttons to change parameters, like the MIDI channel, a midi controller, or a transpose function. The electronics, like so many of the entries to the Musical Instrument Challenge in the Hackaday Prize, are built around the Teensy and it’s incredible audio library.

Sidney Darlington

In a field where components and systems are often known by sterile strings of characters that manufacturers assign or by cutesy names that are clearly products of the marketing department and their focus groups, having your name attached to an innovation is rare. Rarer still is the case where the mere mention of an otherwise obscure inventor’s name brings up a complete schematic in the listener’s mind.

Given how rarely such an honor is bestowed, we’d be forgiven to think that Sidney Darlington’s only contribution to electronics is the paired transistor he invented in the 1950s that bears his name to this day. His long career yielded so much more, from network synthesis theory to rocket guidance systems that would eventually take us to the Moon. The irony is that the Darlington pair that made his name known to generations of engineers and hobbyists was almost an afterthought, developed after a weekend of tinkering.

Continue reading “Sidney Darlington”

Putting A Motor Inside A Speed Controller

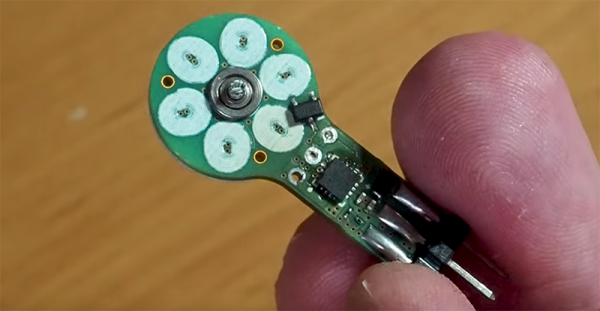
One of the more interesting hacks we’ve seen this year is [Carl]’s experimentations with making motors out of PCBs. Honestly, it’s surprising no one has done this before — a brushless motor is just some coils of wire and a few magnets; anyone can turn some coils into traces and make a 3D print that will hold a few magnets. This latest advancement is something else entirely. It’s a motor and an electronic speed controller all in one.

This project is a continuation of [Carl]’s PCB motor project, which started with him routing coils for a brushless motor as traces in a circuit board. Previously, we’ve seen [Carl]’s motor spinning on its own with the help of a small hobby ESC / motor controller meant for model planes and drones. This time, we’ve got something different. It’s an entire controller and motor, integrated into one single PCB.

This is a very, very small motor and ESC combo. The motor driver is a 3x3mm QFN package, and most of the other components are 0201. The main parts are a very tiny triple half-bridge motor driver and a PIC16F microcontroller. This PIC reads a hall sensor to detect the speed of the motor, and with just three pins — power, ground, and a PWM pin — this motor can spin at a set speed.

The future goals of this project are to make it work just like any other hobby ESC — just plug it into a servo controller and let ‘er rip. Since this motor with an integrated PCB requires only three connections, we’re looking at a great tool to add motion and rotation to any project. It’s fantastic, and we can’t wait to see something like this in robots, toys, and other home goods.

Continue reading “Putting A Motor Inside A Speed Controller”