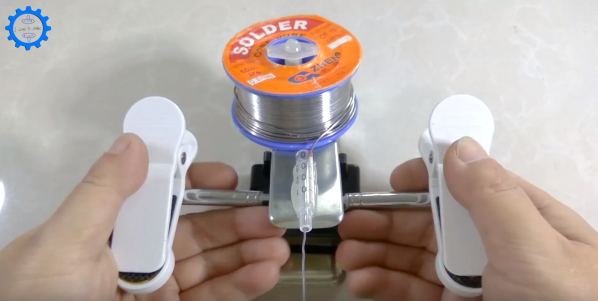
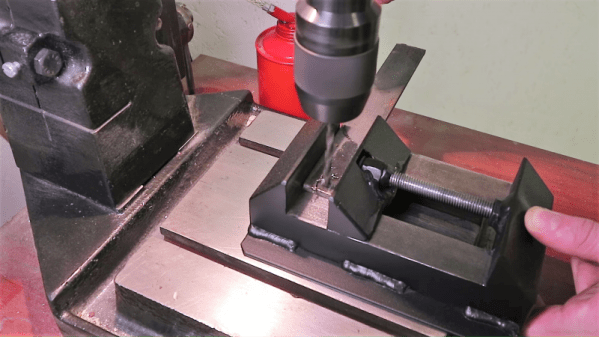
Leather Working With A 3D Printer

No, you can’t print in leather — at least not yet. But [Make Everything] has a tutorial about how to produce a custom leather embossing jig with a 3D printer. From a 3D printing point of view, this isn’t very hard to do and you might want to skip over the first six minutes of the video if you’ve done 3D printing before.

The real action is when he has the 3D print completed. He glues the stamp down to some wood and then fits the assembly to a vise that he’ll use as a press. After wetting the leather, the wood and 3D printed assembly sandwiches the piece and the vise applies pressure for ten minutes. He did make the leather a bit oversized to make alignment more forgiving. After the embossing is complete, he trims it out.

Continue reading “Leather Working With A 3D Printer”

Universal Quick-Release Bar Clamps

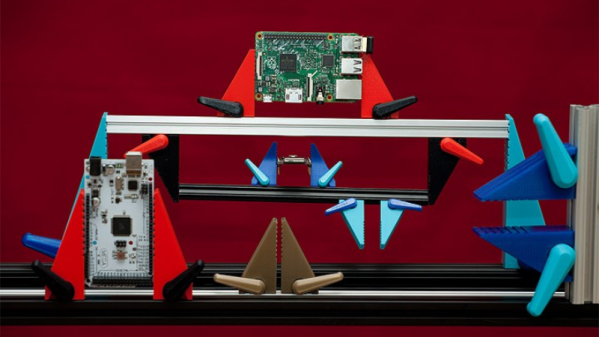
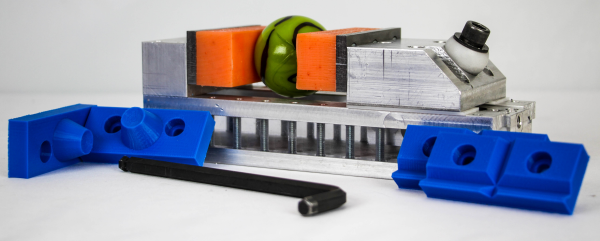
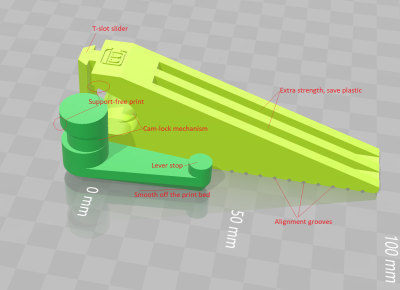
The typical hacker can never say no to more tools. And when it comes to clamps, one just can’t have enough of them. From holding small PCB’s to clamping together large sheets of plywood, you need a variety of sizes and quantities. So it would be pretty neat if we could just 3D print them whenever needed. [Mgx3d] has done that by designing 3D printable bar clamp jaws with a quick release mechanism that can be used with standard T-slot aluminum extrusion. This allows you to create ad-hoc bar clamps of any size and length quickly.

The design consists of two pieces – the jaw and its quick release lever, and does not require any additional parts or fasteners for assembly. Both pieces can be easily 3D printed without supports. The quick release lever is a simple eccentric cam design which locks the jaw in place by pushing down on the extrusion. The design is parametric and can be easily customized for different sizes, either in OpenSCAD or via the online customizer.  The online customizer supports Misumi 15 mm and 20 mm extrusion, 1″ 1010-S and 20 mm 20-2020 from 80/20 Inc., 15 mm from OpenBeam and 10 mm from MicroRax. But it ought to be easy to create fresh designs in OpenSCAD. Check out the video after the break to see the bar-clamps in action.

If you’d like to start equipping your shop with more 3D printed tools, look no further. We’ve featured many types over the years, such as the StickVise and its Gooseneck System, this 3D printed rubber band PCB Vise, and even a 3D printed Mini-Lathe.

Continue reading “Universal Quick-Release Bar Clamps”

Your Work Won’t Move With A Magnetic Drill Press Vise

Setting up your workpiece is often the hardest part of any machining operation. The goal is to secure the workpiece so it can’t move during machining in such a way that nothing gets in the way of the tooling. Magnetic chucks are a great choice for securely and flexibly holding down workpieces, as this simple shop-built electromagnetic vise shows.

It looks like [Make It Extreme] learned a thing or two about converting microwave oven transformers to electromagnets when they built a material handling crane for the shop. Their magnetic vise, designed for a drill press but probably a great choice for securing work to a milling machine, grinder, or even a CNC router, has a simple but sturdy steel frame. Two separate platforms slide on the bed of the vise, each containing two decapitated MOTs. Wired to mains power separately for selective control and potted in epoxy, the magnets really seem to do the job. The video below shows a very thick piece of steel plate cantilevered out over one magnet while having a hole cut; that’s a lot of down force, but the workpiece doesn’t move.

Like the idea of a shop-made vise but would rather go the old-fashioned way? Check out [Make It Extreme]’s laminated bench vise, which also makes an appearance in this video.

Continue reading “Your Work Won’t Move With A Magnetic Drill Press Vise”

Need To Hold Something? Build A Custom Vise

The only thing better than making a cool project is making a cool project that helps make more projects! Case in point, [Greg Stephens] and [Alex] wanted to colorize steel bearings for use in a Newton’s Cradle desk toy. After trying out a torch and not liking it, [Greg] and [Alex] decided to build custom aluminum vise to hold the sphere while it sits in the magnetic induction forge.

Their vise–they call it the Maker’s Vise0–isn’t just a one-off project to help make the cradle. [Alex] and [Greg] aspire to create a tool useable for a wide variety of projects. They wanted it to be oil-less and it had to be customizable. Ideally it would also have an acceptable grip strength, be easy to use, and look good on the bench.

[Greg] and [Alex] have set up a Hackaday.io project, and their logs show a lot of progress with two finished iterations of the vise and a variety of 3D-printed and cast parts to go with. Recently they brought in a 2,000-lb. load test and tested it on their vise collection, including the two prototypes. Version one rated at 500 lbs. reasonable clamping pressure–meaning they didn’t exert themselves to max out the pressure. Version two sits at 800 lbs., still nothing like a desk vise but far stronger than a Panavise, for instance.

Their magnetic induction forge project was also a success, with the team able to quickly change the color of a steel ball. Check out a video after the break…

Continue reading “Need To Hold Something? Build A Custom Vise”

Cheap Helping Hands: Just Add Time

We think of helping hands as those little alligator clips on a metal stand. They are cheap and fall over, so we tend to buy them and don’t use them. However, if you are willing to put $35 or $40 into it, you can get the newer kind that have–well–tentacles–on a heavy base.  [Archie_slap] didn’t want that kind of investment, so he made his own for about $10. We think that’s Australian dollars, so that’s even less in the United States.

What’s better is he documented every step in meticulous detail and with great pictures. You probably won’t directly duplicate his project because you will probably pick up a slightly different base, but that’s not hard to figure out. The arms are actually coolant hose, [Archie_slap] picked up almost everything but the base plate on eBay.

It’s obvious [Archie] is a frugal guy, based on his drill press. It gets the job done, though. The build is attractive and looks like a much more expensive commercial product. Some of us around the Hackaday lab are old enough to wish there was a magnifying glass attached, but maybe that’s version two.

We’ve looked at a lot of different helpers recently. We couldn’t help but think about a somewhat similar Gorillapod holder we covered last year.

Building A Metalworking Vise, Layer By Layer

Machine shop wisdom says the lathe is the king of machine tools. We ascribe to that belief, although the common aphorism that the lathe is the only tool that can make copies of itself seems a bit of a stretch. But in the shadow of the almighty lathe is a tool without which even the simplest projects would be vastly more difficult: the lowly vise. Trouble is, finding a good vise can be a tall order. So why not take matters into your own hands and build this very sturdy vise from scratch?

Most commercially available vises are made from a couple of large castings, but as complete as [MakeItExtreme]’s metalworking shop has become, casting molten iron is not a tool in their kit — yet. So they turned back to what they know and welded up the body and jaw of the vise from mild steel. The video below shows the long sessions of welding and grinding that bring the body and the jaw into being, in the process consuming miles of MIG wire. The main screw is cut from stainless steel and threaded with the correct Acme form for such a high load application, especially given the mechanical advantage the long handle provides. The jaws have dovetails for replaceable inserts, too, which is a nice touch that’s hard to find on commercial units.

Vises on Hackaday tend to the lighter duty varieties, such as a 3D-printed vise, the Stickvise for PCBs, or even a fancied-up woodworking vise. It’s nice to see a heavy metal build for a change.

Continue reading “Building A Metalworking Vise, Layer By Layer”

Ask Hackaday: Helping Hands

[ProtoG] sent us in this video (also below) where he demonstrates the use of machinist’s dial-gauge indicator arms as helping hands. I’ll admit that I got so jealous that I ordered a pair. I wouldn’t say that I need more tools to hold things in place, but I certainly want them. The rapid coarse placement combined with fine adjustment looks so sweet. Using them as scope-probe holders is brilliant.

Our own helping hands, purchased for $5 from a surplus shop, have seen nearly twenty years of use now. About ten years ago, I heat-shrinked and plasti-dipped the jaws, and since then they do less damage to cable insulation. The clips kept coming loose, but that was fixed with a little epoxy. I never used the magnifying glass, and by removing it I bought some more sliding room for the jaws, which was an easy win. The base has a “non-slip” coating of Shoe-Goo that keeps it in place on the desk. Cork might be classier.

For bigger holding, there’s always the desk vise, though I’ll admit that I mostly use it for holding PCBs while soldering, and that a better solution for that particular task wouldn’t hurt. [Mike Szczys] tells me that the Stickvise seen here is a handy thing to have on the bench. It started on Hackaday.io and we still carry it in the store.

For grabbing the fiddly little things, nothing beats a pair of hemostats and a range of tweezers. Hemostats in the desk vise make a great ad hoc holder. Good sharp tweezers pay for themselves with the first removed splinter, or placing SMT parts.

So, Hackaday, what do you use for holding things? What do you hold your PCBs with while soldering? What do you use to hold down SMD parts? What’s your third hand, or twenty-third? Continue reading “Ask Hackaday: Helping Hands”