Blazing Fast Raspberry Pi Display Driver Will Melt Your Face Then Teach You How

Reader [poipoi] recently wrote into our tip line to tell us about an “amazingly fast” Raspberry Pi display driver with a README file that “is an actual joy to read”. Of course, we had to see for ourselves. The fbcp-ili9341 repo, by [juj], seems to live up to the hype! The software itself appears impressive, and the README is detailed, well-structured, educational, and dare we say entertaining?

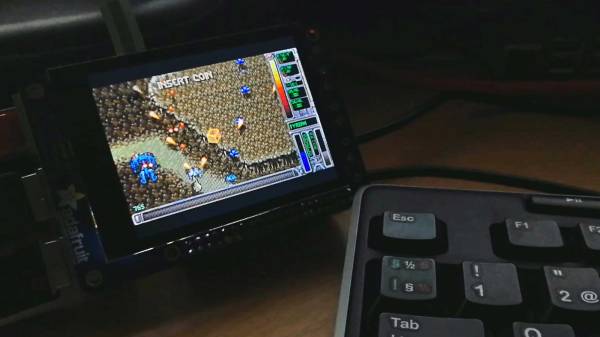
The driver’s main goal is to produce high frame rates — up to around 60 frames per second — over an SPI bus, and it runs on various Raspberry Pi devices including the 2, 3 and Zero W. Any video output that goes to the Pi’s HDMI port will be mirrored to a TFT display over the SPI bus. It works with many of the popular displays currently out there, including those that use the ILI9341, ILI9340, and HX8357D chipsets.

The techniques that let [juj] coax such frame rates out of a not-terribly-fast serial bus are explained in detail in the README’s How it Works section, but much of it boils down to the fact that it’s only sending changed pixels for each frame, instead of the full screen. This cuts out the transmission of about 50% of the pixels in each update when you’re playing a game like Quake, claims the author. There are other interesting performance tweaks as well, so be sure to check out the repo for all the details.

There’s a video comparing the performance of fbcp-ili9341 to mainline SPI drivers after the break.

Continue reading “Blazing Fast Raspberry Pi Display Driver Will Melt Your Face Then Teach You How”

Stock Looking PSP Hides A Raspberry Pi Zero

We don’t see that many PSP hacks around these parts, perhaps because the system never attained the same sort of generational following that Nintendo’s Game Boy line obtained during its heyday. Which is a shame, as it’s really a rather nice system with plenty of hacking potential. Its big size makes it a bit easier to graft new hardware into, the controls are great, and there’s no shortage of them on the second-hand market.

Hopefully, projects like this incredible “PiSP” from [Drygol] will inspire more hackers to take a second look at Sony’s valiant attempt at dethroning Nintendo as the portable king. With his usual attention to detail, he managed to replace the PSP’s original internals with a Pi Zero running RetroPie, while keeping the outside of the system looking almost perfectly stock. It wasn’t exactly a walk in the park, but we’d say the end definitely justifies the means.

The first half of the project was relatively painless. [Drygol] stripped out all the original internals and installed a new LCD which fit so well it looks like the thing was made for the PSP. He then added a USB Li-ion charger board (complete with “light pipe” made out of 3D printer filament), and an audio board to get sound out of the usually mute Pi Zero. He had some problems getting everything to fit inside of the case. The solution was using flat lithium batteries from an old Nokia cell phone to slim things down just enough to close up the PSP’s case with some magnets.

What ended up being the hardest part of the build was getting the original controls working. [Dyrgol] wanted to use the original ZIF connector on the PSP’s motherboard so he wouldn’t have to modify the stock ribbon cable. But it was one of those things that was easier said than done. Cutting out the section of PCB with the connector on it was no problem, but it took a steady hand and a USB microscope to solder all the wires to its traces. But the end result is definitely a nice touch and makes for a cleaner installation.

We’ve covered the exciting world of PSP homebrew, and even DIY batteries built to address the lack of original hardware, but it’s been fairly quiet for the last few years. Here’s hoping this isn’t the last we’ve seen of Sony’s slick handheld on these pages.

Continue reading “Stock Looking PSP Hides A Raspberry Pi Zero”

Hackaday Links Column Banner

Hackaday Links: October 21, 2018

A few weeks ago, we got word [Fran] was being kicked out of her workshop. You might remember [Fran] from her exploits in reverse engineering the launch computer for the Saturn V, her work on replicating the DSKY from an AGC, her visit to the Air & Space Museum annex (so jealous), and her other musical adventures. Why is she getting kicked out? Philly’s getting gentrified, ya jabroinis. Now, there’s a GoFundMe for a new Fran Lab. Go on and ring that bell.

Everyone needs a Sharpie sitting around, so how about one that weighs a pound or so? [MakingStuff] created a new body for a big ‘ol Sharpie marker, complete with knurling. Oh, man, the knurling.

A Powerball ticket costs $2. Last Friday, the expected return on a single Powerball ticket was more than $2. This doesn’t happen often, but last Friday the most logical course of action for everyone was to buy all the Powerball tickets they could.

Boston Dynamics built another dog robot and made it dance to Uptown Funk because we haven’t heard that song enough. No one has listened to Uptown Funk enough times in their life. It’s a great song that never gets old or overplayed.

[Wintergatan] is building a drum machine. You might remember this artisan of plywood from various marble machine builds that also play music. This build goes deep into the techniques of building gigantic mechanical contraptions out of plywood and steel.

Speaking of plywood, Rockler had a contest a while back to build something out of a single sheet of plywood. [OSO DIY] came up with the most interesting table I’ve ever seen. A lot of the entries into this plywood contest turned the plywood on its end, resulting in something that looks like it’s made out of skateboard decks. [OSO DIY]’s coffee table is no exception; it’s basically just a panel of edge-grain plywood made into a table. Where this gets really good is the actual design of the table. It’s clearly a mid-century modern piece, with threaded inserts holding the legs on. However, instead of something that was pressed out of a factory, this table just exudes an immense amount of manual labor. It’s a counterpoint between craftsmanship and minimalist design rendered in plywood and by far one of the most interesting pieces of furniture made in the last few years. Here are some more entries that also capitalize on edge-grain plywood

The Polyphonic Analog/Digital Synth Project

[Matt Bradshaw]’s entry in the Hackaday Prize is Polymod, a modular digital synthesizer which combines the modularity of an analog synth with the power of a digital synth. Each module (LFO, Envelope Generator, Amplifier, etc.) are connected with audio cables to others and the result is processed digitally to create music.

The synth is built with a toy keyboard with each key having a tactile switch underneath it, contained inside a wooden case upcycled from a bookshelf found on the street. Each module is a series of potentiometers and I/O jacks with a wooden faceplate. The modules are connected to sockets on the main board and are held in place with thumbscrews so that the modules can be easily switched out. Each module can be connected to others using audio cables, the same way modular analog synths are connected.

The main board contains a Teensy 3.6 and a Teensy Audio Adapter creates the audio for the synth. Software that [Matt] wrote runs on the Teensy and allows the digital synthesizer to run in either monophonic or polyphonic modes. In polyphonic mode, the software creates digital copies of each module to allow the playing of chords. The Teensy scans up to eight module sockets and for each module that it finds, it reads the potentiometer value as well as the status of the I/O jacks. The keyboard buttons are converted to a control voltage which can be sent to any of the modules to create a melody.

[Matt] has created a great synth that combines benefits of both analog and digital synths together and the result is an inexpensive modular synth that can create some really cool sounds. Check out the videos after the break. In the meantime, take a look at this mess of wires and this article on a slew of open-source synthesizers.

Continue reading “The Polyphonic Analog/Digital Synth Project”

Turning The Deep Note Into A Game

One of the most famous pieces of computer-generated music is the Deep Note, the audio trademark for THX. It begins with a dozen or so voices, randomly tuned between 200 and 400 Hz, then glissandos to a frequency spread of three octaves. Put that through a few thousand watts of a speaker system, play it before Jedi, and the audience will be listening.

The original THX Deep Note was created on hundreds of thousands of dollars worth of hardware running 20,000 lines of code, but that was in 1983. Now we have cheap microcontrollers, so of course, you can now fit the Deep Note in your pocket. You can even make it a game. That’s exactly what [Bob] did with his Deep Synth. It’s the Deep Note, in a Game Boy-ish format.

The hardware for this build is the 1Bitsy 1UP, a retro-inspired handheld game console from [Bob]’s friend [Pitor]. Onboard the 1Bitsy is an STM32 F4 running at 168 MHz with a 2.8″ LCD, SD card reader, and the traditional Game Boy control scheme. All the games are up to you.

[Bob] wrote an audio driver for the 1UP, but needed a good audio demo. Since the Deep Note was a good enough demo for Lucasfilms, it would obviously be a good enough demo for a microcontroller. In far less than 20,000 lines of code, [Bob] made the 1UP polyphonic, and it was surprisingly fast enough to synthesize around thirty oscillators. It actually sounds like the Deep Note, too. You can check out a video (and audio) of that after the break.

Continue reading “Turning The Deep Note Into A Game”

What The Hack Is This Thing?

Let’s play a guessing game. Shown here is a sneak peek at the rear view of a hardware demo being built specifically for the Hackaday Superconference in Pasadena this November 2-4. It’s sure to be a crowd pleaser when finished, but if you’re anything like us, studying what’s behind the finished face of a project like this is even more satisfying than seeing the final product.

If you think you know what it is, you can score yourself a free hardware badge from the conference! Leave a comment below with your best guess about what this is — we’ll pick whoever is closest to win the badge.

Want a closer look? Click here to embiggen.

Update: We have a winner!

It didn’t take long at all for Zardam to realize this a replicate of the console for the Hal 9000 computer from 2001: A Space Odyssey. Congrats!

Some comments on the build from Voja Antonic:

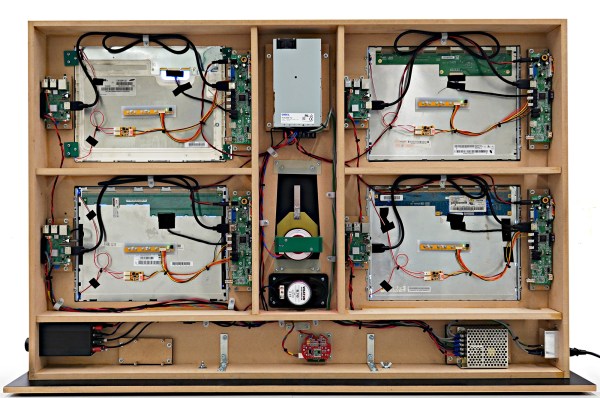
The red round board at the bottom is the PIR motion sensor, the part of another project which is not related neither to HAL nor to the badge. There is a clearly visible 915 MHz module, which is disconnected and has no function in this project.

It is connected to the lower left Raspberry just because it has to be supplied with about 3V and it uses Raspberry’s LDO. It also generates Reset signal for all four Raspis, as it turned out that the 5V supply (bottom right) delivers the slow-rise voltage when turned on, so Raspis won’t boot at all without the external Reset.

When someone walks in front of HAL, motion sensor randomly triggers one of 30 HAL’s sentences from the movie. That’s why the lower left Raspberry is connected to the amplifier and has an extra wire from the motion sensor board to GPIO 24.

And the demo video:

The Prize for Guessing Correctly:

Voja Antonics builds beautiful hardware. The Hackaday Superconference badge is a piece of art, as is the Hal 9000 console. Voja will be at Supercon along with hundreds of other awesome hackers. Come join us for a weekend you’ll never forget!

HTTPS For The Internet Of Things

Every day, we’re connecting more and more devices over the internet. No longer does a household have a single connected computer — there are smartphones, tablets, HVAC systems, deadbolts — you name it, it’s been connected. As the Internet of Things proliferates, it has become readily apparent that security is an issue in this space. [Andreas Spiess] has been working on this very problem, by bringing HTTPS to the ESP8266 and ESP32. 

Being the most popular platform for IOT devices, it makes sense to start with the ESP devices when improving security. In his video, [Andreas] starts at the beginning, covering the basics of SSL, before branching out into how to use these embedded systems with secure cloud services, and the memory requirements to do so. [Andreas] has made the code available on GitHub so it can be readily included in your own projects.

Obviously implementing increased security isn’t free; there’s a cost in terms of processing power, memory, and code complexity. However, such steps are crucial if IOT devices are to become trusted in wider society. A malfunctioning tweeting coffee pot is one thing, but being locked out of your house is another one entirely.

We’ve seen other takes on ESP8266 security before, too. Expect more to come as this field continues to expand.

[Thanks to Baldpower for the tip!]