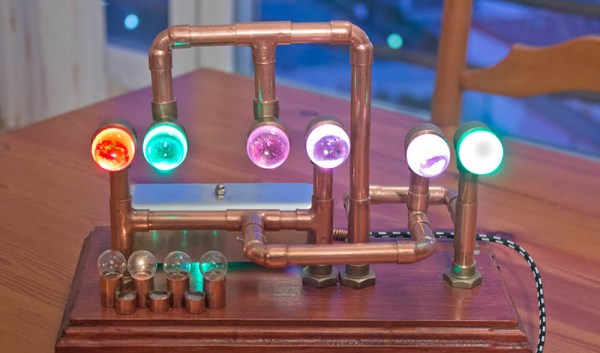
3 Nerds + 2 Days = Little Big Pixel

Two days at a company sponsored hackathon? Sounds like fun to us! And productive too – the end result for [GuuzG] and two of his workmates from their company’s annual “w00tcamp” was this festive and versatile 16×16 pixel mega display.

From the sound of it, [GuuzG] and his mates at q42.com are not exactly hardware types, but they came up with a nice build nonetheless. Their design was based on 16 WS2812 LED strips for a 256 pixel display. An MDF frame was whipped up with cross-lap joints to form a square cell for each pixel. Painted white and topped with a frosted Plexiglass sheet, each RGB pixel has a soft, diffuse glow yet sharply defined borders. Powered by a pair of 5A DIN rail DC supplies and controlled by a Raspberry Pi, the finished display is very versatile – users can draw random pixel art, play the Game of Life, or just upload an image. [GuuzG] and company are planning to add Tetris, naturally, and maybe a webcam for fun.

We’ve seen lots of uses for the ubiquitous WS2812 LEDs, from clocks to Ambilight clones to ground-effect lighting for an electric skateboard. But if you’re in the mood for a display that doesn’t use LEDs, there’s always this multithreading display.

[via Reddit]

The LED Roundsystem

Gavin Morris has been working on his awesome sound responsive LED sculptures for a while. Technically the sculpture is an interesting application of WS2812 RGB LEDs, Raspberry Pis and a load of styrofoam cups and flower pots. However the artistic development, and inspiration for this project is equally interesting. Gavin shares his thoughts and a brief technical description of the project below.

Continue reading “The LED Roundsystem”

Three Watt Individually Addressable RGB LEDs

While the gold standard for colorful blinky projects are individually controllable RGB LEDs, the usual offerings aren’t really that impressive. Yes, a few hundred Neopixels, WS2812, or other RGB LEDs will sear your retinas, but what if you wanted blinky glowy stuff that is so over the top as to be an affront to whatever creator you believe in?

This is it. [Ytai Ben-Tsvi] created an individually addressable RGB LED called the Pixie that is perfect for all the times when you need something bright, colorful, and want to blind a few people in the process.

WS2812s and Neopixels are basically RGB LEDs with a small microcontroller tucked tucked away inside, and so far there is no design house or fab plant in China that is crazy enough to add one of these tiny dies to an already overpowered LED. To build the Pixie, [Ytai] took a bare RGB LED module and added a microcontroller – a PIC12FF157X in this case. It’s not exactly a powerful microcontroller, but it can handle the shift register-like function of an individually addressable RGB, and adds gamma correction, over heating protection (something necessary when you’re dumping this much power into a tiny board, and other safeguards for each individual LED.

[Ytai] is working with Adafruit to produce these Pixies, and although they’re rather expensive at $15 per LED, you won’t need very many to blind yourself.

A Thousand LED Lights For Your Room

Sure, you could get a regular light fixture like a normal person… Or you could use close to a thousand RGB LEDs to light your room!

That’s what [Dmitry] decided to do after trying to figure out the best way to light his pad. You see, his room is 4 by 4 meters, and WS2812 RGB LED strips happen to come in 4 meter lengths… Coincidence? We think not.

The problem with using 16 meters of LED strips is powering them… You see, at 16 meters, you’re looking at about 5V @ 57.6A — and we’re guessing you probably don’t have a 5V 60A power supply handy. Not to mention if you run them in series, the resistance of the system is going to kill your efficiency and the last LEDs probably won’t even work… So [Dmitry] had to break the system up. He has two power supplies feeding the strips from the middle of each pair — that way, he doesn’t have to worry about any voltage drops due to the length of the strips.

Continue reading “A Thousand LED Lights For Your Room”

Because Burning Man Needed More LEDs

There are a lot of blinky glowy things at Burning Man every year, and [Mark] decided he would literally throw his hat into the ring. He built a high visibility top hat studded with more RGB LEDs than common sense would dictate. It’s a flashy hat, and a very good example of the fashion statement a few hundred LEDs can make.

[Mark]’s top hat has 481 WS2812b addressable LEDs studded around the perimeter, a common LED choice for bright and blinky wearables. These LEDs are driven by a Teensy 3.1, with a Bluetooth transceiver, a GPS module, a compass, and gyro/accelerometer attached to the microcontroller. That’s a lot of hardware, but it gives [Mark] the capability of having the hat react to its own orientation, point itself North, and allow for control via a modified Nintendo NES controller.

The WS2812 LEDs draw a lot of power, and for any wearable project having portable power is a chief concern. [Mark]’s original plan was to use an 8x battery holder for the electronics enclosure, and use five AA batteries to power the hat. The total idle draw of the LEDs was 4.5 Watts, and with even a few LEDs blinking colors there was a significant voltage drop. The idea of powering the hat with AA batteries was discarded and the power source was changed to a 195 Watt-hour lithium ion battery bank that was topped off each day with a solar panel.

The hat is awesome, exceedingly bright, and something that gets a lot of attention everywhere  it goes. For indoor use, it might be too bright, but this could be fixed with the addition of a bit of black stretchy fabric, like what our own [Mike Szczys] did for his DEF CON hat. [Mark]’s hat is just version 1, and he plans on making a second LED hat for next year.

LED Organ Chimes Its Light Pipes

Light pipes are a pretty tricky feature to pull off. If the generic set on Digikey doesn’t meet your size and shape constraints, you’ll need to either find a vendor who can fabricate a specific shape for you or redesign that feature altogether. [Folker’s] LED Organ does an excellent job in piping light out from the source, and he does so in a way that’s reproducible with just a couple hours at the hand tools and a couple minutes on a laser cutter.

Hidden inside the base is a cluster of hardware that orchestrates the outer piece. 24 RGB LEDs are broken out into a ring and hidden in the base. [Folker’s] design enables control of the ring through either the LED player or LED Stamp with pattern-generation made possible by the free software, Jinx!

These days, exposed LEDs are ubiquitous enough among DIY electronics to almost be considered a hallmark of the DIY-enthusiast. Sure, “getting the project off the ground” is a great mindset to adopt when trying out some new firmware or components, but it can often leads us to a project’s finish with most of the wiring still exposed. While we’re certainly not offended by exposed LEDs, the task of concealing the shape of these components while also achieving the desired lighting effects is a challenge and rare sight to see. Our hats are off to the execution of this visual symphony.

Continue reading “LED Organ Chimes Its Light Pipes”

An Introduction To Individually Addressable LED Matrices

The most fascinating project you can build is something with a bunch of blinky hypnotic LEDs, and the easiest way to build this is with a bunch of individually addressable RGB LEDs. [Ole] has a great introduction to driving RGB LED matrices using only five data pins on a microcontroller.

The one thing that is most often forgotten in a project involving gigantic matrices of RGB LEDs is how to mount them. The enclosure for these LEDs should probably be light and non-conductive. If you’re really clever, each individual LED should be in a light-proof box with a translucent cover on it. [Ole] isn’t doing that here; this matrix is just a bit of wood with some WS2812s glued down to it.

To drive the LEDs, [Ole] is using an Arduino. Even though the WS2812s are individually addressable and only one data pin is needed, [Ole] is using five individual data lines for this matrix. It works okay, and the entire setup can be changed at some point in the future. It’s still a great introduction to individually addressable LED matrices.

If you’d like to see what can be done with a whole bunch of individually addressable LEDs, here’s the FLED that will probably be at our LA meetup in two weeks. There are some crazy engineering challenges and several pounds of solder in the FLED. For the writeup on that, here you go.