POV Display With An Element Of Danger

FZKU6SCHPFZR2KV.LARGE

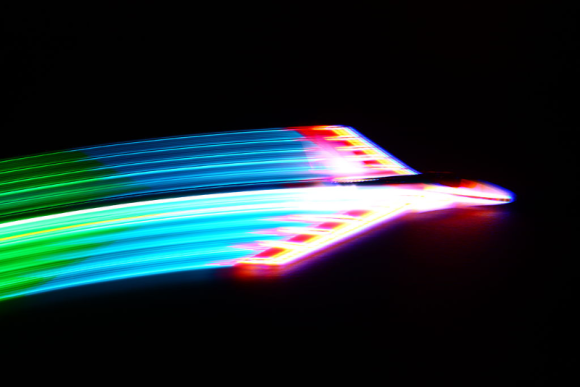
Persistence of vision displays are always cool, although we must admit this one looks like it could very well explode at high speeds…

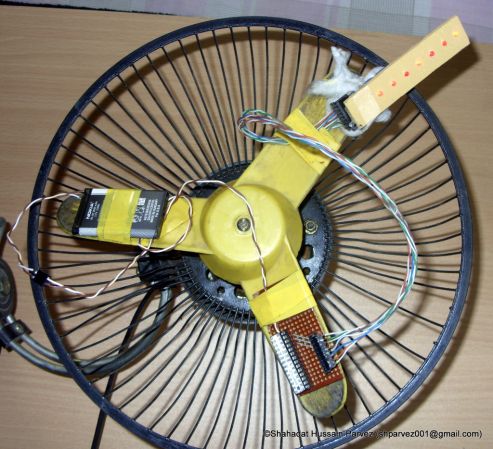
Safety concerns aside, this desk fan based display provides a great starting point for learning about making POV displays. It makes use of an old cellphone battery, an ATmega8, some LEDs, Veroboard, assorted wires and solder and of course, a high-speed desk fan.

[shparvez001] also provides the full code on his blog for the project, making it very easy to replicate. Though we might also suggest you keep it small enough that the original fan cage still fits on top.

From an aesthetic point of view, the display looks fine in the dark — but when the lights are on you might get some odd looks. We can see this project being greatly improved by mounting the LEDs through one of the fan blades, and the control electronics on the back side of the other blades. Maybe throw in some wireless charging for the battery while the fan is off too?

Anyway, stick around after the break to see the display in action. If you want a more permanent fan POV try adding display hardware to a ceiling unit.

Continue reading “POV Display With An Element Of Danger”

The Geek Group Installs Robot, Destroys CRT Monitor

GEEKSMASH

The Geek Group recently documented the process of overhauling part of their workspace to accommodate Project Jeff, a massive KUKA KR-350/1 industrial robot.

We don’t see many behind the scenes industrial-scale projects here at Hackaday, but we’re definitely impressed with the clever techniques employed to pull off this precision install. At around 5 inches deep, the original floor was far too thin to handle the weight and tortional loads imposed by Project Jeff, so The Geek Group carved out a 15′ square space of old concrete and dumped it piece by piece in the rubbish. They then dug a new hole to a depth of 2.5′ and filled it with a fresh pour that amounted to 67,500 pounds of concrete. Sheesh.

That concrete will inevitably expand and move around, which meant installing a pool-noodle-looking slip cover to protect a buried conduit from damage, as well as placing some gaskets around the edges to prevent cracking while maintaining a seal. Around 10 minutes into the video, they tackle the challenge of embedding bolts that connect to the robot’s base; it takes some patience and creative ladder positioning to fit the template in the correct position.

As an added treat, The Geek Group smashed a CRT monitor in our honor, and while they claim software limitations and a steel frame prevented Project Jeff from completely annihilating the monitor, we like to think the skull and cross-wrenches just refused to be destroyed. Because, you know, science. Videos after the break.

Continue reading “The Geek Group Installs Robot, Destroys CRT Monitor”

Roving Hexapod Poops Out 3D Prints

[Jia Wu, Mary Sek, and Jeff Maeshiro], students  at the California College of the Arts (CCA) in San Francisco, took on the task of developing a walking 3D printer. The result is Geoweaver, a hexapod robot with a glue gun extruder system. Hackaday has seen walking CNC machines before, but not a 3D printer. Geoweaver uses two servos on each of its six legs to traverse the land. The team was able to program several gaits into the robot, allowing it to traverse uneven terrain. Walking is hard enough on its own, but Geoweaver also uses a glue gun based extruder to make 3D prints. The extruder head uses two servos to swing in a hemispherical arc. The arc is mapped in software to a flat plain plane, allowing the robot to drop a dollop of glue exactly where it is programmed to. Geoweaver doesn’t include much in the way of on board processing – an Arduino Uno is used to drive the 15 servos. Those servos coupled with a glue gun style heater pull quite a bit of power, which has earned Geoweaver nicknames such as Servo Killer, Eater of Shields, Melter of Wires, and Destroyer of Regulators.

Geoweaver’s prints may not be much to look at yet, however the important thing to remember is that one of the future visions for this robot is to print on a planetary scale. Geoweaver currently uses reacTIVision to provide computer control via an “eye in the sky”. ReacTIVision tracks a fiducial marker on the robot, and applies it to a topographical map of the terrain. This allows Geoweaver to change its height and print parameters depending on the flatness of the ground it is printing on. On a scaled up Geoweaver, reacTIVision would be replaced by GPS or a similar satellite based navigation system.  Most of the software used in Geoweaver is opensource, including Grasshopper and Firefly, written by the team’s professor, [Jason Kelly Johnson]. The exception is Rhino 5. We would love to see an option for a free or open source alternative to laying out ~$1000 USD in software for our own Geoweaver.

Continue reading “Roving Hexapod Poops Out 3D Prints”

Hacking And Philosophy: Surveillance State

hnpss

If you don’t live under a rock (though you may want to now) you probably saw yesterday’s article from Spiegel that revealed the NSA has its own catalog for spy gadgets. Today they released an interactive graphic with the catalog’s contents, and even if you’re not a regular reader of Hacking & Philosophy, you’re going to want to take a look at it. I recommend glancing over IRATEMONK, in the “Computer Hardware” category. As the article explains, IRATEMONK is

An implant hidden in the firmware of hard drives from manufacturers including Western Digital, Seagate, Maxtor and Samsung that replaces the Master Boot Record (MBR).

It isn’t clear whether the manufacturers are complicit in implanting IRATEMONK in their hardware, or if the NSA has just developed it to work with those drives. Either way, it raises an important question: how do we know we can trust the hardware? The short answer is that we can’t. According to the text accompanying the graphic, the NSA

…[installs] hardware units on a targeted computer by, for example, intercepting the device when it’s first being delivered to its intended recipient, a process the NSA calls ‘interdiction.’

We’re interested to hear your responses to this: is the situation as bleak as it seems? How do you build a system that you know you can trust? Are there any alternatives that better guarantee you aren’t being spied on? Read on for more.

Continue reading “Hacking And Philosophy: Surveillance State”

UFO-looking RGB LED RC Plane Lights Up The Night, Uses All The Acronyms

[Roballoba] decided to combine his love for RC planes, things that light up, and photography, and we’re glad he did. He shares his method in this Instructable for illuminating a bare styrofoam replacement fuselage for a Parkzone Stryker RC plane.  There are many more amazing pictures there as well.

He used low-tack tape to lay out the LED strips on the fuselage, solder the connections, and test them. Once he was satisfied with the arrangment, he flipped the strips face down so the foam diffuses the light. The lights are powered by a 12V Li-Po battery he soldered to a deans connector. Finally, [Roballoba] covered  and heat sealed everything with Doculam, a very cost-effective laminate that offers great protection and security.

He used some LED corn lights as afterburners, which is a nice touch of realism. There is a video after the break where [Roballoba] shows us the connections up close and then runs through some light show options.  Another video of a nighttime flight is waiting for you in the write up.

Spent too much money on eggnog and a new console this year to be able to replicate this build? $30 will snag what you need for this smartphone-controlled paper plane we featured a few weeks back. You could always BeDazzle it.

Continue reading “UFO-looking RGB LED RC Plane Lights Up The Night, Uses All The Acronyms”

DIY Incubator Cooks Bacteria… Or Yogurt!

Ever wonder what kind of fecal content is in your drinking water? Do you also like yogurt? If so, this DIY Bacteria Incubator is just for you!

[Robin] is part of the BioDesign team for the Real-World project which is an interdisciplinary project featuring biology, electronics, and environmental sciences to bring together solutions for real world water problems. Since it’s a community oriented project they strive to keep it open-source and well-documented in order to share with everyone.

The DIY Incubator is a rather simple tool that can be used to help analyze water for fecal contamination, which is a problem in many third world countries. It consists of a styrofoam box, a light bulb and a home-brew Arduino which provides the PID control of the heat. For bacterial analysis, regular coliform bacteria live at 35C, while fecal coliform prefer about 44C — if incubated at these temperatures the bacteria will make itself known very quickly (within about 24 hours).

Oh and if you don’t want to find out how dirty your water is, you can also make yogurt instead. Check out a short demonstration of the incubator after the break.

Continue reading “DIY Incubator Cooks Bacteria… Or Yogurt!”

Using The Wii U Controller With Everything

It’s been just a bit over a year since the Wii U was released along with the extremely impressive Wii U controller. With a D-pad, analog sticks, accelerometer, gyroscope, magnetometer, camera and 6.2 inch touchscreen, this controller is ripe for a million and one projects ranging from FPV quadcopters and robots to things we can’t even think of yet. At this year’s Chaos Communication Congress, [booto], [delroth], and [shuffle2] demonstrated how they cracked open the Wii U controller’s encryption allowing for Wii U controller ’emulation’ and giving us full documentation on how the whole thing works.

The guys started on their reverse engineering journey by dumping all the flash chips found on the controller’s board. In those binary blobs, they found Nintendo used a truly ingenious way of obfuscating the WiFi keys used to connect the controller to the Wii: rotate left by three. To be fair to Nintendo engineers, it was secure until someone figured it out.

Connecting the controller to a PC over WiFi is only half the battle, though. Initial information from the Wii U launch suggested Nintendo used Miracast for all the I/O between the controller and the console. This isn’t the case; instead the video, audio, camera, and button input are non-standard but very simple protocols. The hardest to break into was the video display for the touchscreen, but the guys discovered it’s pretty much H.264. After getting around some Nintendo weirdness, it’s possible to display video on the controller.

The guys have put together a small, extremely alpha library that comes with all the demos, documentation, and reverse engineering information. There’s a large wish list of what this library should include, but now that the information is public, it might be the time to pick up a Wii U.

Video of the talk below, here’s the presentation slides, and a demo of emulating a Wii U game pad on a PC.

Continue reading “Using The Wii U Controller With Everything”