Robotically-Tuned Tube Radio

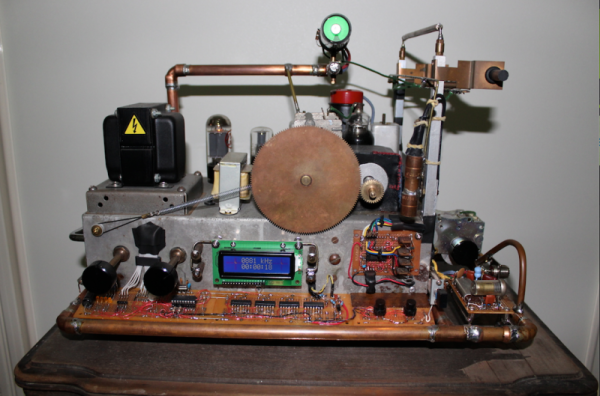
Dubbed the “Robot Radio” by [Brek], this clinking-&-clunking project merges three generations of hackers’ favorite technologies: robots, vacuum tubes, and microcontrollers. After the human inputs the desired radio frequency the machine chisels its way through the spectrum, trying its best to stay on target.

This build began its life as a junky old tube radio that [Brek] pulled out of a shed. The case was restored and then the hacking began. Inserted between the human and the radio, a PIC 16F628A keeps watch in both directions. On one side, the radio’s tank circuit is monitored to see what frequency the radio is currently playing. On the other, the human’s input sets a desired frequency. If the two do not match, the PIC tells a stepper motor to begin cranking a pair of gears until they do.

Another interesting feature is that as the tubes and other electronics warm up and change their values, the matching circuit will keep them in line. [Brek] shows this in the video by deliberately sabotaging the gears and seeing the robot adjust them back where they belong.

As an afterthought, the Robot Radio was supplemented with a module that adds 100khz to the signal so that the information from a nearby airport can be received.

[Brek] styled the whole machine up with some copper framing and other bits, similar to his spectacular atomic clock build we featured last month.

See the video of the radio tuning after the break.

Continue reading “Robotically-Tuned Tube Radio”

Coffee payment system

Coffee Payment System Doesn’t Void Your Warranty

[Oliver] is back with an update to his recent coffee maker hacks. His latest hack allowed him to add a coffee payment system to an off-the-shelf coffee maker without modifying the coffee maker itself. This project is an update to his previous adventures in coffee maker hacking which logged who was using up all of the coffee.

The payment system begins with an Arduino Uno clone inside of a small project enclosure. The Arduino communicates with the coffee maker via serial using the coffee maker’s service port. This port is easily available from outside the machine, so you won’t have to crack open the case and risk voiding your warranty.

The system also includes an RFID reader and a Bluetooth module. The RFID reader allows each user to have their own identification card. The user can swipe their card over the reader and the system knows how many credits are left in their account. If they have enough credit, the machine will pour a delicious cup of coffee.

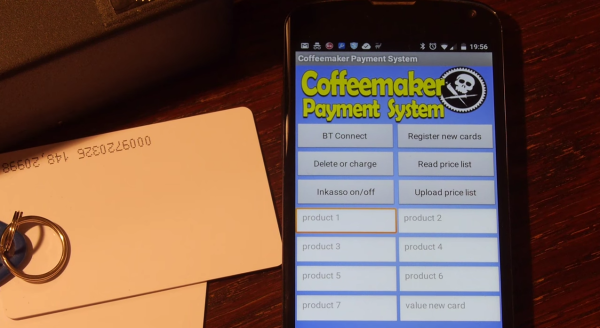
The Arduino communicates to an Android phone using the Bluetooth module. [Oliver’s] Android app was built using MIT’s app inventor. It keeps track of the account credits and allows the user to add more. The system can currently keep track of up to forty accounts. [Oliver] also mentions that you can use any Bluetooth terminal program to control the system instead of a smart phone app. Continue reading “Coffee Payment System Doesn’t Void Your Warranty”

DIY Thickness Sander

DIY Thickness Sander Is Good Enough For A Guitar Shop

[Pat] is a luthier and general guy that likes to build stuff. In order to get his guitars to come out the best they can, he needed a thickness sander. For those who don’t know, thickness sander is a machine that will sand off a small amount of material from the surface of a large wood panel. There are certainly commercially available thickness sanders but [Pat] thought that they were simple enough machines so he decided to give a go at making one himself.

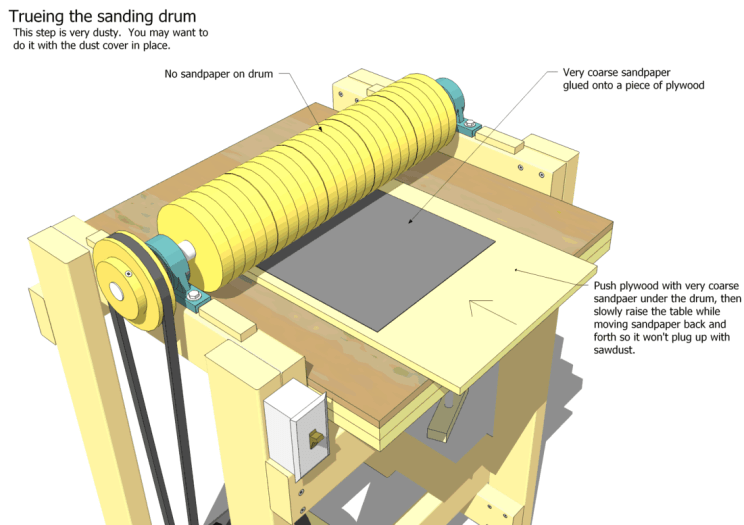
Since [Pat] already had access to a pretty nice wood shop, it only made sense to build the thickness sander primarily out of wood. The frame is made from standard 2×4’s. The drum is made from many disks of MDF mounted on a shaft and spun by an AC motor. You might imagine that a bunch of MDF disks mounted on a shaft would not result in a very cylindrical shape and that is exactly what happened here. So before applying the sand paper to the drum, course sandpaper was applied to a sheet of plywood and used to sand the drum round. It’s a super simple technique that resulted in a true-spinning drum. Afterward, velcro is attached to the drum and velcro-backed sandpaper is wrapped around the drum. This allows quick and effortless changing of sand paper.

thickness_sander-tn

Continue reading “DIY Thickness Sander Is Good Enough For A Guitar Shop”

31st Chaos Communications Congress

The 31st annual Chaos Communications Congress (31C3) kicked off today and you’ve already missed some great talks. If you’re not in Hamburg, Germany right now, you can watch the talks as they happen on the live stream. So stop reading this blog post right now, and check out the list of presentations. (But don’t fret if you’ve already missed something that you’d like to see. All the talks are also available after the fact.)

For those of you whose worldview is centered firmly on the You Ess of Ay, you’ll be surprised to learn that the Congresses are essentially the great-grandaddy of the US hacker conventions. If you’re one of the many (old?) US hackers who misses the early days of yore before DEFCON got too slick and professional, you’ll definitely like the CCC. Perhaps it’s the German mindset — there’s more emphasis on the community, communication, and the DIY aesthetic than on “the industry”. It’s more HOPE than DEFCON.

This is not to say that there won’t be some great hacking showcased at 31C3. It is the annual centerpiece of the European hacker scene, after all. Hardware, firmware, or software; it’s all exploited here.

Some of the talks are in German, naturally, but most are in English. If you haven’t attended before, you at least owe it to yourself to check out the live stream. Better yet, if you’re a member of an American hackerspace, you can at least set up local remote viewing for next year. Or maybe you’ll find yourself visiting Germany next Christmas.

[Image: Wikipedia / Tobias Klenze / CC-BY-SA 3.0]

NeXT Cubes And LCD Monitors

The NeXT slabs and cubes were interesting computers for their time, with new interesting applications that are commonplace today seen first in this block of black plastic. Web browsers, for example, were first seen on the NeXT.

Running one of these machines today isn’t exactly easy; there are odd video connectors but you can modify some of the parts and stick them in an LCD monitor. It’s a tradeoff between a big, classic, heavy but contemporary CRT and a modern, light, and efficient LCD, but it’s still a great way to get a cube or slab up and running if you don’t have the huge monitor handy.

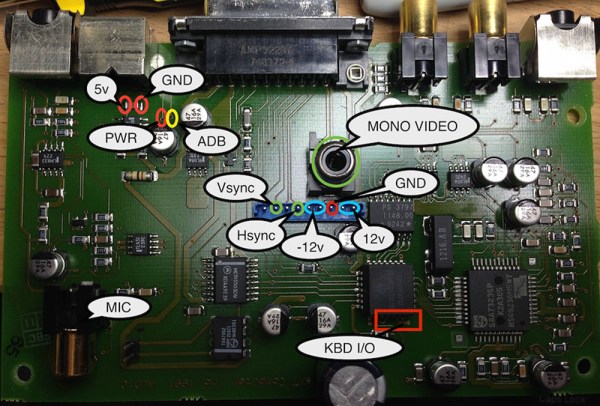
The NeXT cube doesn’t have a single wire going between the computer and the monitor; that would be far too simple. Instead, a NeXT Sound Box sits between the two, providing the user a place to plug the monitor, keyboard, mouse, and audio connectors into. [Brian] took the board from this Sound Box and put it inside an old NEC LCD monitor he had sitting around. 12V and 5V rails were wired in, the video lines were wired in, and [Brian] created a new NeXT monitor.

There are two versions of the NeXT Sound Box – one for ADB peripherals (Apple IIgs and beige Macs), and another for non-ADB peripherals. [Brian] also put together a tutorial for using non-ADB peripherals with the much more common ADB Sound Board.

diy conveyor belt

DIY Conveyor Gets You From Here To There

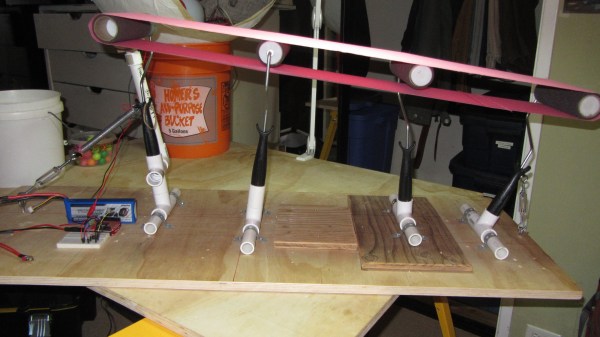
[gwfong] was in a bind. He had to make a unique Halloween prop that dispensed candy to young trick-or-treaters at a Haunted House. He decided on a conveyor belt system and besides being functional, it also had to be inexpensive to make. After poking around the hardware store [gwfong] had an idea: make it out of items he can re-use after Halloween!

As you can see, the main roller system is made of paint rollers. These are cheap and certainly re-useable after the conveyor is disassembled. Luckily for the project, the handle of the paint roller just happens to fit very snugly into a 3/4″ PVC pipe fitting. Four T-fittings and some short lengths of PVC pipe were purchased and are used to mount the paint rollers to a wooden base. A piece of canvas cut to length and sewed into a continuous loop makes up the conveyor belt. A loose belt certainly won’t deliver any candy so two turnbuckles, one at each end, keep the belt tight on the rollers.

There is a DC motor that spins a pulley which is coupled, via a standard rubber band, to one of the end paint rollers. A full-speed conveyor haphazardly flinging candy around wouldn’t work out to well so an Arduino and motor shield are used to control the conveyor’s speed and duration. A 7.4 5000mAh Li-Po battery provides the necessary electricity for a nights-worth of un-tethered candy dispensing.

Continue reading “DIY Conveyor Gets You From Here To There”

Learning I2C With The Bus Pirate

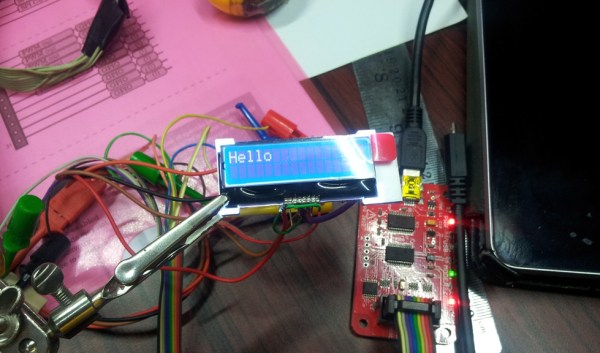
When an air quality display project needed a display, [Inderpreet] looked into small character-based LCDs. [Inderpreet’s] chosen LCD used an I2C interface, which was new to him. Rather than shy away, [Inderpreet] grabbed his Bus Pirate and dove in!

I2C or Inter-Integrated Circuit serial interfaces are often mentioned here on Hackaday. They generally are easy to use, but as with all things, there are little gotchas which can make the road a bit more bumpy the first time you travel it. One of those things is voltage interfacing – I2C uses bidirectional open drain lines, so interfacing 3.3 V and 5V circuits requires a voltage level shifter circuit designed to handle that requirement. Thankfully in [Inderpreet’s] case, both his TI launchpad target devboard and the LCD used 3.3 volt logic levels.

buspirate2Before using the TI though, [Inderpreet] wanted to test with the Bus Pirate first. This would allow him to verify the hardware, and to make sure he was correctly using the I2C bus. The Bus Pirate can operate at 3.3V or 5V logic levels, and has on-board programming specific to the I2C bus. Controlling the Bus Pirate is as easy as hooking up a serial terminal program and plugging in a USB cable.

The I2C bus protocol is relatively simple, but can still be confusing to a new user. Each transaction needs an address, read/write bit, and a start command sent in the proper sequence before the data bytes can begin flowing. There are also acknowledge bits which prove that the data bytes are actually being received by the LCD. The Bus Pirate made all this easy, allowing [Inderpreet] to quickly display “Hello” on his LCD module.

The I2C bus is just the tip of the iceberg for the Bus Pirate. If you’re interested in learning more, check it out over at The Hackaday Store!

[via Dangerous Prototypes]