Sonolithography With The Raspberry Pi Pico

You can do some wild things with sound waves, such as annoy your neighbours or convince other road users to move out of your way. Or, if you get into sonolithography like [Oliver Child] has, you can make some wild patterns with ultrasound.

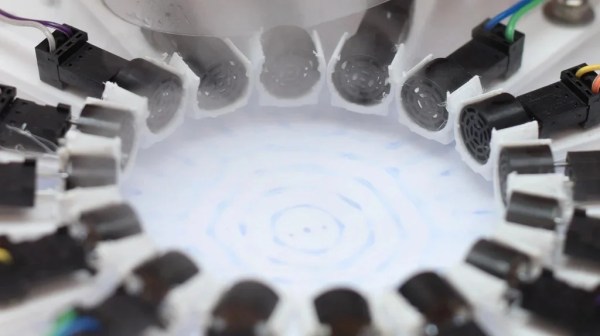
Sonolithography is a method of patterning materials on to a surface using finely-controlled sound waves. To achieve this, [Oliver] created a circular array of sixteen ultrasonic transducers controlled via shift registers and gate driver ICs, under the command of a Raspberry Pi Pico. He then created an app for controlling the transducer array via an attached computer with a GUI interface. It allows the phase and amplitude of each element of the array to be controlled to create different patterns.

Creating a pattern is then a simple matter of placing the array on a surface, firing it up in a given drive mode, and then atomising some kind of dye or other material to visualize the pattern of the acoustic waves.

It could be a useful tool for studying the interactions of ultrasonic waves, or it could just be a way to make neat patterns in ink and dye if that’s what you’re into. [Oliver] notes the techniques of sonolithography could also have implications in biology or fabrication in future, as well. If you found this interesting, you might like to study up on ultrasonic levitation, too!

Your Surface RT Can Become Useful Again, With Raspberry Pi OS

Over the years there have been so many times when Microsoft came up with a product that so nearly got it right, but which tanked in the market because the folks at Redmond had more of an eye to what fitted their strategy than what the customer wanted. The Surface RT was one of these: while the hardware was at least as good if not better than Apple’s iPad, its ARM CPU and an ill-advised signed-apps-only policy meant the tablet couldn’t access the huge existing library of Windows software.

Consumers didn’t want a tablet with next-to-no apps, so it failed miserably. Never mind though, because [Michael MJD] has a video showing how an RT can be given a new life from an unlikely source, with the installation of Raspberry Pi OS.

The video pretty closely follows this guide, and involves creating a Raspberry Pi OS install medium modified with RT-specific kernel modules and device tree. It’s possible because the 32-bit ARM architecture is one of those which Raspberry Pi OS targets, and while a few things such as graphics acceleration don’t work, it’s still successful (if a little slow).

Oddly this is a technique not unlike one from the earliest days of the Raspberry Pi, when we remember people in Raspberry Pi Jams showing off the ancestor of the modern OS running on cheap ARM-based netbooks. In those cases the hack relied on transplanting the Pi userland over the device’s existing kernel, we’d be interested in an explanation of how the RT can use the Pi kernel without the famous Broadcom BLOB intended for the Pi.

We have a soft spot for the RT, as we said a good product held back by a very bad software decision. Seeing it take a new life years later is thus pleasing to us.

Continue reading “Your Surface RT Can Become Useful Again, With Raspberry Pi OS”

Impressively Responsive Air Drums Built Using The Raspberry Pi Pico

Drum kits are excellent fun and a terrific way to learn a sense of rhythm. They’re also huge and unwieldy. In contrast, air drums can be altogether more compact, if lacking the same impact as the real thing. In any case, students [Ang], [Devin] and [Kaiyuan] decided to build a set of air drums themselves for their ECE 4760 microcontroller class at Cornell.

As per the current crop of ECE4760 projects, the build relies on the Raspberry Pi Pico microcontroller as the brains of the operation. The Pico is charged with reading the output of MPU6050 inertial measurement units mounted to a pair of drum sticks. The kick pedal itself simply uses a button instead.

Where the project gets really interesting, though, is in the sound synthesis. The build doesn’t simply play different pre-recorded samples for different drums. Instead, it uses the Karplus-Strong Drum Synthesis function combined with a wavetable to generate different sounds.

In the demo video, we get to hear the air drums in action, complete with a Stylophone playing melody. Unlike some toy versions that trigger seemingly at random with no rhythm, these air drums are remarkably responsive and sound great. They could be a great performance instrument if designed for the purpose.

We’ve seen similar builds before, too.

Continue reading “Impressively Responsive Air Drums Built Using The Raspberry Pi Pico”

Wii-Inspired Controller Built Using Raspberry Pi Pico

We all thought Nintendo was going to change the world of gaming when it released the Wii all those years ago. In the end, it was interesting but not really fundamentally life-changing for most of us. In any case, [Sebastian] and [Gabriel] decided to build a Wii-like controller for their microcontroller class at Cornell.

The build uses a pair of Raspberry Pi Pico microcontrollers, communicating over HC-05 Bluetooth modules. One Pico acts as a controller akin to a Wiimote, while the other runs a basic game and displays it on a screen via VGA output. The controller senses motion thanks to a MPU6050 inertial measurement unit, combining both gyros and accelerometers in all three axes.

The duo demonstrate the hardware by using it as a pointer to play a simple Tic-Tac-Toe game. It’s in no way going to light up the Steam charts, but the project page does go into plenty of useful detail on how everything was implemented. If you want to create your own motion gaming controller, you could do worse than reading up on their work.

We’ve seen some other great examples of motion controls put to good use, like this VR bowling game. Video after the break.

Continue reading “Wii-Inspired Controller Built Using Raspberry Pi Pico”

Raspberry Pi Pico Becomes Emotionally-Aware Music Visualizer

Back in the late 1990s and early 2000s, the nascent world of digital music was incredibly exciting. We all cultivated huge MP3 collections and spent hours staring at the best visualizers Winamp and Windows Media Player had to offer. [Rafael] and [Eric] decided to bring back those glory days with their music visualizer that runs on the Raspberry Pi Pico.

The design is quite interesting, going beyond the usual simplistic display of waveforms and spectrograms. Instead, the Pi Pico uses a Fast Fourier Transform analysis to determine the frequencies of the music, ideally then to determine the key, and thus the mood, of the tune.  Then, the visualizer uses different colors to represent those moods, such as green for happy music in a major key, or deeper blues for a sad piece in a minor key. The output of the visualizer is via Bruce Land’s 8-bit color VGA library, which allows the Pi Pico to drive a monitor directly.

Whether the visualizer really gets the music is up for debate.  The visuals simply don’t look sad and depressing enough when listening to Hallelujah, but maybe that’s just the lack of Jeff Buckley’s vocals in the instrumental. Furthermore, getting an FFT analysis to pull out reliable musical information from an audio recording is finicky to say the least. In any case, the blocky and colorful animations are nice to watch nonetheless. They’d make an excellent basis for visuals at your next underground chiptune show, that much is for certain. Video after the break.

Continue reading “Raspberry Pi Pico Becomes Emotionally-Aware Music Visualizer”

Localizing Fireworks Launches With A Raspberry Pi

If you have multiple microphones in known locations, and can determine the time a sound arrives at each one, you can actually determine the location that sound is coming from. This technique is referred to as sound localization via time difference of arrival. [Kim Hendrikse] decided to put the technique to good use to track down the location of illicit fireworks launches.

The build is based on the Raspberry Pi, with [Kim] developing an “autonomous recording unit” complete with GPS module for determining their location and keeping everything time synchronized. By deploying a number of these units, spread out over some distance, it’s possible to localize loud sounds based on the time stamps they show up in the recording on each unit.

Early testing took place with an air horn and four recording units. [Kim] found that the technique works best for sounds made within the polygon.  Determining the location was achieved with a sound investigation tool called Raven Lite, developed by Cornell University. The process is very manual, involving hunting for peaks in sound files, but we’d love to see a version that automated comparing sound peaks across many disparate recording units. In any case, it worked incredibly well for [Kim] in practice. Later testing with friends and a network of six recorders spread over Limburg, Netherlands, [Kim] was later able to localize fireworks launches with an accuracy down to a few meters.

Similar techniques are used to locate gunshots, and can work well with pretty much any loud noise that’s heard over a great distance. If you’ve been using your hacker skills to do similar investigative work, don’t hesitate to let us know on the tipsline!

Raspberry Pi Does Its Best Retro PC Impression

The Raspberry Pi is a popular choice if you’re looking to put together a simple emulation box — it’s relatively cheap, small enough to tuck into pretty much any entertainment center, and benefits from a large and vibrant development community. You can even get enclosures that will dress the Linux single-board computer up like a miniature version of your favorite retro console. But what about the old school PC gamers who want to relive their glory days in a palm-sized package?

Well, if you’ve got a 3D printer, [fantasticmrdavid] might have just the solution for you. This second iteration of his printable Raspberry Pi enclosure is designed to look like the 286 desktop that he had in his youth, complete with a functional “floppy drive” in the front that takes an SD card. With a 3.5 inch MPI3508 LCD up in the “monitor” and a copy of DOSBox on the SD card, you’re well on your way to booting up a copy of Windows 3.11 or building some contraptions in The Incredible Machine.

While the external aesthetics of the design are impeccable, we appreciate that [fantasticmrdavid] didn’t skimp on the internals. There’s mount points for dual 25 mm fans to keep the more powerful variants of the Raspberry Pi cool, and a speaker expansion board that plugs into the GPIO header to provide era-appropriate bloops and bleeps. The tiny details here really shine, like the fact that the face plates for the dual drives are designed as separate pieces so they can be printed in a different color than the main case.

If you’re not interested in the classics, don’t worry. We’ve seen the Raspberry Pi stand in foraa modern gaming PC, complete with the RGB LEDs you’d expect in a contemporary rig.