Frog Boy Color Reimagines The Game Boy Color Hardware From The Ground Up

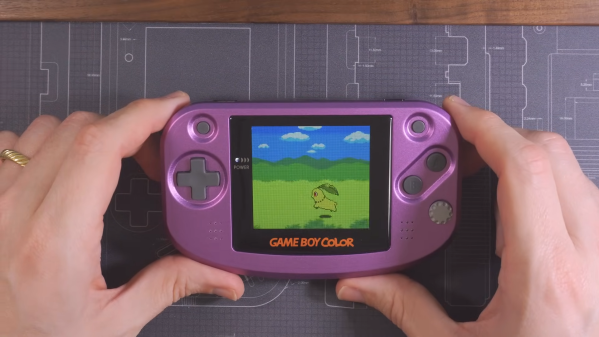
Sales figures suggest Nintendo did pretty well with the Game Boy Color during its original run, even if the hardware and visuals feel a tad archaic and limited today. [Chris Hackmann] has taken the Game Boy Color design and reworked it from the ground up as the Frog Boy Color, kitting it out with modern upgrades in a GBA-like form factor while retaining the original hardware underneath.

[Chris] went to the wide-style GBA layout for comfort, which he considers superior to the original rectangular Game Boy format. He iterated through over 50 3D-printed enclosure designs to get the design to work, ensuring that the final housing could be CNC machined. He then set out to trim down the original Game Boy Color circuit layout to cut out hardware he considered unnecessary. The original LCD driver could go, since the Q5 replacement LCD he intended to use didn’t need it, and he also considered the IR port to be surplus to requirements. He also set out to replace the original audio amp with his own stereo design.

The result is a wide-format Game Boy Color with a gorgeous modern LCD, USB-C charging, and excellent compatibility with original games and accessories. Files are on Github if you want to build one yourself. Of course, he’s not the only person working on building the best Game Boy ever, but we always love seeing new work in this space. Video after the break.

Continue reading “Frog Boy Color Reimagines The Game Boy Color Hardware From The Ground Up”

How IBM Stumbled Onto RISC

There are a ton of inventions out in the world that are almost complete accidents, but are still ubiquitous in our day-to-day lives. Things like bubble wrap which was originally intended to be wallpaper, or even superglue, a plastic compound whose sticky properties were only discovered later on. IBM found themselves in a similar predicament in the 1970s after working on a type of mainframe computer made to be a phone switch. Eventually the phone switch was abandoned in favor of a general-purpose processor but not before they stumbled onto the RISC processor which eventually became the IBM 801.

As [Paul] explains, the major design philosophy at the time was to use a large amount of instructions to do specific tasks within the processor. When designing the special-purpose phone switch processor, IBM removed many of these instructions and then, after the project was cancelled, performed some testing on the incomplete platform to see how it performed as a general-purpose computer. They found that by eliminating all but a few instructions and running those without a microcode layer, the processor performance gains were much more than they would have expected at up to three times as fast for comparable hardware.

These first forays into the world of simplified processor architecture both paved the way for the RISC platforms we know today such as ARM and RISC-V, but also helped CISC platforms make tremendous performance gains as well. In fact, RISC-V is a direct descendant from these early RISC processors, with three intermediate designs between then and now. If you want to play with RISC-V yourself, our own [Jonathan Bennett] took a look at a recent RISC-V SBC and its software this past March.

Thanks to [Stephen] for the tip!

Photo via Wikimedia Commons

A red circuit board with four wires running from an IMU to a Pi Pico W. This is all attached to a clear plastic baton.

An Electronic Orchestra Baton

The conductor of an orchestra may look unassuming on the street, but once they step onto their podium, they are all powerful. If you’ve ever wanted to go mad with power in the comfort of your own home, try this electronic orchestra baton by [Larry Lu] and [Kathryn Zhang].

The wireless baton “peripheral” part of the system uses a Pico W and an IMU to detect the speed of conducting a 4/4 measure. That information is then transmitted to the “central” Pico W access point which plays a .wav at the speed corresponding to the conductor’s specified beats per minute (BPM). Setting the baton down will pause the visualizer and audio playback.

The “central” Pico W uses direct memory access (DMA) and SPI communication to control the audio output and VGA visualization. Since most .wav files have a sample rate of 44.1 kHz, this gave the students a reference to increase or decrease the DMA audio channel timer to control the playback.

Want some more musical hacks? Checkout this auto-glockenspiel or how the original iPod was hacked.

Continue reading “An Electronic Orchestra Baton”

3D Printing Your Own Triboelectric Generators

A triboelectric nanogenerator (TENG) certainly sounds like the sort of thing you’d need to graduate from Starfleet Engineering to put together, but it actually operates on the same principle that’s at work when you rub a balloon your head. Put simply, when friction is applied to the proper materials, charges can build up enough to produce a short burst of electrical energy. Do it enough, and you’re on the way to producing useful power.

In a recent paper, [Leo N.Y. Cao], [Erming Su], [Zijie Xu], and [Zhong Lin Wang] describe how a functional TENG can be produced on a standard desktop 3D printer. What’s even more impressive is that the method doesn’t appear to require anything terribly exotic — just some commercially available filaments and a bunch of PTFE beads.

TENGs can be printed in any size or shape.

So how do your print your own TENG? First, you load up an electrically conductive PLA filament and lay down a base into which a series of channels has been designed. At around the half-way point, you pause the print to insert your PTFE beads, and then swap over to standard filament for a few layers to produce an insulator. Finally, you pause again and switch back over to the conductive filament for the rest of the print, encasing the beads inside the structure.

As [Leo N.Y. Cao] demonstrates in the video below, you then clip leads to the top and bottom of the print, and give it a good shake. If everything went right, LEDs wired up to your new high-tech maracas should flash as the PTFE beads move back and forth inside. But there’s a catch. Going back to the balloon-on-the-head example, the effect at play here produces high voltages but low current — the paper says a TENG containing 60 beads should be capable of producing pulses of up to 150 volts.

Naturally, you won’t get very far with just one of these. Like other energy harvesting concepts we’ve covered in the past, such as vibratory wind generators, it would take a bunch of these working together to generate a useful amount of power. But given how cheap and quickly these printable TENGs can be produced, that doesn’t seem like it would be too much of a challenge.

Continue reading “3D Printing Your Own Triboelectric Generators”

Welcome To The Year Of The Diagonal Linux Desktop

Sometimes you come across one of those ideas that at first appear to have to be some kind of elaborate joke, but as you dig deeper into it, it begins to make a disturbing kind of sense. This is where the idea of diagonally-oriented displays comes to the fore. Although not a feature that is generally supported by operating systems, [xssfox] used the xrandr (x resize and rotate) function in the Xorg display server to find the perfect diagonal display orientation to reach a happy balance between the pros and cons of horizontal and vertical display orientations.

As displays have gone wide-and-wider over the past decades, some people rotate their displays 90 degrees to get more height instead, which is beneficial when reading documents, yet terrible when watching most video content, barring vertical videos, so you either need more than one display, keep rotating, or settle on an optimal intermediate compromise. Interestingly, this wasn’t found at a straight 45°, but instead at 22° of rotation for [xssfox]’s 21:9 ratio ‘ultra-wide’ display. The xrandr settings for other display ratios can be easily calculated using the provided formula and associated JS-based tool.

So what are the advantages here? You get to keep long line lengths in IDEs, while gaining more vertical pixels in some areas. As disadvantages it only works with Xorg at this time, it’s a terrible setup for people prone to vertigo, and it’s decidedly hostile towards top-of-display mounted webcams. Yet with others picking up on this new trend, Linux might just corner the diagonal desktop.

Raspberry Pi Pico Becomes Emotionally-Aware Music Visualizer

Back in the late 1990s and early 2000s, the nascent world of digital music was incredibly exciting. We all cultivated huge MP3 collections and spent hours staring at the best visualizers Winamp and Windows Media Player had to offer. [Rafael] and [Eric] decided to bring back those glory days with their music visualizer that runs on the Raspberry Pi Pico.

The design is quite interesting, going beyond the usual simplistic display of waveforms and spectrograms. Instead, the Pi Pico uses a Fast Fourier Transform analysis to determine the frequencies of the music, ideally then to determine the key, and thus the mood, of the tune.  Then, the visualizer uses different colors to represent those moods, such as green for happy music in a major key, or deeper blues for a sad piece in a minor key. The output of the visualizer is via Bruce Land’s 8-bit color VGA library, which allows the Pi Pico to drive a monitor directly.

Whether the visualizer really gets the music is up for debate.  The visuals simply don’t look sad and depressing enough when listening to Hallelujah, but maybe that’s just the lack of Jeff Buckley’s vocals in the instrumental. Furthermore, getting an FFT analysis to pull out reliable musical information from an audio recording is finicky to say the least. In any case, the blocky and colorful animations are nice to watch nonetheless. They’d make an excellent basis for visuals at your next underground chiptune show, that much is for certain. Video after the break.

Continue reading “Raspberry Pi Pico Becomes Emotionally-Aware Music Visualizer”

Paddling Help From Electric-Assisted Kayak

Electric-assisted bicycles, or ebikes, are fundamentally changing the way people get around cities and towns. What were once sweaty, hilly, or difficult rides have quickly turned into a low-impact and inexpensive ways around town without foregoing all of the benefits of exercise. [Braden] hoped to expand this idea to the open waters and is building what he calls the ebike of kayaking, using the principles of electric-assisted bicycles to build a kayak that helps you get where you’re paddling without removing you completely from the experience.

The core of the project is a brushless DC motor originally intended a hydrofoil which is capable of providing 11 pounds (about 5 kg) of thrust. [Braden] has integrated it into a 3D-printed fin which attaches to the bottom of his inflatable kayak. The design of the fin took a few iterations to get right, but with a working motor and fin combination he set about tuning the system’s PID controller in a tub before taking it out to the open water. With just himself, the battery, and the motor controller in the kayak he’s getting about 14 miles of range with plenty of charge left in the battery after the trips.

[Braden]’s plans for developing this project further will eventually include a machine learning algorithm to detect when the rider is paddling and assist them, rather than simply being a throttle-operated motor as it exists currently. On a bicycle, strapping a sensor to the pedals is pretty straightforward, but we expect detecting paddling to be a bit more of a challenge. There are even more details about this build on his personal project blog. We’re looking forward to seeing the next version of the project but if you really need to see more boat hacks in the meantime be sure to check out [saveitforparts]’s boat which foregoes sails in favor of solar panels.

Continue reading “Paddling Help From Electric-Assisted Kayak”