Video Feedback Machine Creates Analog Fractals

One of the first things everyone does when they get a video camera is to point it at the screen displaying the image, creating video feedback. It’s a fascinating process where the delay from image capture to display establishes a feedback loop that amplifies the image noise into fractal patterns. This sculpture, modestly called The God Machine II takes it to the next level, though.

We covered the first version of this machine in a previous post, but the creator [Dave Blair] has done a huge amount of work on the device since that allows him to tweak and customize the output that the device produces. His new version is quite remarkable, allowing him to create intricate fractals that writhe and change like living things.

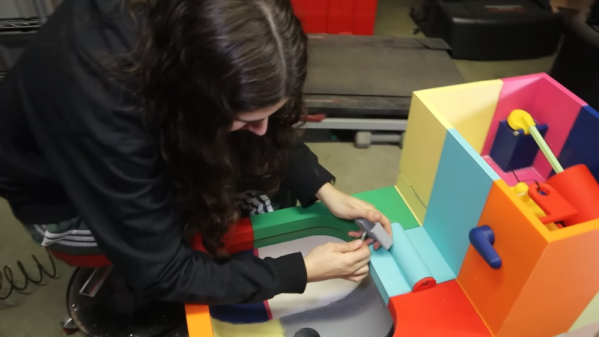
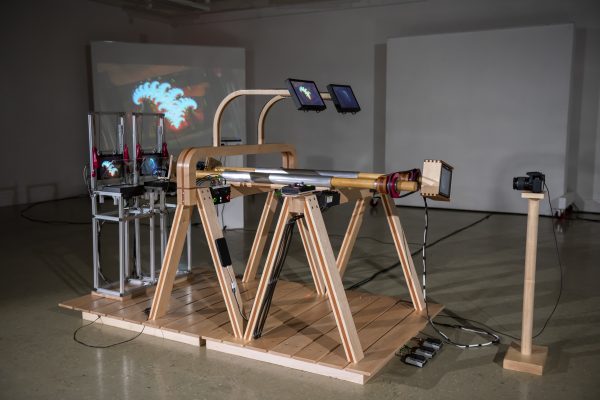
The God Machine II is a sophisticated build with three cameras, five HD monitors, three Roland video switchers, two viewing monitors, two sheets of beam splitter glass, and a video input. This setup means it can take an external video input, capture it, and use it as the source for video feedback, then tweak the evolution of the resulting fractal image, repeatedly feeding it back into itself. The system can also control the settings for the monitor, which further changes the feedback as it evolves. [Blair] refers to this as “trapping the images.”

Continue reading “Video Feedback Machine Creates Analog Fractals”

Saving An Expensive Sony HW65ES Projector With Some Fresh Chips

HDMI section of the Sony HW65ES PCB.

When you’re the proud owner of a beast of a projector like the Sony HW65ES (£2800 in 2016), you are understandably upset when it stops working. In the case of [Wettergren] it appears that a lightning strike in the Summer of 2021 managed to take out the HDMI inputs, with no analog or other input options remaining. Although a new board with the HDMI section would cost 500 €, it couldn’t be purchased separately, and a repair shop quoted 1800 € to repair it, which would be a raw deal. So, left with the e-waste or DIY repair options, [Wettergren] chose the latter.

Suffice it to say that taking one of these large projectors apart is rather an adventure, as is extracting the input PCB. On this board some probing showed that while the HDMI 2 port showed some signs of life, with its DDC lines functioning and the EDID readable. The HDMI 1 port had a dead short on these lines, which got traced back to a dead Sil9589CTUC IC, while HDMI was connected to the Sil9679 IC next to it. With this easy part done, the trick was finding replacements for what is decidedly not an off-the-shelf component, but fortunately EBay came through. This just left the slow agony of microsoldering to replace the dead IC, which ultimately succeeded.

After the second repair attempt in May of 2022, the projector is still working in December of 2023, proving that a bit of persistence, a bit of EBay luck and a microsoldering bench with the skills to use it can bring many devices back from the brink to give them a happy second life.

The scope, with new knobs and stickers on it, front panel renovated

Explosion-Scarred Scope Gets Plastic Surgery Hackerspace Style

Some equipment comes with a backstory so impressive, you can’t help but treat it with reverence. For instance, this Hantek scope’s front panel and knobs have melted when a battery pack went up in flames right next to it. Then, it got donated to the CADR hackerspace, who have in turn given us a scope front panel refurbishing master class (translated, original), demonstrating just how well a typical hackerspace is prepared for performing plastic surgery like this.

All of the tools they used are commonplace hackerspace stuff, and if you ever wanted to learn about a workflow for repairs like these, their wiki post is a model example, described from start to end. They show how they could use a lasercutter to iterate through figuring out mechanical dimensions of the labels, cutting the silhouette out of cardboard as they tweaked the offsets. Then, they designed and printed out the new front panel stickers, putting them through a generic laminator to make them last. An FDM printer helped with encoder and button knob test fits, with the final version knobs made using a resin printer.

Everything is open-source – FreeCAD knob designs, SVG stickers, and their CorelDraw sources are linked in the post. With the open-source nature, there’s plenty of room to improvement – for instance, you can easily put these SVGs through KiCad and then adorn your scope with panels made out of PCBs! With this visual overhaul, the Hantek DSO5102P in question has gained a whole lot more character. It’s a comprehensive build, and it’s just one of the many ways you can compensate for a damaged or missing shell – check out our comprehensive DIY shell guide to learn more, and when you get to designing the front panel, we’ve highlighted a few lessons on that too.

You Wouldn’t 3D Print A Toilet…

[Emily The Engineer] wanted a 3D printing project, so naturally, she decided to print a working toilet. Check out the colorful contraption in the video below. At the start, we thought making it watertight might be a bit difficult, which proved to be a problem. However, some careful work with sealing and soldering irons did allow her to make a working flushable toilet.

Mercifully, we don’t get to see the device in actual use, and, as far as we can tell, she never actually connected it to the plumbing in her home. But it did fill from a garden hose, shut itself off, and flush 3D printer waste, toilet paper, and other material out of its drain. It doesn’t appear that the designs have been made public, but since something of this size would likely take hundreds of print hours to complete, we aren’t sure anyone would really want to do this anyway.

However, some of the techniques might come in handy if you are working on something that has to handle water. If you do replicate this for actual use, consider that many 3D printed plastics aren’t considered food-safe because you can’t adequately clean the little ridges from the layer lines. If you were really using this for its intended purpose, cleaning would be a high priority.

Towards the end, the over-engineering bug hit, and you get to see an add-on bidet, armrests, and even mobile casters. A fun project, even if a bit impractical. As an art installation, though, we’ve definitely seen worse.

A mobile toilet is a unique idea, right? Um — maybe not. If [Emily] does a second version, we’d suggest making the TP roll holder heated.

Continue reading “You Wouldn’t 3D Print A Toilet…”

Building A GPS Receiver From The Ground Up

One of the more interesting facets of GPS is that, at least from the receiver’s point-of-view, it’s a fairly passive system. All of the information beamed down from the satellites is out in the ether, all the time, free for anyone on the planet to receive and use as they see fit. Of course you need to go out and buy a receiver or, alternatively, possess a certain amount of knowledge to build a circuit that can take those signals and convert them into something usable. Luckily, [leaning_tower] has the required knowledge and demonstrates it with this DIY GPS receiver.

This receiver consists of five separate circuit boards, all performing their own function. The first, a mixer board, receives the signal via an active antenna and converts it to a lower frequency. From there it goes to a second mixer and correlation board to compare the signal to a local reference, then a signal processing board that looks at this intermediate frequency signal to make sense of the data its seeing. Finally, an FPGA interfacing board ties everything together and decodes the information into a usable form.

Dealing with weak signals like this has its own set of challenges, as [leaning_tower] found out. The crystal oscillator had to be decapped and modified to keep from interfering with the GPS radio since they operated on similar frequencies. Even after ironing out all the kinks, the circuit takes a little bit of time to lock on to a specific satellite but with a second GPS unit for checking and a few weeks of troubleshooting, the homebrew receiver is up and running. It’s an impressive and incredibly detailed piece of work which is usually the case with sensitive radio equipment like GPS. Here’s another one built on a Raspberry Pi with 12 channels and a pretty high accuracy.

It’s Pronounced GIF

As the holiday season is upon us and a Hackaday scribe sits protected from the incoming Atlantic storms in her snug eyrie, it’s time for her to consider the basics of her craft. Writing, spelling, and the English language; such matters as why Americans have different English spellings from Brits, but perhaps most important of them all for Hackaday readers; is it “gif”, or is is “jif”? This or the jokey sentence about spellings might be considered obvious clickbait, but instead they’re a handle to descend into the study of language. Just how do we decide the conventions of our language, and should we even care too much about them?

Don’t Believe Everything You Read in School

A picture of an American classroom in 1004
Not everything you learn here is worth holding on to. Harrison Keely, CC BY 4.0.

We are sent to school to Learn Stuff. During that time we are deprived of our liberty as a succession of adults attempt year after year to cram our heads with facts. Some of it we find interesting and other parts not so much, but for the majority of it, we are discouraged from thinking for ourselves and are instead expected to learn by rote a set of fixed curricula.

Thus while writers have to discover for themselves that English is a constantly evolving language through which they can break free of these artificial bounds that school has imposed upon them, far too many people remain afraid to put their head above the linguistic parapet.

The result is that perceived deviations from the rules are jumped upon by those afraid to move with the language, and we even find our own linguistic Holy Wars to fight. The one mentioned above about “gif” versus “jif” is a great example, does it really matter that much whether you pronounce it with a hard “G” because that’s how most people say it, or as though it were a “J” because the creator of the file format said it that way? Not really, because English is an evolving language in the hands of those who speak it, not those of the people who write school books. Continue reading “It’s Pronounced GIF”

Impressively Responsive Air Drums Built Using The Raspberry Pi Pico

Drum kits are excellent fun and a terrific way to learn a sense of rhythm. They’re also huge and unwieldy. In contrast, air drums can be altogether more compact, if lacking the same impact as the real thing. In any case, students [Ang], [Devin] and [Kaiyuan] decided to build a set of air drums themselves for their ECE 4760 microcontroller class at Cornell.

As per the current crop of ECE4760 projects, the build relies on the Raspberry Pi Pico microcontroller as the brains of the operation. The Pico is charged with reading the output of MPU6050 inertial measurement units mounted to a pair of drum sticks. The kick pedal itself simply uses a button instead.

Where the project gets really interesting, though, is in the sound synthesis. The build doesn’t simply play different pre-recorded samples for different drums. Instead, it uses the Karplus-Strong Drum Synthesis function combined with a wavetable to generate different sounds.

In the demo video, we get to hear the air drums in action, complete with a Stylophone playing melody. Unlike some toy versions that trigger seemingly at random with no rhythm, these air drums are remarkably responsive and sound great. They could be a great performance instrument if designed for the purpose.

We’ve seen similar builds before, too.

Continue reading “Impressively Responsive Air Drums Built Using The Raspberry Pi Pico”