Forming Voltron’s Blazing Sword For Real

Activate interlock! Dynotherms connected! Infracells up! Mega thrusters are go! If you grew up in the 80’s you undoubtedly know that quote means it’s time to form Voltron. The 1984 Lion Force Voltron series has shown an incredible amount of staying power. These 5 lions have come together to form no less than 3 reboot series, the most recent coming out just this month from Dreamworks and Netflix.

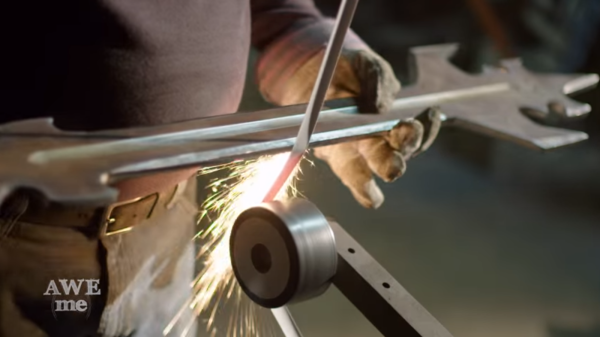
[Matt and Kerry Stagmer], blacksmiths for the Man at Arms web series haven’t forgotten Voltron either. Every episode of the original series ended with the mighty robot defeating enemies using an iconic blazing sword. While they might not be able to bring us 5 robot lions which join together to form one mega robot, [Matt and Kerry] can bring us a human sized version of Voltron’s sword (YouTube).

Starting with a high-resolution image of a toy version of the sword, [Matt] traced the outline. The shape was sent over to a plasma cutter. Rather than cut one sword, two outlines were cut. One in 1/4″ steel, the other in 3/16″. A CNC was used to cut grooves in the 1/4″ section. These grooves became the manifold for propane gas jets. Separate jets were cut around the perimeter of the sword. With this complete, the two pieces were carefully TIG welded together.

This sword isn’t all prop and no chop. The upper sections were heat-treated and sharpened to a razor edge. We won’t go so far as to call this practical. It wields more like an ax than a sword. At the end of the day it doesn’t really matter though – this blazing sword is completely awesome.

Blacksmith Forge Made From The Bathroom Sink

The sweltering heat had finally moved on and Giant Tick season was coming to a close (not kidding, they are HUGE here), when I decided to fire up my hacked together blacksmith forge made out of an old bathroom sink and aquarium stand.

In the age-old formula I needed to supply an air source to a fuel to create enough heat to make iron malleable. I got the idea that this particular bathroom sink might be a good candidate for a fire bowl after I banged my shin with it and then cursed at it. It was clearly made of cast iron and as proof it was clearly unfazed by my tirade of words which I hope my son has learned from the Internet and not from listening to me remodel the bathroom.

Continue reading “Blacksmith Forge Made From The Bathroom Sink”

Retrotechtacular: Häfla Hammerforge Healed

Visit any renaissance fair across the United States this fall and you’ll undoubtedly find a blacksmith. He’ll be sweating away in a tent, pounding on a piece of glowing steel set against an anvil. While the practice of the single blacksmith endures today, high-production ‘works of days past required increasing amounts of muscle. The more tireless the muscle, the better. The manual efforts of the blacksmith were replaced by huge hammers, and the blacksmith needed only to turn the piece between impressions and maintain a healthy respect for the awesome crushing power of the machine.

Last week, blacksmith enthusiasts completed restoration work on the Häfla hammer in Finspang, Sweden. The 333 year old hydraulic hammer hadn’t been used since 1924, when operations ceased at the Häfla Hammerforge. The ‘works was built in 1682 and used the German method of forging, which had been introduced to Sweden in the 1500s. Steel production was revolutionized in the 1800s by the Bessemer process, which resulted in a much stronger product. Continue reading “Retrotechtacular: Häfla Hammerforge Healed”

Mini-Forge On A Budget

7

Feeling a little black-smithy? Ever wanted to hammer some red-hot steel into a new shape? Turns out, it’s well within your reach!

We’ve seen soup can forges, paint can forges, and even full blown coal fired forges — but none quite as simple as this. All you need is a fire brick — and some tools.

The problem is, fire bricks are kind of fragile. In order to drill into it without cracking the brick [Mike] advises us to clamp it in a wooden jig to help support it. Slowly drill a long hole lengthwise in it, slightly oblong to allow for your work piece to go inside. Flip the brick sideways, and add a second perpendicular hole in order to insert your gas torch of choice.

Now before you go heating it up, it is wise to reinforce the brick by wrapping some wire around it to prevent it from falling apart when it inevitably cracks due to temperature changes. A more permanent solution is to encase the entire brick in concrete to make it more durable, which [Mike] plans on doing next time. Continue reading “Mini-Forge On A Budget”

Propane Forge Built From A Soup Can

propane-forge-from-soup-can

It doesn’t look like much, but this easy to build propane forge is just what you need to try your hand at blacksmithing. [Code Cowboy] took on the build after watching this how-to video which shows the fabrication of a small knife after completing the forge build.

The first step is to eat all of the soup (or beans if you prefer). With an empty can in hand the stand — made of two angle brackets — and inlet are attached. Next comes the heat proofing for the walls of the forge. At first glance we thought that cat litter was one of the ingredients, but that’s just an empty container used to haul playground sand. The sand is mixed with equal parts of plaster of paris before adding water to achieve a clay-like consistency. This is packed into the can, with a small opening to receive the metal to be heated.

The torch itself can be used to cure the heat shield. After letting the mixture harden a 30 minute burn will force the rest of the water out of the heat proofing.

Continue reading “Propane Forge Built From A Soup Can”

DIY Armor Starts With This Gauntlet Tutorial

This is not photoshopped, it’s a real gauntlet made of brass. [David Guyton] crafted it for some promotional photos for his book. But he also took the time to put together a step-by-step build tutorial.

The process starts with paper templates. These are much easier to work with than metal stock so [David] spends quite a bit of time trimming each piece to fit correctly. They are hinged together using thumb tacks which he crimps with a pair of pliers. With all the templates tuned to perfection he uses an awl to scratch the outline in his brass stock (you can use the metal of your choice). All of the holes are drilled and a bit of hammering flattens the parts before he heads to the grinder to smooth the cut edges.

To make the curves [David] fabricated his own jigs from pieces of pipe and carved wood squeezed together with a bench vice. It’s time-consuming, but the skills needed should be rather easy to develop with a little practice. You can catch his entire build in the video after the break.

Continue reading “DIY Armor Starts With This Gauntlet Tutorial”

Build Your Own Forge Inside A Gallon Paint Can

If you’d like to try your hand with the art of Blacksmithing but don’t want to go all-in on your first project this may be for you. It’s a forge which you can build for under $100. [Mike O’s] creation has some great features, like the option of using the forge as a pass through, and he finds it’s possible to heat metal up to 4″ wide.

He bought an empty paint can at the home store (we guess you don’t want fumes from any paint residue). The business end of the forge is actually the bottom of the paint can. He cut a small opening, then lined the inside of the can with Insulwool, a fabric used as heat shielding. From there the inside was lined with several layers of Satanite Refractory Cement. The same applications were made to the paint can’s original lid, which serves as the back of the forge. This way it can be removed for that pass-through we mentioned earlier.

A propane torch brings the heat for this project. [Mike] mentions that you’re going to want to do the first few firings outside as the cement really stinks until it’s been through a few heating cycles. This creation should get him started but we bet he’ll upgrade to something like this coal forge before long.

[via Reddit]