Home Made 8mm Digitizer

The 8mm film look is making a comeback, but distributing it is an issue. [Heikki Hietala] wanted an easy way to digitally capture the 8mm movies he made. So, he built an 8mm digitizer from an Arduino, a cheap Canon camera and the guts of an old 8mm film camera. When you throw in a few 3D printed components and some odd electronics, you get an impressive build that captures 8mm film with impressive speed and quality.

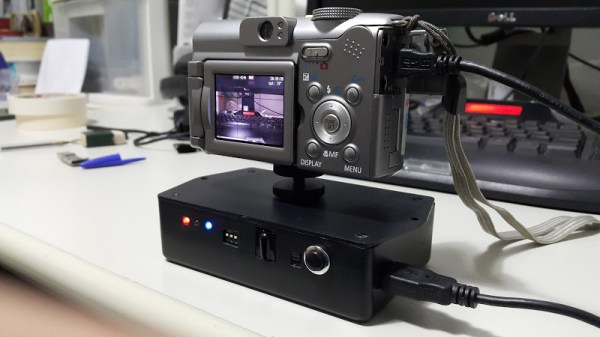
This build started with a Canon Ixus 5 camera running CHDK (the Canon Hack Development Kit) to lock the settings down. This points at the film strip through a macro lens so each frame of the strip fills the frame. An Arduino then triggers the camera to take a photo using a USB cable. The same Arduino also controls a motor that winds the film and triggers the film gate from the camera that he salvaged. By reversing the function and triggering it with a servo motor, he can easily blank off the edges of the frame so no stray light shining through the film material causes any problems. Once the camera has captured every frame on the strip, he feeds the captured images into Blender, which processes them and spits out the final movie.

This is a very impressive build overall. [Heikki] has obviously put a lot of thought into it, and the whole thing looks like it runs very efficiently and quickly. The captured video looks great, as you can see from this sample. The decision to use a salvaged film gate was a smart one: there is no point in reinventing the wheel if engineers of previous generations have solved the problem. Kudos to [Heikki] for also documenting the process in a lot of detail: he has produced a 5-part series on his blog that shows how and why he made the decisions he did. This series goes over the overall view of the project, using CHDK to control the camera, 3D printing parts, wiring the Arduino and writing the code that controls the system.

This sits nicely alongside the 8mm to video camera hack that we wrote about recently. This one doesn’t involve taking apart the camera (except for the sacrificial one that supplied the gate), and you still get that wonderfully grainy, jumpy look of 8mm film.

Continue reading “Home Made 8mm Digitizer”

Camera Controller

A Remote For CHDK Cameras Made Possible With Arduino

[AlxDroidDev] built himself a nice remote control box for CHDK-enabled cameras. If you haven’t heard of CHDK, it’s a pretty cool software modification for some Canon cameras. CHDK adds many new features to inexpensive cameras. In this case, [AlxDroidDev] is using a feature that allows the camera shutter to be activated via USB. CHDK can be run from the SD card, so no permanent modifications need to be made to the camera.

[AlxDroidDev’s] device runs off of an ATMega328p with Arduino. It operates from a 9V battery. The circuit contains an infrared receiver and also a Bluetooth module. This allows [AlxDroidDev] to control his camera using either method. The device interfaces to the camera using a standard USB connector and cable. It contains three LEDs, red, green, and blue. Each one indicates the status of a different function.

The Arduino uses Ken Shirrif’s IR Remote library to handle the infrared remote control functions. SoftwareSerial is used to connect to the Bluetooth module. The Arduino code has built-in functionality for both Canon and Nikon infrared remote controls. To control the camera via Bluetooth, [AlxDroidDev] built a custom Android application. The app can not only control the camera’s shutter, but it can also control the level of zoom.

Controlling A Point And Shoot With Bluetooth

Loading point and shoot digital cameras is old hat around here, but [Alex] and [Andreas] are taking it to the next level. They’ve made a Bluetooth controller for a cheap Canon camera, allowing pictures to be taken with an iPhone or Android device.

The camera in question is a Canon IXUS70, although any camera supported by CHDK will work. We’ve seen a few builds using this firmware to take pictures of the sunrise every day and transmitting images over a radio link, but this build is far more interactive.

The camera is connected to an Arduino and Bluetooth shield with a hacked up USB cable. The ‘duino communicates with a phone using a JQuery app, giving any phone with a Bluetooth module control of the camera’s zoom and shutter.

All the code is available on the github, with a very good video demonstration of the build available below.

Continue reading “Controlling A Point And Shoot With Bluetooth”

Enjoying The Sunrise Every Single Day

Exif_JPEG_PICTURE

[Andy] wanted to take a few at sunrise, but waking up before sunrise has obvious problems associated with it. Instead, he built a device that calculates the local sunrise time, snaps a picture, and goes to sleep until the next morning.

The camera used for the project was an old Canon point and shoot, chosen for the ability to load CHDK firmware. Other electronics included an Arduino pro mini, a LiPo battery and charger board, real time clock, and an old Nokia LCD for the user interface.

There’s quite a bit of code that goes into figuring out when the sun will rise each day, but once that’s figured out, all [Andy] has to do is take the camera somewhere pretty, point it East, and record a few days worth of sunrises. When put into a ‘game camera’ enclosure, its rugged enough to stand up to everything except a thief, and has enough battery power for a few weeks worth of sunrises.

Video demonstrating the local sunrise time below.

Continue reading “Enjoying The Sunrise Every Single Day”

Digital Camera Becomes Video Transmitter

canon

In the arena of high altitude balloons, Canon’s PowerShot series of digicams are the camera du jour for sending high into the stratosphere. There’s a particular reason for this: these cameras can run the very capable CHDK firmware that turns a $100 digicam into a camera with a built-in intervalometer along with a whole bunch of really cool features. It appears this CHDK firmware is much more powerful than we imagined, because [Chris] is now transmitting pictures taken from a Canon a530 to the ground, using only the CHDK firmware and a cheap radio module.

These PowerShot cameras have an ARM processor inside that runs VxWorks, a minimal but very capable OS for embedded devices and Mars rovers. By tying in to the Tx and Rx lines of the camera, [Chris] can issue commands to the OS, change settings, and even install his own code.

With the help of [Phil Heron]’s SSDV encoder written in C, [Chris] was able to get the camera to transmit images  with a small radio transmitter that fits in the battery compartment. Right now, [Chris] has only built the CHDK + SSDV for the Canon a530, but with how useful this build is, we expect to see an improved version very shortly.

Reading Punch Cards With An Arduino And Digital Camera

[digitaltrails] wanted the data on a few old IBM 80-column punch cards he had lying around, but didn’t have decades old computer hardware in his garage. He decided to build his own out of LEGO, an Arduino, a digital camera, and a bit of Python.

The hardware portion of [digitaltrails] build includes a crank-operated feed mechanism made entirely out of LEGO. For each turn of the crank, the feed mechanism sends one card down a chute where a photodetector wired into an Arduino tells a camera to take a picture. After that, a servo is activated, sending the card into the ‘already scanned’ bin.

On the software side of the build, [digitatrails] used the Python Imaging Library to scan one row of pixels where each column is expected to be. The software outputs the code and data contained on the 80-column card as well as a very cool ASCII art version of each card.

Considering you just can’t go down to Fry’s and buy an IBM 80-column punch card reader, we’re loving [digitatrails]’ clever way of getting data off an otherwise unreadable storage medium. Check out the video of the card reader in action after the break.

Continue reading “Reading Punch Cards With An Arduino And Digital Camera”

Adding A Remote Shutter To A Cheap Digital Camera

[Luo] sent in a very easy way to add a remote shutter to just about any Canon Powershot. Even though it’s just a button, battery, and USB cable, we’re sure this would be a great project to teach the younglings about the power of soldering.

Some Canon Powershot digicams are impressive beasts with the ability to take time-lapse, long exposure, and high-speed photos. These cameras are generally crippled by their firmware, but by installing CHDK these features can be enabled.

[Luo] read the CHDK wiki and found the firmware has the ability to snap a picture whenever a button is pressed. All he had to do is send 5V down a USB cable. After whipping up shutter button housed in a tin of Eclipse gum and attaching a cable, [Luo] had a functional shutter.

With the CHDK firmware, you can do a lot of really interesting stuff with the old Canon camera sitting on your shelf: we’ve seen a lot of intervalometers and even a few book scanners that use a similar setup. Nice work, [Luo].