Upgrading A Microsoft Surface To A 1 TB SSD

The Microsoft Surface Pro 3 is a neat little tablet, and with an i7 processor, a decent-resolution display, and running a full Windows 8.1 Pro, it’s the closest you’re going to get to a desktop in tablet format. Upgrading the Surface Pro 3, on the other hand, is nigh impossible. iFixit destroyed the display in their teardown, as did CNET. [Jorge] wanted to upgrade his Surface Pro 3 with a 1 TB SSD, and where there’s a will there’s a way. In this case, a very precise application of advanced Dremel technology.

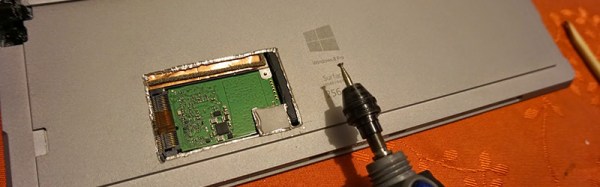
Taking a Surface Pro 3 apart the traditional way with heat guns, spudgers, and a vast array of screwdrivers obviously wasn’t going to work. Instead, [Jorge] thought laterally; the mSSD is tucked away behind some plastic that is normally hidden by the small kickstand integrated into the Surface. If [Jorge] could cut a hole in the case to reveal the mSSD, the resulting patch hole would be completely invisible most of the time. And so enters the Dremel.

By taking some teardown pictures of the Surface Pro 3, printing them out to scale, and aligning them to the device he had in his hand, [Jorge] had a very, very good idea of where to make the incision. A Dremel with a carbide bit was brought out to cut into the metal, and after a few nerve-wracking minutes the SSD was exposed.

The only remaining task was to clone the old drive onto the new one, stuff it back in the Surface, and patch everything up. [Jorge] is using some cardboard and foam, but a sticker would do just as well. Remember, this mod is only visible when the Surface kickstand is deployed, so it doesn’t have to look spectacular.

Thanks [fridgefire] and [Neolker] for sending this in.

Dremel Light Ring

Light Ring Allows Precise Dremeling

Whether you are working at home, in the office or in the shop, proper lighting is pretty important. Not having proper lighting is a contributor to fatigue and visual discomforts. Prolonged straining of the eyes can result in headaches, eye twitching, blurred vision and even neck pain. [pinomelean] likes to make chemically etched PCB boards and he was having a hard time seeing while drilling those boards for the through-hole components. So, he did what any good hacker would do and came up with a solution: a light ring for his Dremel.

Yes, [pinomelean] does prefer to drill his PCB holes by hand with a Dremel. Since he was already a competent PCB board maker, he decided that it would be an appropriate method to make a light ring. The light ring itself is round with a center hole just over 0.750″ in diameter. This hole slides over the 3/4-12 threaded end that most Dremels have for attaching accessories. The stock Dremel decorative  ‘nut’ secures the light ring PCB to the tool. There are pads for 9 surface mount LEDs and through holes for a current-limiting resistor and pins to connect a power supply, which in this case is an old phone charger. In the end the project worked out great and [pinomelean] can clearly see where those holes are being drilled!

If you’re interested in making one of these light rings, [pinomelean] graciously made his board layout available in his Instructable. If you think one would go well with a soldering iron, check this out.

dremel base station

DIY Super Accessory For Your Dremel

Little jobs require little tools and you can’t get much more littler than a Dremel. For his tiny tasks, [sdudley] has built a Dremel-powered base station that features a table saw, drum sander and router table. Overall, it is about one cubic foot in size and is almost entirely made from ‘1 by’ dimensional lumber. The Dremel power plant was actually used to make the base, specifically slowly removing material at the clamping points that hold the rotary tool secure to the base. The Dremel is held in an upright position and pokes out through the center of the table for both the drum sander and router configurations. To use this as a table saw, the Dremel is mounted almost horizontally on the base. A Mini Saw attachment has to be purchased for the table saw configuration but it does a great job at holding a vertically spinning saw blade.

After the break there’s a nice video of this tool’s use and assembly (it’s even worth watching just for the musical accompaniment that takes you on a wild ride through several genres of music). For those who want to make one for themselves, [sdudley] has made his part templates and assembly guide available in PDF format on his Instructables page. If you’re looking for something a little larger, check out this circular saw converted to a table saw.

Continue reading “DIY Super Accessory For Your Dremel”

dremelduplicator

Dremel Powered Duplicating Carving Machine

[Adran] wanted to be able to accurately cut out a bunch of the same parts out of wood but didn’t have the cash to spend on buying or building an automated CNC machine. After thinking about it for a while he decided to build a mechanical device that will allow him to duplicate objects by tracing them in 3 dimensions. This type of duplicator uses a stylus to trace over the surface of an object while the cutting tool is also moved over a piece of raw material, cutting as it goes. The end result is a newly carved object that is the same shape as the original. The idea is like a pantograph that works in 3 dimensions.

The wood frame is constructed to move freely front to back and left to right. To control the height of the cutting tool, in this case a Dremel, the frame pivots up and down and the X-axis rail. A screw driver is mounted off the side of the Dremel that acts as a stylus. It is mounted in the same orientation as the Dremel bit and is constrained such that it and the Dremel move in the same direction and amount at all times. When the tip of the screwdriver is traced over a 3D part, the Dremel moves the exact same amount carving a part out of a block of material.

Although the machine works, [Adran] admits there is some room for improvement. The left to right motion is a little choppy as the wood frame is riding directly on steel rails. He plans on adding linear bearings for the next revision to smooth things out.

DIY Router Base For Your Dremel

dremel-attachment-main

Dremel rotary tools are handy. Some of the attachments are convenient.  [vreinkymov] felt the convenience wasn’t worth the cost, so he decided to make a Router Base for his Dremel. These types of attachments are used to hold the Dremel perpendicular to the work surface.

Underneath the little nut/cover near the spindle of the Dremel, there is a 3/4″-12 threaded feature used to attach accessories. A quick trip down the hardware store’s plumbing aisle resulted in finding a PVC reducer with the correct female thread to fit the Dremel. Once on the rotary tool, the reducer threads into a PVC nipple that is glued to a piece of acrylic. The acrylic acts as the base of the router attachment.

Continue reading “DIY Router Base For Your Dremel”

Simple Dremel TRIAC Hack Repair

Dremel Repair

It’s a wonderful thing to see a clever hack repair instead of disposing of a product. The best repair approach is finding exact replacement components, but sometimes exact components can’t be sourced or cross-referenced. Other times the product isn’t worth the shipping cost for replacement parts or you just don’t have time to wait for parts. That’s when you need to really know how something works electronically so you can source suitable replacement components from your junk bin to complete the repair. This is exactly what [Daniel Jose Viana] did when his 110 volt Dremel tool popped its TRIAC after he plugged it into a 220 volt outlet.

[Daniel] knew how the TRIAC functioned in the circuit and also knew that a standard TRIAC of sufficient specifications could be used as a replacement even if it didn’t have the correct form factor to fit the PCB layout. For [Daniel’s] tool repair he had to think outside the box enough to realize he could use some jumper wires and snuggle a larger TIC206E TRIAC that wasn’t meant for the device but still applicable into the housing where there was enough free space. A little shrink-wrap and all was good again. Sure the fix was simple, but let’s not trivialize the knowledge he needed for this repair.

And if you’re wondering if it worked, he notes that he’s been using this tool for three years since the repair. We thank [Daniel] for sharing this tip and allowing us to add this to our tool belt of Dremel repair tricks.

Oreo-creme Hater Builds Rube Goldberg CNC Router To Remove The Stuf

oreo-separator

Look, we understand the need to find a project to occupy your time and interest. So we’re not going to ask the wrong question (why?) for this one. This guy hates the creme that connects the chocolate cookies to make an Oreo. So he built a complicated system to separate the cookies and remove the creme. Check out the video after the break for a hardware overview (where we catch a glimpse of an Arduino RBBB) and a complete demonstration.

Although the project is a marketing gimmick for the company, we really love the fun they had making the video and the device actually works! Drop a cookie in the chute and it will be lifted into position for cleaving with a hatchet (we’re unsure what the string mechanism on the hatchet is for). The two pieces are then grabbed by some servo-powered grippers and transferred to a CNC router bed where a Dremel tool removes the residual creme before dumping the cookies out into your hand.

Once again, marketers should take note of this style of advertising. Notice the two main features achieved here: including a product in something we’re genuinely interested in and not being annoying (we’re looking at you Head-On).

Continue reading “Oreo-creme Hater Builds Rube Goldberg CNC Router To Remove The Stuf”