Heating, Bending, And Gluing To Make Acrylic Enclosures

acrylic-enclosures-heating-bending-gluing

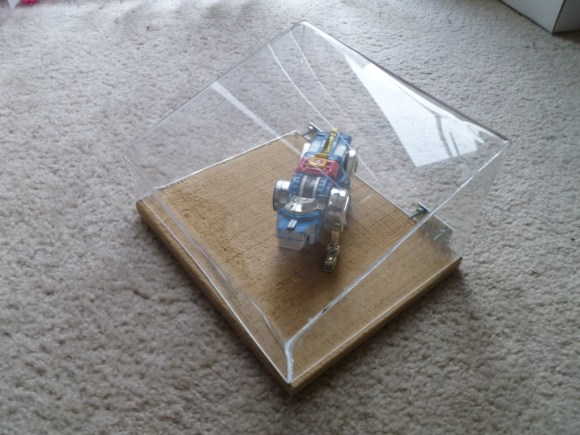
You can do a lot with acrylic and few tools. If you’re just starting out we’d suggest taking a look at [Michael Colombo’s] guide to heating, bending, and gluing to create custom acrylic enclosures. Chances are you already have most of what you need. The one tool you might be lacking is a heat gun.

The process starts with math. Before cutting the acrylic down to size you need to calculate how much you need. Next [Michael] demonstrates his cutting technique using a Dremel and a cut-off wheel. We prefer to clamp along the cut line, score many times with a razor knife, and snap the stuff. But you can also send it through a table saw if you have the right blade.

The bending technique he uses starts by clamping boards on either side of the bend. The acrylic left sticking out is pushed with a scrap board while the bend is heated with the heat gun. Once all of the corners were made in one piece the sides were glued in place. This last step can be tricky. The acrylic glue is made to work with perfect seams, so make sure your cuts are clean and the bent pieces line up.

The process was documented in the clip found after the jump. If you’re looking for a more targeted heat source check out this dedicated acrylic bender.

Continue reading “Heating, Bending, And Gluing To Make Acrylic Enclosures”

BGA Soldering With A Paint Stripper And Stopwatch

Having just received a shiny set of PCBs from the fab-house [Devbisme] needed a way to solder the main chip in place. It has a Ball-Grid Array footprint which is notoriously difficult to populate in a home lab. But he makes it look pretty easy and decided to share a video tutorial of the process.

The main tool he used is the paint stripper (heat gun) seen above. Since he didn’t have his own fancy reflow oven he made things work with the gun as his heat source. First he applies a generous layer of liquid solder flux to the BGA footprint on the board. Next he melts some solder onto the tip of his iron and uses it to tin all of the board’s BGA pads. Then it’s time for the critical step of positioning the chip. He uses vacuum tweezers to set it in place, and traditional tweezers to fine-tune its position. From here he heats with the paint stripper for two minutes, starting far above the board and slowly moving closer, with the reverse at the end of the soldering process. Once cool the board is cleaned with distilled water and blown dry with compressed air. After a visual inspection he finishes the application with a 30 minute stay in a 300 degree oven. We’ve included the video after the break for your convenience.

We’ve seen a similar technique used for replacing a chip on an already populated board.

Continue reading “BGA Soldering With A Paint Stripper And Stopwatch”

Learn A New Fabrication Technique From DIY Prosthetics Builders

This is a screenshot from a video tutorial on making your own prosthetic parts from 2-liter soda bottles. The opaque white part is a mold made of plaster. It’s a representation of the wearer’s limb, and provides the hard, heat-resistant form necessary for this manufacturing technique. You can see the clear plastic soda bottle which fits over the form after the bottom was removed. A heat gun causes the plastic to shrink to the shape of the plaster model.

Once formed, the threaded neck is split down the middle with a band saw. This will receive a piece of 1/2″ PVC pipe to be held in place by the neck and a pipe clamp. It’s possible to stop there, but a second video details an additional bottle used to make the device more rigid. See both videos after the break.

This manufacturing process is aimed at parts of the world that don’t have access to advanced prosthetics. We think it’s a wonderful demonstration of what can be done to improve the lives of amputees. We also think it’s a technique that can be used in other projects… we just haven’t figured out what those are as of yet.

It’s amazing how versatile this plastic waste can be if you put your mind to it.

Continue reading “Learn A New Fabrication Technique From DIY Prosthetics Builders”

Homebrew Heat Gun From Scrounged Parts

A Hack a Day reader needed a tool to solder a lot of SMD parts, so he built a DIY heat gun, and we’re impressed with the results.

After trawling the internet looking for ideas for his heat gun, [MRGATZ85] found that most builds used the ceramic element from cheap soldering irons. Experiments in this direction didn’t go very well because the ceramic element in these irons tends to fall apart very easily. In a moment of inspiration, [MRGATZ85] realized he had an old vaporizer lying around and decided to take it apart. To his surprise, the vaporizer element was a great size, self-contained, and most importantly free. After fabricating a case out of high-temperature foam, aerosol cans, and deadbolt parts, [MRGATS85] was left with a very nice build.

Aside from SMD work, a heatgun can be a very valuable tool for PCB stripping and being used for solder reflow. We’re a little surprised we haven’t seen a homebrew heat gun in quite a while. Even though the element is surrounded by high-temperature foam, the gun still gets a little hot to the touch. We’re hoping that will eventually be under control; it’s a very useful build otherwise.

Check out the image gallery, or the video demo after the break.

Continue reading “Homebrew Heat Gun From Scrounged Parts”

Heat Gun GPU Reflow Fixes Laptop

Solder connections on processors seem to be a very common failure point in modern electronics. Consider the Red Ring of Death (RRoD) on Xbox 360 or the Yellow Light of Death (YLoD) on PlayStation 3. This time around the problem is a malfunctioning Nvidia GPU on an HP Pavilion TX2000 laptop. The video is sometimes a jumbled mess and other times there’s no video at all. If the hardware is older, and the alternative to fixing it is to throw it away, you should try to reflow the solder connections on the chip.

This method uses a heat gun, which we’ve seen repair PCBs in the past. The goal here is to be much less destructive and that’s why the first step is to test out how well your heat gun will melt the solder. Place a chunk of solder on a penny, hold the heat gun one inch above it and record how long it takes the solder to flow. Once you have the timing right, mask off the motherboard (already removed from the case) so that just the chip in question is accessible. Reflow with the same spacing and timing as you did during the penny test. Hopefully once things cool down you’ll have a working laptop or gaming console again.

Another Take On Roasting Those Beans

[Andrew] takes his coffee very seriously and like any hardcore aficionado he wanted to do the roasting himself. The coffee roaster design uses a heat gun for the roasting and sources an old bread maker as a vessel. As part of the automatic bread making process there’s a little agitator arm inside which keeps the beans moving while the heat is applied. A computer controls the heat gun, adjust with feedback from a temperature sensor. We had a bit of a laugh reading about melted temperature sensors, but design flaws aside this computer interface allows rather strict control of the roasting profile.

Reader [Youseff] tipped us off about this after seeing the Popcorn Coffee Bean roaster from last week.