Better Macro Images With Arduino Focus Stacking

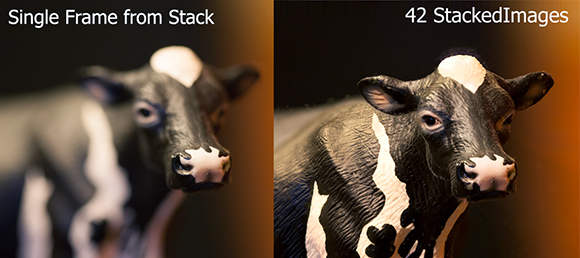
If you’ve ever played around with macro photography, you’ve likely noticed that the higher the lens magnification, the less the depth of field. One way around this issue is to take several slices at different focus points, and then stitch the photos together digitally. As [Curious Scientist] demonstrates, this is a relatively simple motion control project and well within the reach of a garden-variety Arduino.

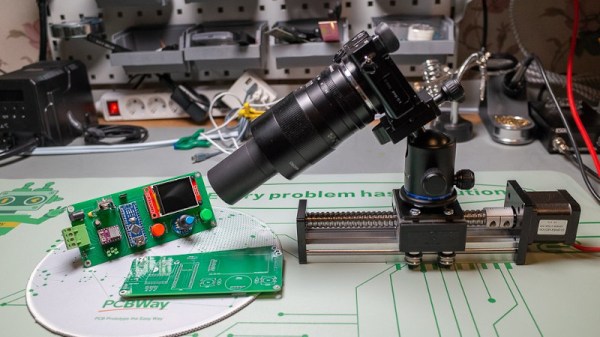
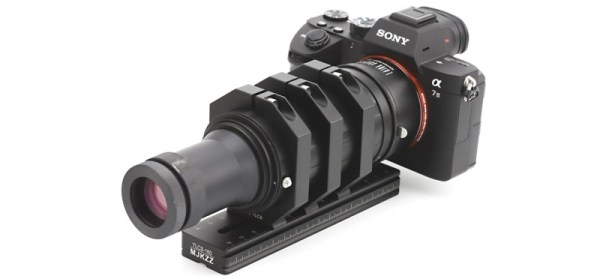
You can move the camera or move the subject. Either way, you really only need one axis of motion, which makes it quite simple. This build relies on a solid-looking lead screw to move a carriage up or down. An Arduino Nano acts as the brains, a stepper motor drives the lead screw, and a small display shows stats such as current progress and total distance to move.

The stepper motor uses a conventional stepper driver “stick” as you find in many 3D printers. In fact, we wondered if you couldn’t just grab a 3D printer board and modify it for this service without spinning a custom PCB. Fittingly, the example subject is another Arduino Nano. Skip ahead to 32:22 in the video below to see the final result.

We’ve seen similar projects, of course. You can build for tiny subjects. You can also adapt an existing motion control device like a CNC machine.

Continue reading “Better Macro Images With Arduino Focus Stacking”

Trying Out A 3D Printed Microscope Lens Adapter

If you want to take pictures of tiny things close up, you need a macro lens. Or a microscope. [Nicholas Sherlock] thought “Why not both?” He designed a 3D-printed microscope lens adapter that you can find on Thingiverse. Recently, [Micael Widell] tried it out with a microscope lens and you can see the results in the video below.

A $20 microscope lens allows for some amazing shots. There are two designs that fit different cropped-image and full-frame cameras. As you might expect, the depth of field is razor-thin, probably sub-millimeter. Additionally, with a 4X lens on a 35 mm sensor, the field of view is about 9 mm so you have to have a steady hand just to keep everything in frame.

Continue reading “Trying Out A 3D Printed Microscope Lens Adapter”

Macro Photography With Industrial Lenses

Line scan cameras are advanced devices used for process inspection tasks in industrial applications. Used to monitor the quality of silicon wafers and other high-accuracy tasks, they’re often outfitted with top-quality optics that are highly specialised. [Peter] was able to get his hands on a lens for a line-scan camera, and decided to put it to work on some macro photography instead.

Macro image taken with the hacked lens.

Judging by the specs found online, this is a fairly serious piece of kit. It easily competes with top-shelf commercial optics, which is what piqued [Peter]’s interest in the part. Being such a specialised piece of hardware, you can’t just cruise over to eBay for an off-the-shelf adapter. Instead, a long chain of parts were used to affix this lens to a Sony AIII DSLR, converting from threaded fittings to a Nikon mount and then finally to Sony NEX mount.

Further work involved fitting an aperture into the chain to get the lens as close as possible to telecentric. This improves the lens’s performance for certain tasks, and makes focus stacking macro shots more readily achievable – something we’ve seen [Peter] tinker with before.

You never know what you might find when sorting through surplus industrial gear, could could score some high-performance hardware if you know where to look. It’s always great to see a cheap find become a useful instrument in the hacker toolbox!

A Soap Film Photography How-To

Blowing bubbles is a pastime enjoyed by young and old alike. The pleasant motion and swirling colors of the bubbles can be remarkably relaxing. With the right tools and techniques, it’s possible to take striking photos of these soap film phenomena, and that’s exactly what [Eric] and [Travis] did.

Adding sugar to the soap solution increases the resilience of the film significantly. With enough added, the film no longer pops, but instead breaks and fails in interesting ways.

After beginning with a robotic arm and a computer fan blowing bubbles, the project moved towards a simple stepper motor setup. A thin frame is lowered into a solution of soapy water, then brought back up by the stepper motor. The resulting soap film is held in front of a black background and carefully lit with a softbox light.

Lens selection is critical for this sort of work – in this case, a TS-E 50mm Macro f/2.8 lens was the order of the day. [Eric] shares other tips for taking great shots, such as adding sugar to the solution to make the soap film last longer, and using a modified speaker to help “paint” the surface of the films.

The resulting images are beautiful examples of the art, showing vibrant colors from the interference patterns created by the light. [Eric] has done a great job of clearly documenting the development process and the final results, making it possible for others to recreate the project elsewhere.

We’ve seen other soapy projects before, like this automatic bubble blowing machine. Video after the break.

Continue reading “A Soap Film Photography How-To”

Horrible Macro Rig Makes Good Photos

We love horrible hacks like this. It’s a lens and a ring of LEDs, taped to a cell phone. Powered through crocodile clips, also taped to the cell phone. There’s nothing professional here — we can think of a million ways to tweak this recipe. But the proof of the pudding is in the tasting.

Continue reading “Horrible Macro Rig Makes Good Photos”

DIY Camera Light Ring

Inexpensive Ring Light Makes Macro Photos Easy

[edyb] uses his relatively inexpensive Cannon camera quite a bit. However, in dark areas or extreme closeups, the camera’s image quality leaves something to be desired. [edyb] hopped on the ‘net and found out that a ring light may cure his photo faux pas. Ring lights are nothing new but nothing existed for his lower-end point and shoot camera. With a USB-powered lamp and a spare AA battery pack kicking around, [edyb] decided to make his own.

First, the USB lamp was disassembled, luckily the LEDs were already laid out in a ring shape. The clear protective housing and gooseneck were discarded and the remaining PCB ring was glued directly to the camera. A female USB jack was then glued to the top of the camera and soldered to the two leads connected to the lamp’s PCB. The AA battery holder received a small switch and a male USB plug, also courtesy of a few dabs of glue. The now-assembled battery pack plugs directly into the camera via the USB connector and is its only method of attachment.

DIY Camera Light Ring
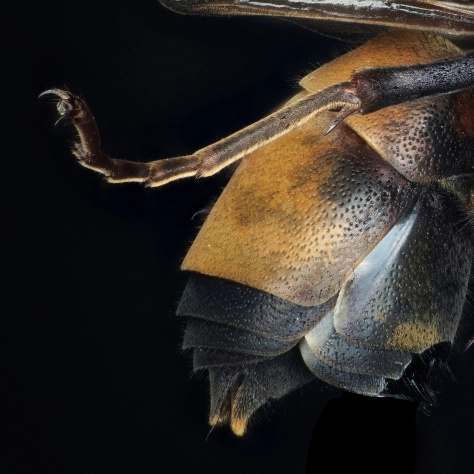
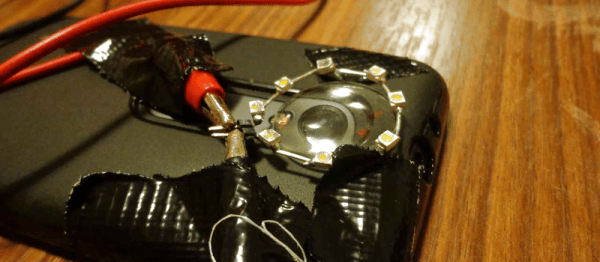
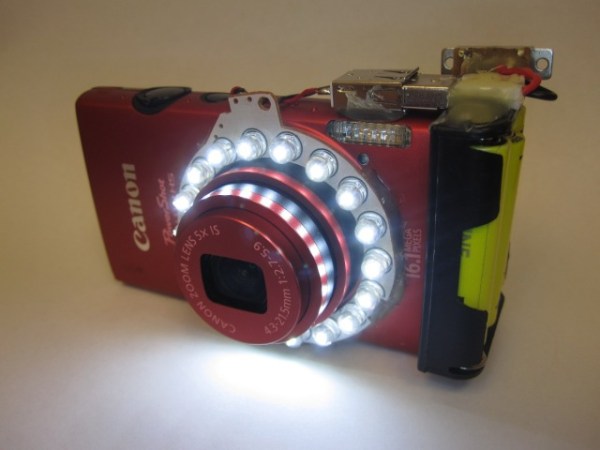
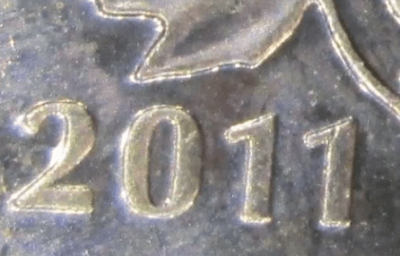
The utilitarian modification may look crude but the results are anything but. Check out this close-up macro shot of a Canadian penny. Not too bad.

[edyb] has done some similar mods to other cameras, attaching components with magnets and even using an old Blackberry battery to power the LEDs showing that there is no one way to solve a problem. Check out the video after the break…

Continue reading “Inexpensive Ring Light Makes Macro Photos Easy”

Flatbed Scanner Eliminates The Perils Of Macro Photography

IMG_7728

If you have ever played around with macro photography, you’ll know how hard it is to get a focused image of something that isn’t two-dimensional. For virtually every 3D object, you’ll have to deal with the depth of field – the small region where things are actually in focus. [David] came up with a neat homebrew solution for making sure everything in his macro photos is in focus using a discarded flatbed scanner and a Raspberry Pi.

[David]’s technique relies on focus stacking. Basically, [David] takes dozens of images of the same object, moving the camera closer by a fraction of an inch before snapping each frame. These pictures are stitched together with CombineZ, a piece of software used for extending the depth of field in images.

The hardware part of the build is a Raspberry Pi hooked up to a stepper motor driver and the shutter button of [David]’s camera. By attaching his camera to the carriage of a flatbed scanner, [David] can inch his camera ever closer to his object of study while grabbing the images for CombineZ.

The results are impressive, and would be nearly impossible to replicate any other way without tens of thousands of dollars in camera equipment.