LoRa Helps With Remote Water Tank Level Sensing

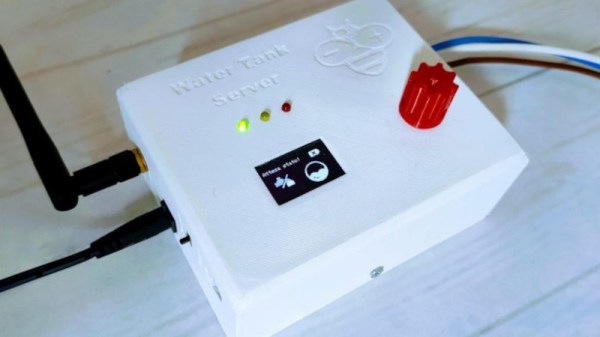
[Renzo Mischianti]’s friend has to keep a water tank topped up. Problem is, the tank itself is 1.5 km away, so its water level isn’t typically known. There’s no electricity available there either — whichever monitoring solution is to be used, it has to be low-power and self-sufficient. To help with that, [Renzo] is working on a self-contained automation project, with a solar-powered sensor that communicates over LoRa, and a controller that receives the water level readings and powers the water pump when needed.
[Renzo] makes sure to prototype every part using shields and modules before committing to a design, and has already wrote and tested code for both the sensor and the controller, as well as created the PCBs. He’s also making sure to document everything as he goes – in fact, there’s whole seven blog posts on this project, covering the already completed software, PCB and 3D design stages of this project.

These worklogs have plenty of explanations and pictures, and [Renzo] shows a variety of different manufacturing techniques and tricks for beginners along the way. The last blog post on 3D designing and printing the sensor enclosure was recently released, and that likely means we’ll soon see a post about this system being installed and tested!

[Renzo] has been in the “intricately documented worklogs” business for a while. We’ve covered his 3D printed PCB mill and DIY soldermask process before, and recently he was seen adding a web interface to a 3D printer missing one. As for LoRa, there’s plenty of sensors you can build – be it mailbox sensors, burglar alarms, or handheld messengers; and now you have one more project to draw inspiration and knowledge from. [Renzo] has previously done a LoRa tutorial to get you started, and we’ve made one about LoRaWAN!

Continue reading “LoRa Helps With Remote Water Tank Level Sensing”

A Mostly Fair Deal For All With A Raspberry Pi

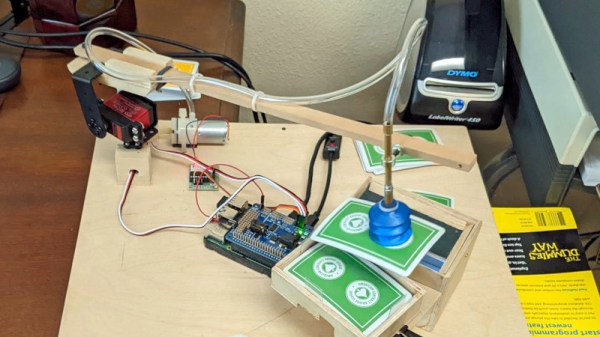
To be a professional card dealer takes considerable skill, something that not everybody might even have the dexterity to acquire. Fortunately even for the most ham-fisted of dealers there’s a solution, in the form of the Dave-O-matic, [David Stern]’s automated card dealer using a Raspberry Pi 4 with a camera and pattern recognition.

It takes the form of a servo-controlled arm with a sucker on the end, which is able to pick up the cards and present them to the camera. They can then be recognized by value, and pre-determined hands can be dealt or alternatively a random hand. It seems that the predetermined hands aren’t an aid in poker cheating, but a part of the bridge player’s art. You can see it in action in the video below the break.

We like the project, but sadly at this point we must take [Dave] to task, because while tantalizing us with enough detail to get us interested he’s slammed the door in our faces by failing to show us the code. it would be nice to think that the clamor from disaffected Hackaday readers might spur him into throwing us a crumb or two.

It probably won’t surprise you to find that this isn’t the first Raspberry Pi to find itself dealing cards.

Continue reading “A Mostly Fair Deal For All With A Raspberry Pi”

Trying Out A 3D Printed Microscope Lens Adapter

If you want to take pictures of tiny things close up, you need a macro lens. Or a microscope. [Nicholas Sherlock] thought “Why not both?” He designed a 3D-printed microscope lens adapter that you can find on Thingiverse. Recently, [Micael Widell] tried it out with a microscope lens and you can see the results in the video below.

A $20 microscope lens allows for some amazing shots. There are two designs that fit different cropped-image and full-frame cameras. As you might expect, the depth of field is razor-thin, probably sub-millimeter. Additionally, with a 4X lens on a 35 mm sensor, the field of view is about 9 mm so you have to have a steady hand just to keep everything in frame.

Continue reading “Trying Out A 3D Printed Microscope Lens Adapter”

ESP32 Powers Fresh Take On An IoT Geiger Counter

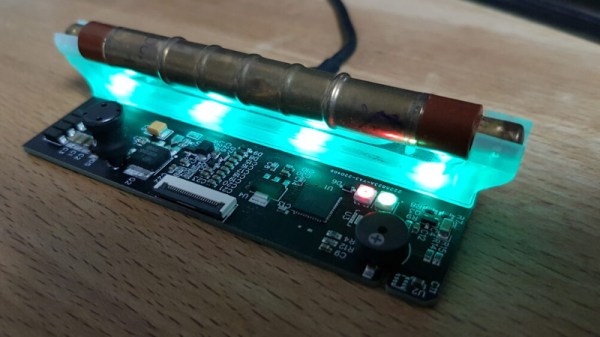
Over the years we’ve covered many projects aimed at detecting elevated radiation levels, and a fair number of them have been Internet connected in some way. But as they are often built around the Soviet-era SBM-20 Geiger–Müller tube, these devices have generally adhered to a fairly conservative design. With the current situation in Europe heightening concerns over potential radiation exposure, [g3gg0] thought it was a good a time as any to revisit the idea of an Internet-connected Geiger counter using more modern components.

Now to be clear, even this modernized approach still makes use of that same SBM-20 tube. There’s such an incredible wealth of information floating around out there about how to work with them that you’d almost put yourself at a disadvantage to chose something else to base your design on. Put simply, it’s hard to go wrong with a classic.

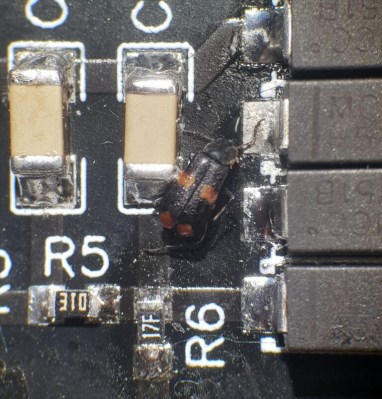
An unfortunate bug was discovered in the HV circuit.

That said, [g3gg0] decided early on that the design would use as many SMD components as possible, a considerable departure from many of the SBM-20 counters we’ve seen. That meant coming up with a new high-voltage power supply capable of providing the tube with the necessary 400 V, which from the sound of things, took a few attempts to complete. The final result is perhaps the smallest and cleanest looking board we’ve ever seen play host to this particular tube.

To run the show, [g3gg0] selected the ESP32-PICO-D4. You certainly don’t need such a powerful microcontroller to read the impulses from the SBM-20 tube and publish them via MQTT, but to be fair, the chip has a number of other duties. It’s handling the WS2812 RGB LEDs that go off in response to detected particles, running the (apparently optional) 2.9 inch WaveShare electronic paper display, and also pulling data from a BME280 environmental sensor as well as a CCS811 VOC sensor — so it’s keeping fairly busy.

As impressive as this build is, we do hate that it had to be built. From certain world leaders dropping casual comments about the strength of their nuclear arsenal to foolhardy attempts to capture the Chernobyl power station, having access to a reliable Geiger counter isn’t an unreasonable precaution right now. For everyone’s sake, let’s hope the fancy RGB LEDs on this particular build remain as dark as possible.

Continue reading “ESP32 Powers Fresh Take On An IoT Geiger Counter”

Retrotechtacular: 1990s CD Mastering Fit For A King

Before it was transformed into an ephemeral stream of ones and zeroes, music used to have a physical form of some kind. From wax cylinders to vinyl discs to tapes of various sizes in different housings and eventually to compact discs, each new medium was marketed as a technological leap over the previous formats, each of which justified incrementally more money to acquire.

But that’s the thing — each purchase resulted in you obtaining a physical item, which had an extensive manufacturing and distribution process behind it. And few artists demanded more manufacturing effort than Michael Jackson in his heyday, as revealed by this in-depth look at the CD manufacturing process for The King of Pop’s release of the HIStory double-disc set in 1995.

The video was produced as sort of a love letter to Michael from the staff and management of the Sony Music disc manufacturing plant in Pittman, New Jersey. The process is shown starting with the arrival of masters to the plant, strangely in the form of U-matic videocassettes; the 3/4″ continuous loop tape was normally used for analog video, but could also be used for recording digital audio. The digital audio is then sent for glass mastering, which is where the actual pits are created on a large glass disc under cleanroom conditions. In fact, much of the production process bears a strong similarity to semiconductor manufacturing, from the need for cleanrooms — although under less stringent conditions than in a fab — to the use of plasma etching, vapor deposition, and metal plating operations.

Once the master stampers are made, things really ramp up in replication. There the stamper discs go into injection molding machines, where hot polycarbonate is forced against the surface under pressure. The copies are aluminized, spin-coated with UV-cure lacquer, and sent on down the line to testing, screen printing, and packaging. Sony hired 40 extra full-time workers, who appear to have handled all the tedious manual tasks like assembling the jewel cases, to handle the extra load of this release.

As cheesy as this thank-you video may be, it was likely produced with good reason. This was a time when a Michael Jackson release was essentially a guarantee of full employment for a large team of workers. The team was able to produce something like 50,000 copies a day, and given that HIStory sold over 20 million copies, that’s a lot of workdays for the good folks at Pittman.

Continue reading “Retrotechtacular: 1990s CD Mastering Fit For A King”

The Benefits Of Displacement Ventilation

The world has been shaken to its core by a respiratory virus pandemic. Humanity has been raiding the toolbox for every possible weapon in the fight, whether that be masks, vaccinations, or advanced antiviral treatments.

As far as medicine has come in tackling COVID-19 in the past two years, the ultimate solution would be to cut the number of people exposed to the pathogen in the first place. Improving our ventilation methods may just be a great way to cut down on the spread. After all, it’s what they did in the wake of the Spanish Flu.

Continue reading “The Benefits Of Displacement Ventilation”

DIY Low-Cost LoRa Satellite Ground Station

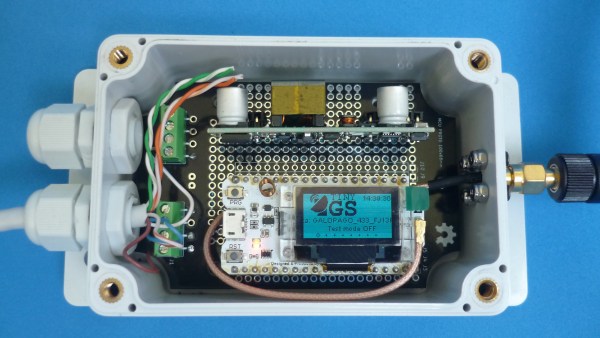
Embedded engineer [Alberto Nunez] has put together a compact LoRa satellite telemetry ground station that fits in your hand and can be built for around $40 USD.

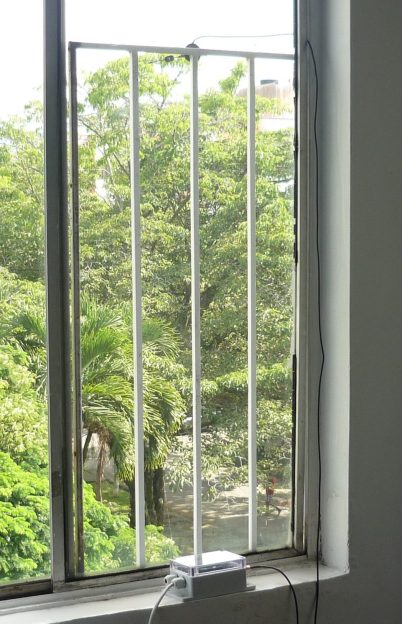
The station receives signals from any of several satellites which use LoRa for telemetry, like the FossaSat series of PocketQube satellites. Even with a sub-optimal setup consisting of a magnetic mount antenna stuck outside a window, [Alberto] is able to receive telemetry from satellites over 2,000 kilometers distant. He also built a smaller variant which is battery powered for portable use.

The construction of this ground station makes use of standard off-the-shelf items with a Heltec ESP32-based LoRa / WiFi module as the heart. This module is one of several supported by the TinyGS project, which provides receiver firmware and a worldwide telemetry network consisting of 1,002 stations as of this writing. The firmware has a lot of features, including OTA updates and auto-tuning of your receiver to catch each satellite as it passes overhead.

The TinyGS project started out as a weekend project back in 2019 to use an ESP32 to receive LoRa telemetry from the FossaSat-1 satellite, and has expanded to encompass all satellites, and other flying objects, using LoRa-based telemetry. It uses Telegram to distribute data, with a message being sent to the channel anytime any station in the network receives a telemetry packet from a satellite.

If you’re interested in getting your feet wet receiving satellite signals, this is an easy project to start with that won’t break the bank.