Mains Rated Solid State Relay Test Box

building-a-mains-solid-state-relay-test-box

We like our nice, safe, 5V prototyping projects where the only thing that might get fried is a chip. But there are times when you want to switch appliances for one reason or another and then you’re going to want a mains rated relay. [Viktor] got tired of having exposed high voltage on the bench during the prototyping stage of these projects so he recently built a solid state relay test box.

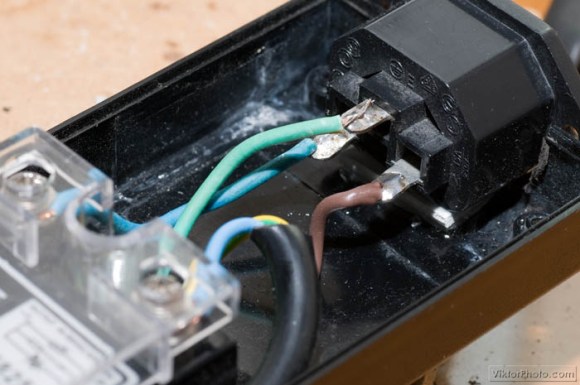
The only thing he bought for the project was the SSR itself. To act as an enclosure he used the brick from an old laptop power supply. This is perfect for a couple of reasons. First off, it’s designed to contain high voltage if there is ever a short or other problem. Second, it’s already setup for incoming and outgoing power. He just needed to remove the guts and mount the relay. Notice that it comes with a clear plastic shield that physically separates the high voltage side from the low voltage control end. This, along with the cable routing, keeps the dangerous stuff on one side to ensure you won’t get an arc to the low voltage portion of the project.

Dimming The Living Room Lights Using Your TV Remote

As part of a complete home theater setup [Andy] wanted to be able to control the lights from his couch. He started thinking about the best way to do this when he realized that his TV remote has buttons on it which he never uses. Those controls are meant for other components made by the same manufacturer as the TV. Since he doesn’t have that equipment on hand, he built his own IR receiver to switch the lights with those unused buttons.

He monitors and IR receiver using an AVR microcontroller. It is powered from mains via the guts from a wall wart included in the build. Also rolled into the project is a solid state relay capable of switching the mains feed to the light circuit. [Andy] mentions that going with a solid state part mean you don’t get that clicking associated with a mechanical relay. An electrical box extension was used to give him more room for mounting the IR receiver and housing his DIY circuit board.

Bluetooth Control In A Power Strip

[Mansour] had a ceramic space heater mounted near the ceiling of his room. Since heat rises this is not the best design. He upgraded to an infrared heater which works a lot better, but lacks the timer function he used on the old unit. His solution wasn’t just to add a timer. He ended up building a Bluetooth module into a power strip in order to control the device wirelessly. He ends up losing all but two outlets on the strip, but everything fits inside the original case so we think it’s a reasonable trade-off.

He uses relays on both the live and neutral wires to switch the two outlets. These are driven via MOSFETs to protect the ATmega168 which controls the board. The microcontroller and Bluetooth module both need a regulated DC power source, so he included a transformer and regulator in the mix. After the break you can see him demonstrating the system using two lamps. There’s even a terminal interface which lets you select different control commands by sending the appropriate character. This interface makes script a breeze.

At least this power strip doesn’t spy on you.

Continue reading “Bluetooth Control In A Power Strip”

How’s The 60Hz Coming From Your Wall?

If you’ve ever wondered why NTSC video is 30 frames and 60 fields a second, it’s because the earliest televisions didn’t have fancy crystal oscillators. The refresh rate of these TVs was controlled by the frequency of the power coming out of the wall. This is the same reason the PAL video standard exists for countries with 50Hz mains power, and considering how inexpensive this method of controlling circuits was the trend continued and was used in clocks as late as the 1980s. [Ch00f] wondered how accurate this 60Hz AC was, so he designed a little test.

Earlier this summer, [Ch00f] bought a 194 discrete transistor clock kit and did an amazing job tearing apart the circuit figuring out how the clock keeps time. Needing a way to graph the frequency of his mains power, [Ch00f] took a small transformer and an LM311 comparator. to out put a 60Hz signal a microcontroller can read.

This circuit was attached to a breadboard containing two microcontrollers, one to keep time with a crystal oscillator, the other to send frequency data over a serial connection to a computer. After a day of collecting data, [Ch00f] had an awesome graph (seen above) documenting how fast or slow the mains frequency was over the course of 24 hours.

The results show the 60Hz coming out of your wall isn’t extremely accurate; if you’re using mains power to calibrate a clock it may lose or gain a few seconds every day. This has to do with the load the power companies see explaining why changes in frequency are much more rapid during the day when load is high.

In the end, all these changes in the frequency of your wall power cancel out. The power companies do the same thing [Ch00f] did and make sure mains power is 60Hz over the long-term, allowing mains-controlled clocks to keep accurate time.

Proximity Switch For Your Mains Devices

[Ivan’s] friend built a proximity sensor to switch his LED bench lighting off every time he walked away. The idea is pretty neat, so [Ivan] decided to implement it for mains devices by making this proximity switched outlet box.

A Sharp GP2D12 infrared distance sensor is the key to the system. It has an emitter and receiver that combine to give distance feedback base on how much of the light is reflected back to the detector. This is presented as a voltage curve which is monitored by an ATtiny85 (running the Arduino bootloader). It is small enough to fit inside the outlet box along with a tiny transformer and linear regulator to power to logic circuitry. The mains are switched with a relay using an NPN transistor to protect the chip’s I/O pins.

Check out the video after the break to see this in action. It should be a snap to add a count-down timer that gives you a bit more freedom to move around the workshop. With that in place this is a fantastic alternative to some other auto-shutoff techniques for your bench outlets.

Continue reading “Proximity Switch For Your Mains Devices”

Christmas Prep Starts Early: MIDI Control For Strings Of Lights

If you’re planning to outdo yourself with this year’s Christmas decorations now’s the time to start planning. After all, what else have you got going on since the dreadful heat is making outdoor activities a sweat-soaked misery? Take some inspiration from [Tim] who just finished prototyping a wireless MIDI controller for his strings of Christmas lights. You can just see the four spools in the distance which are lighting up as he tickles the ivories.

The wireless link is provided by a WiFi access point which uses its USB port to control the external hardware. This is a USB Bit Whacker board which in turn drives a relay board that was designed to switch mains voltages. The high voltage parts of the rig are housed in a plastic food storage container which hosts two pair of outlets to drive four channels in total. [Tim] is happy with the outcome, which he shows off in the video after the break, and hopes to expand to a total of sixteen channels for this year’s festivities.

Continue reading “Christmas Prep Starts Early: MIDI Control For Strings Of Lights”

Under-bench Timed Outlets Won’t Let You Leave The Iron On

When we used to use firesticks (the pen style plug-in soldering irons) it was always a worry that we might leave them on. But now we use a base unit which has an indicator light to serve as a reminder. Still, [FoxxTexx] isn’t taking any chances and instead built this timer-based outlet which kills the power automatically.

The parts are all pretty common. The timer itself is the same form factor as a light switch and is commonly used for heat lamps or hot tub jets. It feeds the outlet next to it by way of the indicator switches to the right. We like the use of the switches but since mains voltage is still running through them we would suggest using a three-gang box and mounting them on the cover plate so that all the wiring is contained. If done this way you could just have the electrical box siting on your bench, but it is a nice touch to have it mounted this way.

We’ve long been proponents of a timer system. Back when we put together our Hacker’s Soldering Station we just used a plug-in timer unit.