Converting A TP Link Router To Mission Control For Cheap 433MHz Home Automation

[Jean-Christophe Rona] found himself with some free time and decided to finish a project he started two years ago, reverse engineering cheap 433MHz home automation equipment. He hopes to control his space heaters remotely, in preparation for a cold and, now, robotic winter.

In a previous life, he had reverse engineered the protocol these cheap wireless plugs, garage doors, and electric window shutters all use. This eventually resulted in a little library called rf-ctrl that can toggle and read GPIO pins in the correct way to control these objects. He has a few of the more popular protocols built into the library and even wrote a guide on how to do the reverse engineering yourself if you have need.

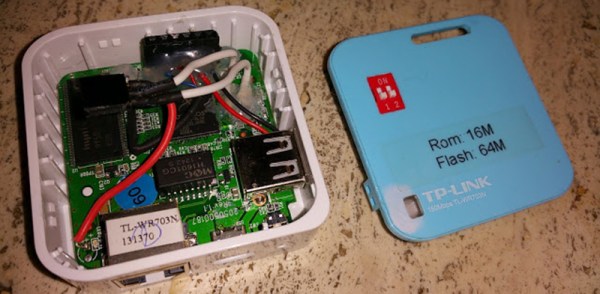
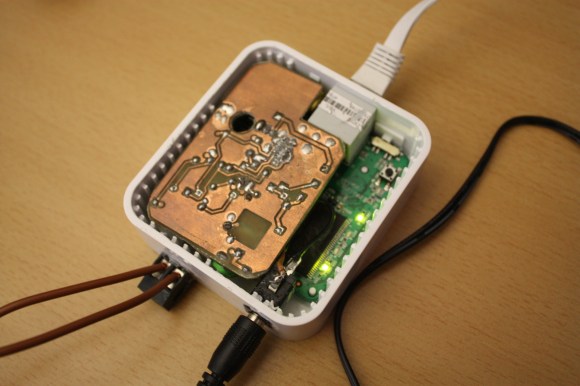
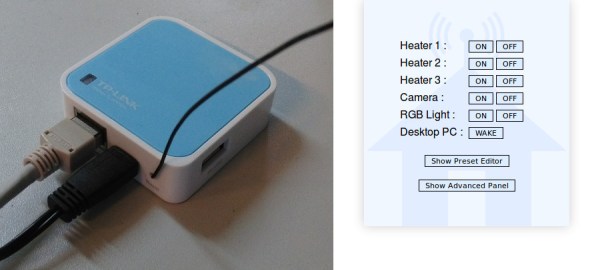
Having successfully interfaced with the plugs to use with his space heaters, [Jean-Christophe] went about converting a cheap TP Link router into a command center for them. Since TP Link never expected anyone to hammer their square peg into a mismatched hole, it takes a careful hand at soldering and some enamel wire to break out the GPIO pins, but it’s well within the average skill set.

The end result is a nicely contained blue box with a little antenna hanging out of it, and we hope, a warm abode for the coming winter.

Bridging Networks With The Flip Of A Switch

The TP-Link TL-WR703n is the WRT54G for the modern era – extremely hackable, cheap, and available just about everywhere. Loaded up with OpenWRT, it’s capable of bridging networks: turning Ethernet into WiFi and vice versa. This requires reconfiguring the router, and after doing this enough times, [Martin] was looking for a better solution. The SOC inside the WR703n has two exposed GPIO pins, allowing [Martin] to choose between WiFi access point or client and between bridged or NAT/DHCP.

According to the OpenWRT wiki, there are a few GPIOs available, and after connecting these pins to a DIP switch, [Martin] could access these switches through the firmware. The hard part of this build is building the script to change the settings when the system boots. This script looks at the state of the GPIOs and changes the WiFi into client or access point mode and tries not to muck about with the DHCP somewhere off in the cloud. Yes, we just used cloud in its proper context.

The only other hardware to complete this build was a simple USB to serial converter that should be shoved into the corner of everyone’s workbench. Not bad for an extremely minimal soldering and configuration required for a something that’s extremely useful.

DEFCON Shenanigans: Hack The Hackaday Hat

We don’t want to call it a challenge because we fear the regulars at DEFCON can turn our piece of hardware into a smoking pile of slag, but we are planning to bring a bit of fun along with us. I’ll be wearing this classy headgear and I invite you to hack your way into the WiFi enabled Hackaday Hat.

I’ll be wearing the hat-of-many-scrolling-colors around all weekend for DEFCON 22, August 7-10th in Las Vegas. You may also find [Brian Benchoff] sporting the accessory at times. Either way, come up and say hello. We want to see any hardware you have to show us, and we’ll shower you with a bit of swag.

Don’t let it end there. Whip out your favorite pen-testing distro and hack into the hat’s access point. From there the router will serve up more information on how to hack into one of the shell accounts. Own an account and you can leave your alias for the scoreboard as well as push your own custom message to the hat’s 32×7 RGB LED marquee.

You can learn a bit more about the hat’s hardware on this project page. But as usual I’ve built this with a tight deadline and am still trying to populate all the details of the project.

A Different Type Of Arduino Internet Shield

different-arduino-internet-shield

The cost of an Ethernet shield for an Arduino isn’t horrible; generally between $17 and $32 depending on which one you buy. But have you seen the cost of a WiFi shield? Those are running North of $70! [Martin Melchior] has a solution that provides your choice of Ethernet or WiFi at a low-cost and it’ll work for most applications. He’s using a WiFi router as an Arduino Internet shield.

This is the TP-Link WR703N which has been very popular with hackers because of its combination of low price (easy to find at $25 or less) and many features: the USB is super hand and, well, it’s a WiFi router! The Arduino Pro Mini shown dead-bug style is talking to the router using its serial port. [Martin] wires a pin socket to the router, which makes the rest of assembly as easy as plugging the two together. The rest of his post deals with handling bi-directional communications with Arduino code.

If you really just need that direct Ethernet pipe consider building an ENC28J60 chip into your designs.

TP-Link Router Turned Into A DALI Automated Lighting Controller

dali-control-in-tplink-router

The members of Shackspace continue to put up impressive hacks based around the tiny TP-Link routers. This time around [Timm] has shoehorned a DALI controller inside the router case. This is a protocol we don’t remember hearing about before. The Digital Addressable Lighting Interface is a control network for commercial lighting. That way people responsible for taking care of large buildings can shut off all the lights at night (to name just one use). The new room at Shackspace has this style of controllers in its lights.

The two brown wires coming into the router make up the data bus for the DALI system. It connects to the add-on PCB which uses an Atmel AT90PWM316 microcontroller. The chip is specifically designed for DALI networks which made the rest of the project quite easy. It talks to the lights, the router talks to it, bob’s your uncle, and you’ve got network controlled lighting. Get this in a big enough building and you can play some Tetris.

In case you were wondering. Yes, this project has already been added to their TP-Link firmware generator.

SenseLamp Automates Rooms By Replacing Light Fixtures

senselamp

Would you believe that this beautiful light fixture is actually a hacked together home automation project? Okay, so this wire mess is the second of three versions that [Christian] built. It replaces a light fixture in the room, but if you look closely you’ll see that there is a compact fluorescent bulb included in the build. The laser-cut frame acts as a bit of a lamp shade, while providing a place to mount the rest of the hardware.

The final version cleans things up a bit, and adds a footprint for the PIR motion sensor that he forgot to design into this version. The idea is that each lamp monitors motion in the room, switching the light on and off again as necessary. A light-dependent resistor ensures that the bulb is only powered up if the room is dark so as not to waste electricity during the day.

The build includes a sensor package that reports back temperature and humidity data. Communications are provided by a WR703N router rolled into each of the four units installed in his house. With this kind of hardware at his disposal it should be a snap to control every IR remote control device in his house via the network by adding an IR LED and some code to the lamps.

The Keypad Contest

Keypad

What can you do with ten buttons and ten lights? A lot.

[Andrew] and [Nathan] found a collection of Hale Research keypads being thrown out, and decided to host the Keypad Contest. The goal of the contest was to create something nifty using the ten buttons and ten lights on the keypad, and an ATtiny2313 that replaced the original 8051-compatible microcontroller in the device.

[Andrew] wanted to try making PCBs with his home-built CNC machine, so he milled out USBtinyISP programmers for the ATtiny2313. Then he gave out eleven development kits to a group, and explained how to develop on the hardware.

After a month of hacking, seven people completed projects. The winner was an internet radio controller, which had the keypad sending serial data to a TP-Link WR703N router. The router used a USB sound card and OpenWRT firmware to stream music. The runner up was a timing game called “Capture”.

The contest write up has details on all seven projects. [Andrew] and [Nathan] were successful in getting software engineers to try hardware with this contest, resulting in some neat hacks. After the break, check out a video demo of the internet radio controller.

Continue reading “The Keypad Contest”