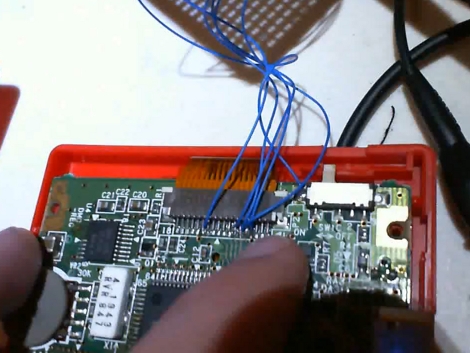
Game Boy VGA Using An FPGA

[ViDAR] was looking for a project to keep him occupied and settled on creating a VGA converter for his Game Boy. He had some difficulty finding pinouts for the LCD and CPU but working with what was known, and an oscilloscope, he found the necessary signal. Tap into just a few lines using those thin blue wires; Vsync, Hsync, clock, and two data pins. From there a development board with an Altera Cyclone II field-programmable gate array takes care of the heavy lifting. The board already has hardware for a VGA connection so it was just a matter of processing the incoming signals into the VGA standard. His demo video is embedded after the page break.

Want a dedicated solution? Check out this Game Boy video adapter inside a VHS cassette.

Continue reading “Game Boy VGA Using An FPGA”

Make Your Own Cookie Cutters This Year

In case you needed another reason to build, borrow, or buy a 3D printer, here’s one way to design and print your own cookie cutters. [Nikolaus Gradwohl] put together a processing app that aims to make the design process a bit easier. So if you’ve never designed a printable object before, but can get your hands on a MakerBot or similar device through a friend or your local hackerspace, this is for you. Check out the video after the break to see the process of making a cutter in the shape of a mushroom, or just download the app and give it a go.

Continue reading “Make Your Own Cookie Cutters This Year”

Nook Color Rooted: Hands On

Nookdevs have released information on how to root your nook color. So naturally, I had to run out and get one.  Who doesn’t want a multitouch android tablet for $250?  The instructions for rooting are extremely simple. You really only need microSD card and a Linux/Windows/Mac computer to connect to.  After rooting, your nook will work exactly as it did before, but you can now install android applications on it.  Many applications are built for a phone that has more physical buttons, so I have run into some issues, but over all, the applications that work tend to work well.

Join me after the break for more thoughts, a video of it in action, and a few pictures.

Continue reading “Nook Color Rooted: Hands On”

Jacob’s Ladder Using EL Wire

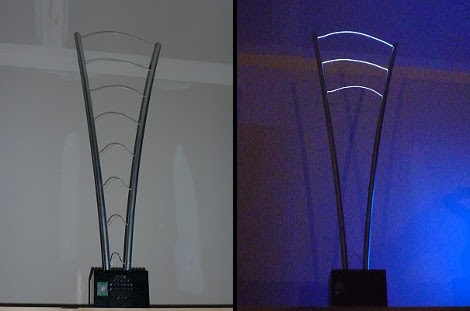
For Halloween [Paul] wanted to build a Jacob’s Ladder without the peril that working with high voltage might bring. He was inspired by a sequencer board for electroluminescent wire and decided to build a Jacob’s Ladder simulator using the glowing material. What he ended up with is quite convincing. Eight segments of EL wire have been mounted between two diverging towers. When a PIR sensor detects motion in the room, an Arduino switches on the simulation, playing a recording of the classic sizzling voltage sound while using the sequencer board to flicker the wires from bottom to top. See for yourself in the video after the break. We give [Paul] bonus points for constructing the base out of Lego.

But if you’re not one for being cautions, there’s always this real Jacob’s Ladder build. Or maybe you just want to make something glow with the EL wire.

Continue reading “Jacob’s Ladder Using EL Wire”

Kids Type With Their Eyes, Robot Arm Prints Their Words

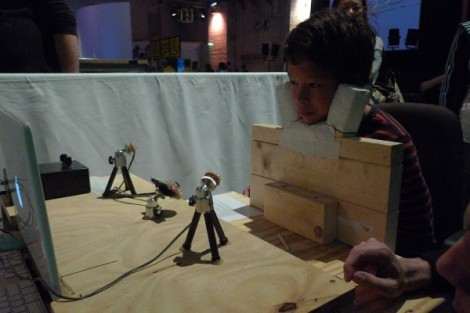
F.A.T. took it to the next level, combining a couple of their projects for the Cinekid festival. This contraption lets kids write their names with their eyes for printing by a robot arm. The first part is a glasses-free version of the EyeWriter, originally developed as an assistive technology. The system uses some IR LEDs to generate a reflection on your eye that a PS3 camera can pick up and use to precisely track your gaze. Just look at each key on a virtual keyboard to spell out your message. From there, a robot arm used previously in the Robotagger project prints out the name on a big sheet of paper the kids can take home. This is cool, but more importantly it’s a great way to inspire the next generation of hackers and engineers. Check out the video after the break.

Continue reading “Kids Type With Their Eyes, Robot Arm Prints Their Words”

RC Plane Built Using Pieces Of An RC Car

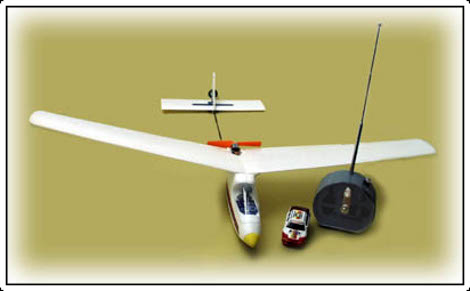
This hack’s old as dirt to be sure, but new to us and a great accomplishment. The plane above, which is meant to fly without an operator, has been given RC control thanks to parts from that little car. The transmitter and receiver pair are the obvious transplant, but how do you add steering to a $7 plane that wasn’t manufactured to have that feature? The tail was cut and reconnected with mylar hinges to turn it into a rudder. A rare earth magnet and a coil are also thrown into the mix to provide movement. Basically this is a simple solenoid where the coil pushes against the magnet when energized, actuating the rudder. This in combination with an upgraded motor allows for both speed control and yaw. It doesn’t look like you can control roll and pitch but what more can you really expect?

This would be a nice first step on that path to building an epic flying camera rig.

[Thanks Rob]

Using Analog Voltage References With Arduino

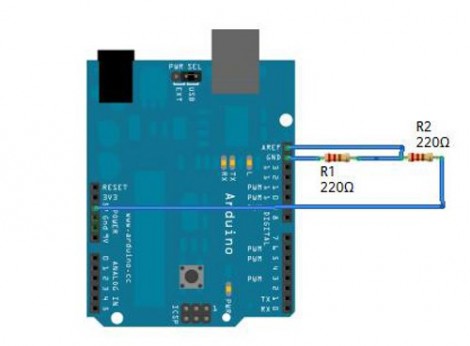
Little Bird Electronics posted an article about using an analog voltage reference with Arduino. This is a tool available when using an analog-to-digital converter. By setting up either an internal or external AREF, you can better use the ADC considering its resolution limitations. For instance, if you are measuring a signal that you know will always be below 2V, an external circuit, such as a voltage divider or an adjustable regulator, can give you a reference voltage just above that upper limit; say 2.5V. This way the 1024 divisions of resolution will be spread across your signal’s range, rather than just the lower half of the ADC readings.

Analog references are common to microcontrollers that have ADCs. Even if you’re not working with an Arduino, read through the article and use what you learn with your uC of choice.