Project Hosting, A Common Question

Ok, you’ve finished your project, you’ve taken great notes along the way and photographed every step. Now you want to share. Where will you post it? There are a lot of options out there, private hosting, Hackaday,  instructables, and tons of others. How can you decide? Here are some handy break downs to help you figure it out at a glance.

Each has its own pros and cons. Take a peek at our list after the break and share your own as well.

Continue reading “Project Hosting, A Common Question”

Tuesday Two-Fer: Battery Cases And ABS Lettering

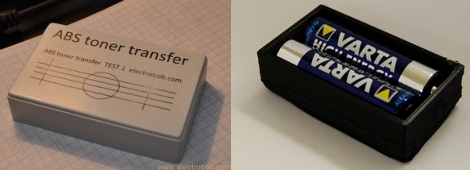
These are both interesting, unrelated, and can’t quite stand on their own so we threw them into one post.

On the left you see the product of using toner transfer on ABS plastic. [Bogdan] tried this out as a way to make front panels for his enclosures. It really shouldn’t work very well because ABS has a lower melting point than toner does. But it seems that it takes a while for the ABS to heat up. If you’re quick, ironing for about 10 seconds, you can get the toner to stick to the plastic and then soak the paper off, leaving your printed design looking nice and clean.

To the right you see a printed battery case. [Nikolaus Gradwohl] ran across the same problem we’ve face many times: how to attach batteries to your projects? We’ve duct-taped them together, used the blister packs they’re sold in, Dremeled them out of thrift-store toys and just about every other thing you can imagine. He decided to make them easy to manufacture with a 3D-printer. This is accomplished with an OpenSCAD file he wrote. Plug in the size and number of batteries and a printable package will be automatically generated.

Original Shell Houses A Game Boy Advance SP

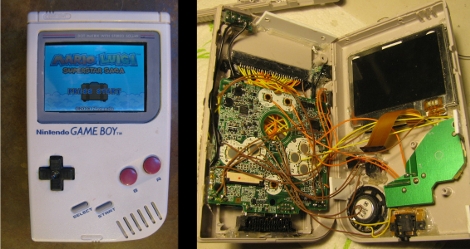
[Jackson] decided he wanted to give his original Game Boy a bit more power so he replace the internals with those from a Game Boy Advance SP. This keeps the case work to a minimum, as the original was larger than the SP. He kept the buttons, speaker, headphone jack, and power switch but modified the enclosure to use the volume, charger, and battery from the newer hardware. The cartridge connector was relocated to match the slot in the back half of the case, with the color screen being the biggest giveaway that someone’s monkeyed with the device. Not a bad use for a dead Game Boy, as least you’ll be playing this one instead of dedicating it to virtual storage.

Meter Clock With Pleasing Design Considerations

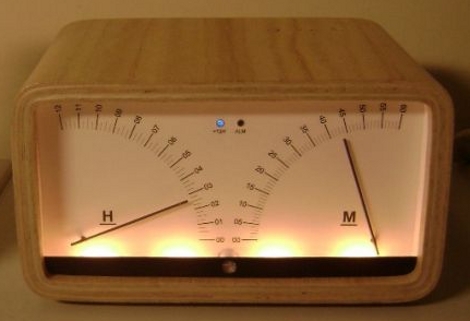
[AndyO] embraced his inner geek by building this meter clock. It exhibits a lot of features that you’d want to see in a home-built timepiece, include over-complexity, abundant features, and RGB LEDs. We’re fascinated by the design he put into this. For instance, the two indicator LEDs on the clock face are not poking through the surface, but use brass tubes as light pipes. Also, the three buttons on the top are almost indistinguishable, and have an RGB back light that places a halo around each. The case itself was built by first making a form, then laminating thin sheets of wood (a difficult task due to the tight curves). The needles themselves are not actually meters, like the clock the inspired the build, but are attached to servo motors. This all comes together into a fascinating build, and a great writeup.

[Thanks Graham]

Knitting Machine Hack By Keypad Emulation

[Travis Goodspeed] and Hackaday alum [Fabienne Serriere] joined forces to develop an alternative interface for a knitting machine. They’re working with the Brother KH-930E machine. We saw [Becky Stern] use the same model by manipulating data on an emulated floppy drive for the device. [Travis] and [Fabienne] went a different route, and are emulating the keypad using an Arduino and a set of transistors.

They started by reverse engineering the keypad matrix using a continuity tester. Once they worked out the column and row layout they connected each to an NPN transistor. The Arduino sketch simulates button presses to set knitting bits for each row, with just one reset button for user input. This can be used to send data from a PC, or as a standalone system. Either way, it’s not only a great way to add functionality to the kitting machine, but a good example of how to interface with the keypad on just about any device.

Star Trek Inspired Pocket Doors

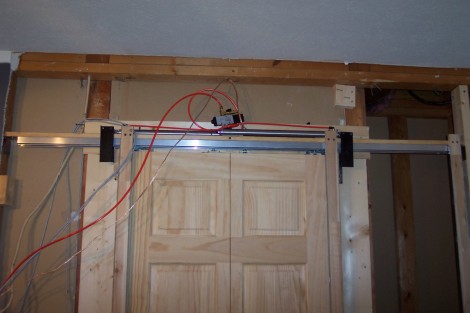
Do you have enough confidence in your hacking abilities to build a project into the walls of your home? [Marc] used his skills to build an air-powered sliding door for his bedroom. It is similar to the sliding door you’d find on the Enterprise, two sections that slide nicely into the wall to let you pass. Although the picture above shows the internals, he followed through and ended up with a fully finished room that looks fantastic. A compressor in the attic provides the pressure necessary to move the door sections. It is automated, but uses a button press or keypad combination to run instead of detecting motion. Of course, since he’s using a PIC microcontroller to drive the system there’s always room for future changes. Check out how great the finished look is in the video after the break.

Continue reading “Star Trek Inspired Pocket Doors”

Hot Resistors Used For Color-changing Clock Face

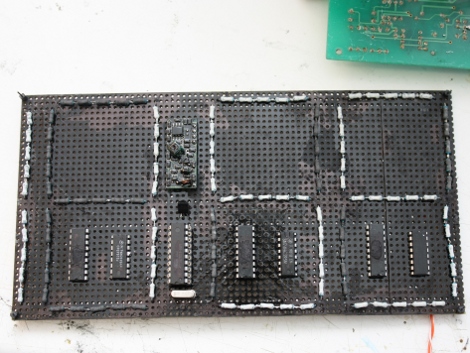
[Sprite_TM] built a full clock display using thermochromic paint. This picks up where he left off with his paint-based 7-segment display prototype. He never really saw that design through to a finished project, but he recently came across the leftover paint and decided to do something with it. Instead of making thin traces on a PCB he’s heating up resistors mounted on protoboard. Each resistor has been coated with the black/light grey paint after getting a rough sanding on the tops of the packages. Run around 500mW through a segment and they heat up enough to change the paint to light grey. Once shut off, the segments gradually fade over the next 60 seconds.