A Badge Without A Conference

We saw this one a few days ago when it was first bouncing around the interwebs but never took a close look at it. Today, when we ran across a direct link in the tips box it was the promo video (embedded after the break) that won us over. Once you dig into the particulars of The Verbalizer we think you’ll agree that this is a hackable conference badge without the pesky need to attend a conference.

As you probably guessed from the design of the PCB, this is a microphone. It’s intended for use with Google’s new voice search feature, and connects to a computer via a Bluetooth module. But really it’s just another roll-your-own Arduino with a few extra bits. You’ll find an ATmega328 and an FTDI chip which provides a USB connection for programming. The real fun starts with the microphone and speaker circuitry which is just waiting to be breadboarded at home. We found a few other things while poking around in the schematic (available by downloading their Product Docs and Schematics package). It looks like there’s some capacitive touch… you what? Isn’t it more fun if you find this stuff yourself, kind of like the hidden gems of the DEFCON badges?

Continue reading “A Badge Without A Conference”

DIY Battery Reconditioner Saves Old Rechargeable Batteries From The Landfill

rechargeable_battery_reconditioner

Instructables user [msuzuki777] had amassed quite a collection of batteries over the years, but was finding that some of his rechargeable AA and AAA cells seemed to be at the end of their useful life. After reading some information at the Battery University regarding the restoration process for nickel-based batteries, he figured he might as well try building a battery reconditioner of his own.

He worked through several designs that either flat-out did not work, or had issues that limited the number of batteries he could simultaneously recondition. After reading about this rechargeable battery capacity tester we featured a few months back, he was ready to give the project one more try.

It seems that the third try was the charm, because his FET-based design worked quite well. He ended up wiring two FETs to each battery, which are connected via a relay. The batteries get discharged until the voltage drops down to 1V, at which point one FET is turned off, allowing the batteries reach their target voltage of 0.4V more slowly.

Despite the self-proclaimed messy layout of his circuit, [msuzuki777] is quite happy with the results. He has been able to recover several batteries, which is a fantastic alternative to letting them decay in a landfill.

Electronics Lessons For Beginners

electronics

Hackaday reader [grenadier] wrote in to share a series of tutorials he is working on, where he discusses the basics of electricity and electronics. The first lesson titled, What is Electricity?” has been wrapped up, and is available for free on his site.

For any of our regular readers, the lesson will seem pretty basic (and likely full of things to nitpick). However, we imagine his lessons would be quite helpful to anyone looking to expand their electronics know-how.

Now don’t get us wrong, we love the series of electronics tutorials that Jeri has been periodically releasing, but we think there’s plenty of room on the Internet for other willing teachers as well. If his first lesson is any indicator, his tutorials will be easy to understand, sprinkled with a little bit of humor, and chock full of fun videos that demonstrate the subject at hand.

Take a quick look his way if you get a chance – you or someone you know might find his tutorials and reference guides insightful.

[Image courtesy of Electronicsandyou]

Automotive Backup Alarm

[Dino’s] project of the week is a backup alarm for your car. This is a feature that has become popular on many large vehicles like SUVs where visibility is an issue when moving in reverse. But it doesn’t sound like he was motivated by the need to have this in his own car. Instead, he was looking for something to build using a laser range finder.

[Joe Grand] (the brains behind DEFCON badges) has been working on an inexpensive laser range finder for Parallax. He sent one of the first-run prototype boards to [Dino] for beta testing and we’re glad that [Dino] decided to show it off. It uses a small red laser diode and a camera module to measure distance in millimeters. The board communicates serially and this particular project uses an Arduino along with a character LCD and speaker to display distance and sound an alarm when the car is within a meter of an object.

Check out the video after the break to see the build in its entirety. The system works reasonably well, if the object you’re about to hit is perfectly lined up with the laser dot.

Continue reading “Automotive Backup Alarm”

A Beautiful Fibre Optic Chandelier

[Bill] Decided that his living room could use some more light, or at least some more colourful light. To meet his needs [Bill] has designed and build what he describes as a modern/contemporary chandelier. The chandelier uses about 250′ of fibre optic cable to distribute the light from eight LED’s, light from the fibre optics is being diffused using marbles in place of the globes you would normally expect in a chandelier.

Control is achieved wirelessly via a pair of Xbee modules, this will allow [Bill] to integrate it into his home automation project he plans for the future. The colours are currently set using three slide potentiometers, and the chandelier is powered using a repurposed ATX power supply. It looks like a lot of time was spent on the acrylic enclosure and it was worth it because the results are fantastic. Check out his website for build details and the video after the break for a demonstration on the chandelier in action.

Continue reading “A Beautiful Fibre Optic Chandelier”

Thumper The T-Shirt Launcher

Thumper The T-Shirt Launcher

[joe] and [ryan] built Thumper for their high school FIRST robotics team. The cannon itself is a solenoid-fired compressed air launcher that gets its juice from three large PVC tanks stored in the box below the turret, and the cannon is able to be fired nine times between visits to the air compressor. It was intentionally designed to resemble an M2 Browning 50 Caliber heavy machine gun, with the two vertical handles and boxy body.  They finished construction in about a week with a budget of only $300. When they saw that a lot of their friends had also built cannons, they scrounged for parts from their garages to re-use to build the mobile platform simply for one-upmanship sake. The motor and drive-train propelling this behemoth came out of a 1980s-era mobile X-Ray machine that had been discarded by a local hospital. The rear wheels were specially modified to fit the drivetrain, and the front end is a chopped, hacked, and welded axle and steering mechanism from an old lawn tractor. Sections of unistrut form the rest of the frame.

[joe] and [ryan] were even asked to bring Thumper to their high school prom as a unique way to hand out T-Shirts for the evening. Unfortunately, there’s no website for this build.

See video of Thumper in action with a Nerf Football after the break. Hack A Day even got to take it for a spin around the Power Wheels Racing Series track at Maker Faire KC!

Continue reading “Thumper The T-Shirt Launcher”

Measuring RPM With Reflective Sensors

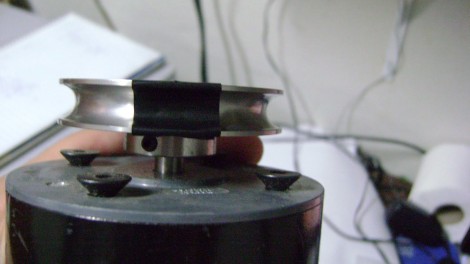
[Arao] wanted to measure the RPM of a spinning wheel using parts that he could scavenge from his junk box. A bit of thought led him to build a reflective sensor which can measure the spinning of a wheel (translated).

He got his hands on an infrared phototransistor which had been used as part of the remote control for some consumer electronics. Snooping around with his multimeter helped him establish the pin out of the device. By positioning an IR LED inside of a shroud, yet adjacent to the phototransistor, he can measure the intensity of the LED’s light as it is reflected off of nearby surfaces. The pulley seen above has a piece of electrical tape on it. When this passes by the LED, less of the infrared light is reflected and the drop in intensity is picked up by the phototransistor. [Arao] made the system rock-solid by rolling an LM358 op-amp into the circuit. He’s posted the schematic as well as some screen shots from an oscilloscope during testing.