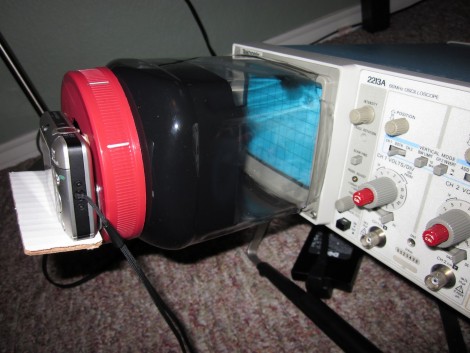
Adding Digital Storage To An Analog Scope

This is a hack in the finest sense of the term. It not only allows you to capture data from an analog oscilloscope for later analysis, but provides you with a great tool if you’re posting on the Internet about your projects. [J8g8j] used an empty cashew container to add a camera mount to the front of his scope. This is possible because the bezel around the display has a groove in it. A bit of careful measuring helped him make an opening that was just right.

You can see that the red cap for the jar holds the camera and gave him a bit of trouble in the original prototype. This version has a tray where camera sits, which replaces the Velcro with didn’t hold the camera level the first time around. He’s also painted the inside of the clear plastic to reduce glare on the oscilloscope readout. Black and white images seem to come out the clearest, but it can be difficult to make out the grid lines. The addition of LEDs to help them stand out is one of the improvements we might see in the future.


Beginner Project: Super Cheap Magnetic Mixer

[wesdoestuff]’s mother needed a clean way to mix together fragrance oils. Being the stand up kinda guy he is, [Wes] threw together a few spare parts to make this Magnetic Stir Plate.

The whole setup is amazingly simple. Pry the fins off of an old computer fan, glue a couple magnets to the fan’s hub. Drill a hole for a DC connector, find some sort of cover and.. Bob’s your uncle! [Wes] advises that you test the spacing of the magnets on the hub before gluing them permanently, as they can be a bit tricky to align.

The stir bar for non food items is  a magnet bar from one of those crazy magnet and ball bearing toys, it is basically just a solid magnet covered in plastic.  Food safe bars can be acquired, though they are not as cheap.  With all that room under the hood we would love to see him throw in some kind of a PWM speed control but that could be a bit complicated. Most of us could throw this together from spare parts.  Video after the jump!

Continue reading “Beginner Project: Super Cheap Magnetic Mixer”

Giving “sight” To The Visually Impaired With Kinect

NAVI

We have seen Kinect used in a variety of clever ways over the last few months, but some students at the [University of Konstanz] have taken Kinect hacking to a whole new level of usefulness. Rather than use it to control lightning or to kick around some boxes using Garry’s Mod, they are using it to develop Navigational Aids for the Visually Impaired, or NAVI for short.

A helmet-mounted Kinect sensor is placed on the subject’s head and connected to a laptop, which is stored in the user’s backpack. The Kinect is interfaced using custom software that utilizes depth information to generate a virtual map of the environment. The computer sends information to an Arduino board, which then relays those signals to one of three waist-belt mounted LilyPad Arduinos. The LilyPads control three motors, which vibrate in order to alert the user to obstacles. The group even added voice notifications via specialized markers, allowing them to prompt the user to the presence of doors and other specific items of note.

It really is a great use of the Kinect sensor, we can’t wait to see more projects like this in the future.

Stick around to see a quick video of NAVI in use.

[via Kinect-Hacks – thanks, Jared]

Continue reading “Giving “sight” To The Visually Impaired With Kinect”

Cellphone Charger Has A USB Port Forced Upon It

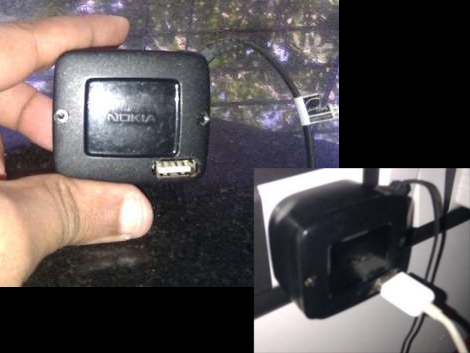
We still can’t figure out why a standard charging scheme hasn’t been developed for handheld devices (other than greed). Certainly we understand that many devices have different electrical needs as far as voltage and current are concerned, but we still long for the ability to use one charger for many different doodads. [Rupin] is trying to narrow down the number of dedicated chargers he uses by adding a USB charging port to his Nokia cellphone charger. Since the USB standard calls for regulated 5V a hack like this can often be done just by patching into the power output coming off of the voltage regulator in the plug housing of the device. [Rupin’s] charger had 5V printed on the case, but when he probed the output he found well over 8 volts. He added a 7805 linear regulator to get the stable output he needed, then cut a hole in the case to house the connector.

Since [Rupin] wants to use this as an iPod charger he couldn’t just let the two data lines float. Apple uses a specific charger verification scheme which requires some voltage dividers to get the device to start charging.

USB Man-in-the-middle Adapter

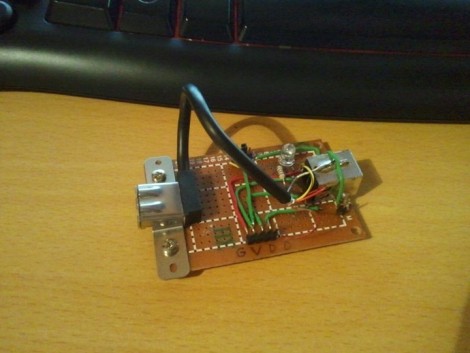
The module works as a pass through, providing access to data and power lines for a USB device. [BadWolf] built it in order to sniff out communications between peripherals and the Universal Serial Bus. For now it just provides access to the different signals, but we think there’s quite a bit of usefulness in that. First off, the power rail is mapped out to a jumper, making it dead simple to monitor the voltage stability or patch in a multimeter to get feedback on current consumption. But you can also see in the foreground that a pin socket makes it easy to tap into the board using jumper wires. We think it would be a great breadboard adapter for USB work that would continue being useful after you’ve populated your first PCB for the prototype.

[BadWolf] has other plans in store for it though. He wants to intercept and decipher the communications happening on the data lines. In the video after the break he mentions the possibility of using a Bus Pirate for this (we have our doubts about that) but plans to start his testing with an STM32 discovery kit. We can’t wait to see what he comes up with.

Tokyo Hackerspace Helping Disaster Victims

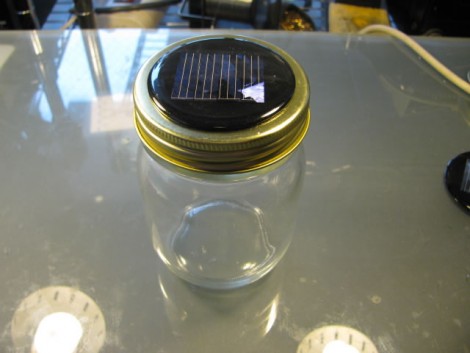
We, like the rest of the world, have watched in horror as footage of the recent earthquake-caused disaster has been reported from northern Japan. It’s easy to watch video and see nothing but distruction, however, life goes on and [Akiba] is looking for a way to help the recovery efforts. He mentions that one of the big needs in the disaster area right now is for light, as the power infrastructure has been heavily damaged. The mason jar seen above is a Kimono Lantern that was meant to accent a garden at night. It has a solar cell – one NiMH rechargeable battery – and one bright LED along with a charging circuit. It was designed in the Tokyo Hackerspace and they released the build files in hopes that a large number can be donated to those in need. With a reasonable amount of daylight, the single cell battery can be charged enough to provide 10 hours of light from the little device.

How can our hacks help others? That question has been on our minds for the last few days. Light is a great first step. But we’ve also wondered about information networks to help coordinate rescue and cleanup workers. There are hacks that bring WiFi using wind power or solar power. What other hacks do you think would be useful to aid in the recovery process?

DsPIC-based Spectrum Analyzer

spectrum_analyzer

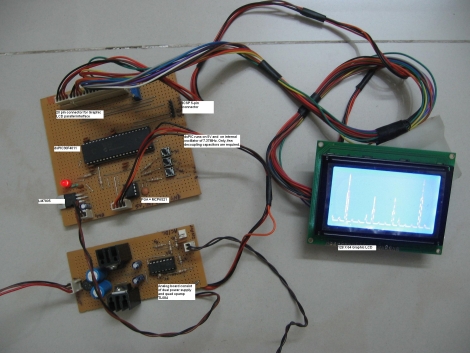
[Debraj] wrote to us describing a project he recently completed – a  simple, compact spectrum analyzer using a 16-bit dsPIC microcontroller.

The analyzer is fed an analog signal, which is passed through a large resistor followed by an opamp. A DC offset is then applied to the signal, after which it is passed through a software-programmable gain amplifier before being fed into the dsPIC’s analog input. A Fast Fourier Transform calculation is done using code provided by the PIC’s manufacturer once 128 samples have been collected. The results are then displayed on the attached LCD in real-time.

If you get a chance, take a look at the video embedded below for a walkthrough and demonstration of his analyzer. [Debraj] says that the analyzer was built to measure harmonics in his home power lines, but for demonstration purposes, he has used a simple function generator instead.

If you’re interested in seeing some other spectrum analyzers, be sure to check out these items we featured in the past.

Continue reading “DsPIC-based Spectrum Analyzer”