FabLab Helps The Developing World Set Up Long-distance Wireless Ethernet

The wooden frame seen above hosts a parabolic reflector making up one side of a wireless network link. This is a Fab Lab project called FabFi which uses common networking hardware to setup long-distance wireless Ethernet connections. It’s a bit hard to tell in the image above, but the reflector focuses radio waves on the antennae of a router we’re quite familiar with, the Linksys WRT54G. It’s held upside-down in an enclosure meant to protect it from the elements. The node above manages to complete a connection spanning 2.41 miles!

One of the core values of the project is to develop hardware that is easy to build with limited resources, then to make that knowledge freely available. Anyone who has the ability to download and print out the 2D design file can build a reflector for themselves. As we’ve seen in other projects, paper stencils and hand tools can handle this job with no need for a laser-cutter (which was used for the prototype). WRT54G routers are inexpensive and the project uses the open source firmware OpenWRT. They can be run from 12VDC power which means a car battery works when mains power is not an option. The system has been running in Afghanistan for two years and hardware failure is still in the low single-digits.

[Thanks das_coach]

Zzstructure Emulator

[John Ohno] has been working on a zzstructure operating system written C since January. [John] realizes not many people know what a zzstructure is, so he posted a demo of his project. [John] has also put all the code online.

A zzstructure is both a hypertext and operating system unlike anything we have today. You could say that when it was first conceived in 1960 it was 100 years ahead of its time. [John]’s implementation of zzstructures operates on a 256-dimension grid and functions a lot like a multidimensional forum thread. Although that’s a lot to wrap your head around, it can probably best be explained by [Ted Nelson], the creator of zzstructures.

Continue reading “Zzstructure Emulator”

Wearable Video Coat

[David Forbes] is no stranger to the weird and esoteric, so he created a color LED TV built into a lab coat. He plans on bringing it to Burning Man next month.

The RGB LEDs are mounted narrow flex boards, providing a 160×120 pixel NTSC display. Video processing is taken care of by an Xilinx FPGA that takes the YCrCb video feed from a video iPod and converts it into four separate RGB streams for the front, back, and the two sides. The requisite controls for brightness and color are on the shoulders.

Of course, the build wouldn’t be over-the-top without the ability to plug a Nintendo into a lab coat, so there’s an NTSC input on an RCA jack. Everything is powered by two 11.1 V, 5Ah radio-control LiPo battery packs that should power this for a while.

Check out a video of the LED lab coat below.

[youtube=http://www.youtube.com/watch?v=jtSm8Oom2n4&w=470]

One-click Unbrick For Samsung Phones

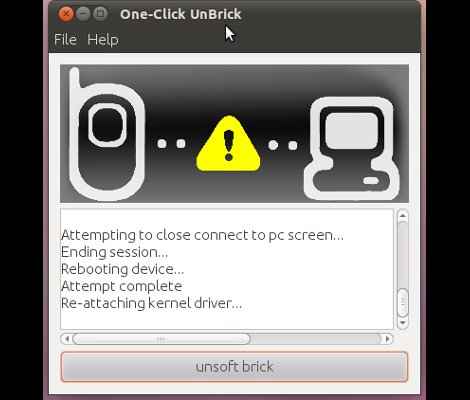
[Adam Outler] has been pretty heavy into mobile device hacking lately. The biggest problem with that field is recovering from back flashes or development firmware glitches. In many cases you can use a JTAG programmer to reflash stock firmware to resurrect a handset. Unfortunately you’ll be hard pressed to find a phone that comes with a JTAG header, and soldering to the microelectronic boards is not for the faint of heart.

But a solution is here, [Adam] pulled together a wide set of resources to create a package to unbrick Samsung phones. Now we’re sure that there’s more than a handful of people who would argue that a bad firmware flash that can be fixed this way means that the phone wasn’t actually “bricked” in the first place. But what we see is one more barrier torn down between being a hardware user and becoming a hardware hacker. You’re much more likely to get in there and get your hands dirty if you know that you’ll be able to undo your mistakes and reclaim you precious pocket hardware. See just how easy it is in the video after the break.

Continue reading “One-click Unbrick For Samsung Phones”

Re-manufacturing Inkjet Cartridges For 3d Printing


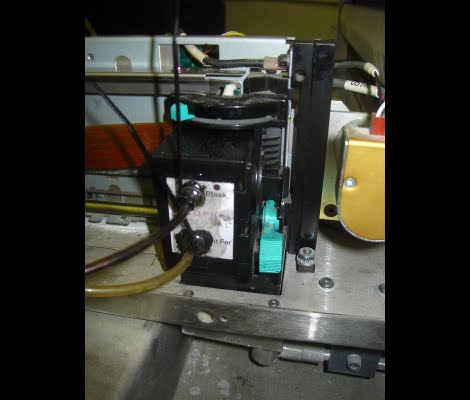
[Nullset] uses inkjet printer technology for his 3D printing needs. We usually think of hot-plastic printing like the RepRap or Makerbot when we hear about rapid prototyping, but this setup uses a liquid bonding agent to turn powder into a solid structure. Standard inkjet cartridges can be used to precisely place the bonding agent, but it’s hard on the heads and you have to replace them often. [Nullset] is getting pretty good at it, and decided to write a tutorial on the modifications necessary to print with bonding liquid.

At its core, the method injects binder into the cartridge through one port while using a second for drainage. [Nullset] found that the needle fittings used to inflate a basketball work great for this. He drills a couple of holes that the threaded end of the needles fit into. That connection is sealed with some epoxy, and the tubing that delivers the binder is zip-tied to the needles. A bit of purging is necessary to get rid of any old ink, but after the initial flush you’ll be up and running pretty quickly. He figures the whole process can be one in around 10 minutes once you get the hang of it.

Accounting For Material Loss When Laser Cutting


When you cut something out, you lose a bit of material in the process. Think of a table saw and the sawdust it produces, that’s the waste material lost in an area the width of the blade. It’s really easy to measure that, just measure the blade. But [James] started wondering about a good way to measure material loss from a laser cutter.

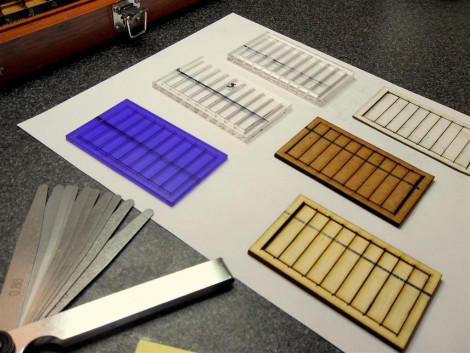
Why does it matter? If you’ve designed pieces that should fit together with each other, loss of material can lead to joints that aren’t tight. [James] figured out that the loss could be measured by making several cuts within a rectangular frame. You can see his test pieces above, with ten strips cut out of each frame. After the laser is done doing it’s work just slide all the pieces together and measure the opening created at one end. It helps to have an enhanced caliper to make the measurement easy to read. Now divide that distance by the number of laser passes and account for that dimension next time you design parts for the cutter.

Controlling A Counter Top Water Distiller With Salvaged Parts

distiller_power_off_timer

Hackaday reader [Kyle] wrote in to share a project he recently wrapped up, involving a counter top water distillation unit he uses at home.

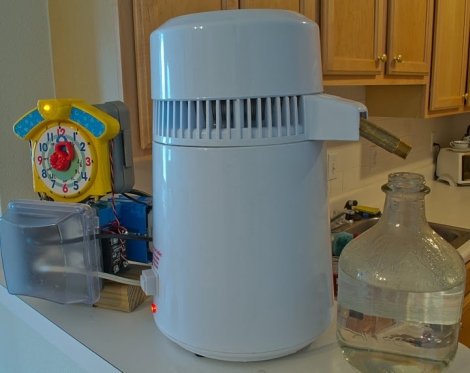
He lives in Atlanta, and hates both the taste and contaminants in the water, so using this distiller is an absolute must in his house. The problem with this cheap unit is that it waits until it is completely dry before shutting off the heating element. According to [Kyle] this brings up two huge problems.

First, letting the unit run dry simply vaporizes all of the contaminants that he was trying to remove, allowing them to re-condense and contaminate his fresh water. Second, the heating element reaches extreme temperatures once the water is gone, which causes premature failure of the distillation unit.

He originally used a timer to remind himself to turn off the unit before it ran dry, but the process became tedious. He found that he would often forget to turn off the distiller before it ruined his newly cleaned water.

Looking for another solution, he decided to automate the process using some components left over from an Arduino-based terrarium temperature/humidity controller he built a while back. A salvaged toy clock tower was used as an input dial, which sets the distillation time on the microcontroller. The Arduino in turn manages a set of relays that controls the power supply to the distiller.

While [Kyle] only sent us this information to us via email, he has made code and pictures available online. We’re sure he would be pretty open to answering any questions you might have related to his build, so fire away in the comments section.

[Update]
After seeing that his distiller made the front page, [Kyle] directed us to a write up he prepared, detailing some more specifics on the project.