Google ADK On An EvalBot

evalbot_google_adk

After learning that Google’s ADK relied on using an Arduino-compatible board, [Benjamin] was disappointed that other microcontroller platforms weren’t invited to the party. Rather than switch camps, he took it upon himself to get the ADK working with his EvalBot. In fact, his modifications should allow the ADK to work with nearly any Stellaris ARM kit.

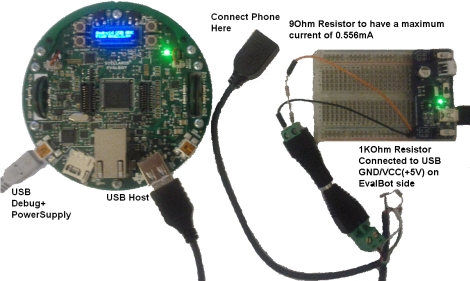
The hack is composed of two parts. The first, and most important bit is the USB host driver he developed to work with the ADK. The code borrows some bits from Texas Instruments, and will be published on GitHub once he gets a chance to clean up the source a bit. To get his phone working with the EvalBot, he also had tweak the external USB power supply in order to provide the current required to operate properly with other USB-connected hardware.

It’s always nice to have more options when working with Google’s ADK, and [Benjamin’s] work is likely a welcome addition to any Stellaris developers toolkit.

Continue reading to see a quick video of his EvalBot ADK demo.

Continue reading “Google ADK On An EvalBot”

Bare-bones Electronic Advent Calendar

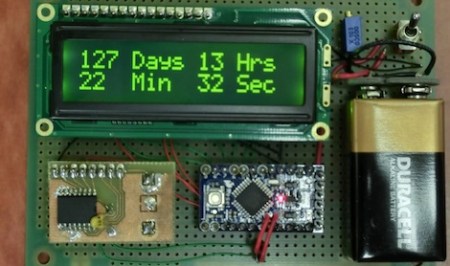
It’s officially September now (in some parts of the world), and that means we’ve been watching the Christmas decorations go up on the floor of Costco, Walmart and Target for the last few weeks. As a small test of reality, [Eric] decided to build an electronic advent calendar that counts down the days until Christmas. As a simple build using parts lying around on the bench, [Eric] did a pretty good job at deferring his kid’s questions of, “How long until Christmas?” to a machine.

The build is fairly bare-bones, using only an Arduino Pro Mini, RTC and LCD display. For the real-time clock, [Eric] used the ever popular DS3231 RTC. The software reads the time from the clock and calculates the number of seconds between the present time and the hard-coded target date.

Everything is powered by a 9 Volt battery that wouldn’t last the remaining 115 days until Christmas. There is a power switch and the RTC has a battery backup, so the build will probably suffice for all but the most fanatical child.

vacuum_forming_consistent_results_every_time

How To Build A Vacuum Form Table That Gets It Right Every Time

[James] builds all sorts of robots and superhero costume replicas at home, so he is always searching for a better way to get consistent results when using his vacuum table. A lot of people use their oven or exposed heating coils from electric frying pans to warm the plastic sheets, but [James] wasn’t really interested in going down that route. He cites that he would rather not heat plastic in the oven where he cooks his food, nor is he really keen on the idea of exposed heating elements.

Instead, he opted for a slightly pricier, though completely reasonable setup that produces consistent results every time. Most of the forming table was built using MDF sheeting, as you can see in the video below. His heating apparatus was the most expensive part of the rig, since it’s an off the shelf quartz-based room heater. He lays the heater on its back side, and directs the heat up through an MDF frame using aluminum foil as a reflector. The plastic sheeting mounted at the top heats evenly, and in no time, he has a perfectly vacuum formed prop that is ready to be painted.

Sure, it might cost a bit more than some other vacuum formers we’ve looked at before, but spending a bit more up front to get consistent results is well worth it if you ask us.

Continue reading “How To Build A Vacuum Form Table That Gets It Right Every Time”

Multitouch Tower Defense Uses Physical Towers

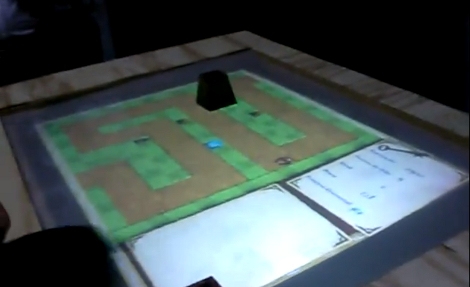
If you’re tired of playing flash games with a mouse, perhaps you’ll draw inspiration from this project. Arthur built a multitouch interface that uses objects as part of the control scheme. In the image above you can see that the game board for a tower defense game is shown on the display. There is a frustum-shaped game piece resting on the surface. Just place that piece where you want to build your next tower, and then select the tower type from the list.

The controller itself is pretty straight-forward. The surface is a piece of acrylic topped with some light diffusing material. A projector shines through another acrylic window on the side of the unit, reflecting on a mirror positioned at a 45 degree angle. As for the multitouch detection, the hardware uses a series of UV LEDs along with a modified PS3 eye camera. [Arthur] chose the reacTIVision software package to process the input from the camera. Check out a couple of videos after the break to see the hardware, and some game play.

Continue reading “Multitouch Tower Defense Uses Physical Towers”

Virtual Machine For Microcontrollers Lets You Run Python On AVR Chips

[Clifford Wolf] wrote in to let us know about a project he recently completed called EmbedVM. It’s a virtual machine for AVR microcontrollers. The package has a relatively small overhead, taking up about 3kB of program memory. The VM can execute 74,000 instructions per second, and runs asynchronously from the microcontroller. As [Clifford] demonstrates in the videos after the break, this can be handy for preloading commands to prevent slowdown during heavy VM processor loads.

The snippet in the image above is an example program written in the C-like VM code which will play some [Rick Astley] on a speaker. This code can be run from RAM, EEPROM, or even external storage like an SD card. Recently there was a supplemental compiler project that even takes Python code and compiles it into VM byte-code. What a nice abstraction tool for making inexpensive microcontroller-based designs easily programmable for those that have a bit of Python experience.

If you don’t recognize the name, [Clifford Wolf] is also the author of OpenSCAD, a tool that is quite popular with 3D printing.

Continue reading “Virtual Machine For Microcontrollers Lets You Run Python On AVR Chips”

The Life And Death Of A Fantastically Brilliant Flashlight

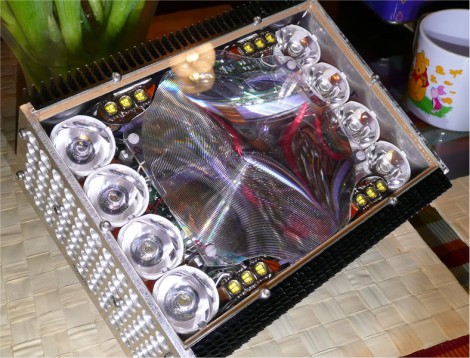
[Holzleim’s] flashlight build is quite impressive. And the rise and fall of the hardware is quite a story. He designed it as a handheld light, relying on batteries to power a multitude of high-power LEDs inside.From the collection of four 5350 mAh lithium polymer cells he was able to achieve a peak power output that surpasses 500 Watts!

Projects that make use of these powerful LED modules have heat dissipation as a major design element. With this in mind, [Holzleim] used large bars of copper as a mounting surface for each group of modules. The size and thickness of these bars made it difficult to use traditional soldering techniques to affix the bodies of the modules so he ended up using a clothes iron to ramp up the temperature high enough to reflow the solder. Once mounted, most of the LEDs were paired with optics, including that Fresnel lens at the center, to help focus the light.

To keep the batteries topped off, [Holzleim] designed his own external charger which can run off of mains or from a car’s electrical system. Unfortunately he must not have included a way to monitor the battery temperature because one of the cells failed, causing a fire that burnt out the components inside the flashlight. Luckily his wife was home at the time and got the failing device outside where it didn’t cause more damage. We’ve linked to his posts regarding the charging system, the properly functioning light burning paper with its beam intensity, and his sad announcement about the fire after the break.

Continue reading “The Life And Death Of A Fantastically Brilliant Flashlight”

Making A Line-following Toy Into A Programmable Robot

[Eric Gregori] picked up this little yellow robot as a kit build. It has a single PCB inside that has a pair of IR emitters and detectors pointed downward at the front of the robot. It is able to follow a dark line on a light surface based on how the infrared beam reflects back to the detector. But it’s a one-trick pony that [Eric] wanted to make into a programmable robot.

The kit came with a schematic, which makes the process of patching into its logic quite easy. There are two motors, each with a driver circuit made up of a pair of transistors and one flyback diode. This means the motors can only move in one direction, but they also only take one logic connection to control. Instead of populating the transistor that usually connects the IR receiver to the motor driver, [Eric] soldered jumper wires from each to an MSP430 chip (the G2231 that came with his Launchpad).

As you can see in the clip after the break, the first version of the code he wrote makes the robot follow a line as it would if it had not been altered. But there’s still plenty of programming space and several free I/O pins for future improvements.

Continue reading “Making A Line-following Toy Into A Programmable Robot”