laptop_screen_polarized_art_fixture

Polarized Art Fixture Made From A Busted Laptop Screen

[Pedro] had a busted laptop LCD screen on his hands, but rather than throw it out, he brainstormed what he could possibly do with what would typically be considered a worthless item. He decided to make a simple art installation using the scrapped part, so he gathered a few other supplies and got to work.

The first thing he did was pull the LCD screen from the laptop, separating the front panel from the backlight panel. He drained the liquid crystal fluid from the display, and set it inside a picture frame in place of the glass. He added spacers around the edge of the frame so that the backlight could be mounted several inches behind the LCD panel.

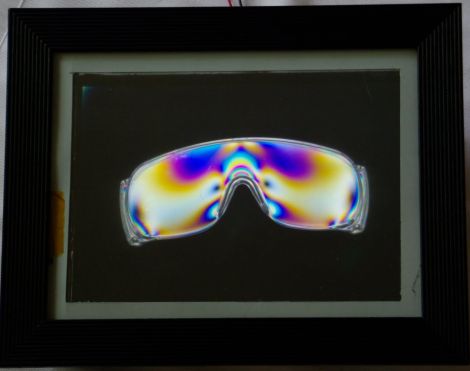
[Pedro] then found a few polystyrene and polycarbonate plastic items from around the house, and placed them inside the frame. As you can see in the picture above, the polarizing filter built into the LCD screen makes for some pretty cool effects.

While you could debate for hours over exactly what is art, there’s no denying that his PolFrame looks cool and is a great way to save electronics from the scrap heap. We just want to know what he did with the LC fluid he drained from the screen!

Bounty For An HP Touchpad Android Port

If you spent your weekend outside and away from the Internet, you might have missed the massive liquidation of HP TouchPads on Amazon, woot.com, WalMart, and the HP online store. Normally a $100 fully featured tablet is nothing to scoff at, but there is a catch: The HP TouchPad runs WebOS. WebOS is a fine operating system for a tablet, but it’s not Android. The folks at HacknMod.com posted a bounty for the first person to port Android to the HP TouchPad.

HacknMod is offering up $450 for a basic Android port and is looking for sponsors for the WiFi, Audio, Camera, and MultiTouch bounties. There’s a lot of discussion about the port on the XDA Developers and the RootsWiki forums if you’d like to get a bearing on how far along the project is. The TouchPad has already been rooted so there’s your starting point.

We’d like to throw our hat into the ring, but we missed out on the TouchPad fire sale. If anyone knows of an online shop where they’re still available, leave a message in the comments.

via HacknMod.com

FPGA Bitcoin Miner Is Probably The Most Power Efficient.

[fpgaminer], [li_gangyi], and [newMeat1] have been working together for the last few months to build an FPGA bitcoin miner that blows GPU mining rigs out of the water in terms of power efficiency. The board requires only 6.8 watts for 100 Mhashes/second, but [li_gangyi]’s blog says the team expects to hit 150-200 Mhashes with some improvements. That’s efficiency GPUs can’t touch.

Bitcoins are a digital currency that are ‘mined’ by calculating hashes that verify bitcoin transactions. While mining operations can be performed on a CPU, graphics cards and FPGAs beat CPUs by several orders of magnitude in terms of how many hashes can be performed per second.

The heart of the board is a Spartan-6 LX150 FPGA – a pricey bit of kit – and the team is selling each board for $440 USD. For that amount of money, you could buy two ATI 6770s at half the price and crunch four times as many hashes a second. At less than 7 watts, though, we wouldn’t worry too much about cooling the rig and the electricity costs will be very low.

Video: Shocking [Jack] Into Submission With High Voltage

Hackaday headquarters has recently been overrun by techno-groupies hanging around outside so we decided to take some measures to discourage that. A word of warning though, if last week’s video ruffled your feathers then you probably shouldn’t watch this one. In this video [Jack] shows you how to create a stun glove using a disposable camera and some leather spikes. To prove that it really works, he intentionally takes a jolt from it courtesy of Hackaday’s security chief [Vlad].

Check out the video after the break.
Continue reading “Video: Shocking [Jack] Into Submission With High Voltage”

Hacking A2DP Support Into An Old Car Stereo

a2dp_tape_deck_retrofit

[Roofus] had an older car, and unfortunately his stereo’s cassette player just wasn’t doing it for him. He always wanted to simply get into his car, pull out his cell phone, and have his music ready to play without any fuss. After messing around with all sorts of different tape adapters, he got fed up and decided to rig up an A2DP (Stereo Bluetooth Audio) adapter on his own.

He pulled the head unit out and started looking around to see how he could wire an adapter in. He figured the best course of action would be to remove the tape deck, and fool the stereo into thinking that a tape had been inserted. After spending some time tracing wires and studying how his old tape adapters worked, [Roofus] had an A2DP connection wired in and was ready to rock out.

Greeted with nothing but silence, he turned to his favorite hacking site (Hackaday, naturally) for assistance. Some friendly forum-goers helped him identify a ground loop issue, and he set off to his nearest RadioShack for a pair of isolation transformers that would fix his problem.

Once he knocked out the ground loop issues, his adapter worked like a charm. He put everything back together, and aside from a tiny switch he installed to toggle between audio sources, you would never know it was there.

Hackaday Links: August 21, 2011

Arduino + PS2 controller + R2D2

Here’s an unbelievably real-looking R2D2 replica driven by a PS2 controller with an Arduino inside that plays sounds from the movies. Too bad we couldn’t find any more details about it. [Thanks Bill]

Server build time-lapse

[Justin] and his colleagues spent five days upgrading their server by building a 29-unit cluster. Lucky for us they set up a web-cam to capture the process.

Cockroach computer

Behold this working desktop computer, complete with monitor and mouse. We’re not sure how it was done, or what it’s for, but worth a peek just because of its size. [Thanks Harald via Dvice]

Modelling self-assembling viruses

A 3D printer and magnets were used to build this model of a self-assembling virus. Shake the jar and it falls apart. Shake a bit more and it’ll rebuild itself… it has the technology.

Tardis cufflinks

[Simon] is exercising his geek chic with these Tardis cuff links. The Doctor Who inspired accessories were made from a model railroad telephone booth.

One-man SMD Assembly Line Shares A Lot Of Tips About Doing It Right

Need to use that antiquated hardware that can only be connected via a parallel port? It might take you some time to find a computer that still has one of those, or you could try out this USB to Parallel port converter. It’s not limited to working with printers, as the driver builds a virtual parallel port that you should be able to use for any purpose. But what we’re really interested in here isn’t the converter itself, but the build process. [Henrik Haftmann] posted a three-part series of videos on the assembly process, which you can watch after the break.

The build is mostly surface mount soldering with just a handful of components that need to be hand soldered. The first of his videos shows him stenciling solder paste onto the boards. From what we can see it looks like he built a nice jig for this using scrap pieces of copper-clad which match the thickness of the PCB, and hold it and the stencil securely in place. There’s a bunch of other tips you can glean from the videos, like the image seen above. It’s a clamp that holds the PCB and USB jack together while they are soldered.

If you’re ever thinking of assembling a bunch of boards you should set aside thirty minutes to watch them all.

Continue reading “One-man SMD Assembly Line Shares A Lot Of Tips About Doing It Right”