Building A Radio Telescope For A School Science Project

The image above is a picture of  Hydrogen emissions from our galaxy. The cool thing about this picture is it wasn’t taken with millions of dollars worth of equipment; instead, only a few hundred dollars worth of ham radio gear was needed to get a picture of the Milky Way. [Shanni Prutchi], with the help of her dad [David] built this radio telescope in 5th grade, and even gave a presentation on this build at the National Radio Astronomy Observatory.

Instead of a gigantic satellite dish, [Shanni] used a loop yagi antenna to collect radio signals in the 1420 MHz band. These signals are amplified, filtered, and sent to an ICOM IC R-7000 receiver specially modified by [Shanni]’s dad for radio astronomy.

After her telescope saw first light, [Shanni] and [David] decided to use their brand new toy to detect the passage of the sun. At around 10:00 am they pointed the telescope at where the sun would be at 1:30 pm. For the next few hours, the telescope gathered and integrated radio signals to make an awesome graph. Yep, [Shanni]’s scope can detect radio waves coming directly from the sun.

Like a lot of us, [Shanni] was very much influenced by the movie Contact, something we brought up last week in a post on software-defined radio telescopes. This telescope was built in 2005, meaning [Shanni] couldn’t take advantage of any of the new advances in cheap software radios. We’re still waiting for someone to throw a Realtek SDR telescope together, so if you’ve got one send it in

Using An Android As A Webserver

In the latest episode of XDA TV [Adam Outler] turned his Android phone into a webserver. At first this might sound comical, but the ever-increasing power of our handhelds makes it a pretty legitimate option. It’s hard to come up with concrete uses off the top of our head, but we’re sure there’s value in being able to pull the phone out of your pocket and serve some content.

The app BotBrew Basil makes the installation process nearly automatic. It gives you point-and-click access to install the lighttpd webserver package and set the daemon to run automatically at boot time. That’s it! Of course you need to supply your own HTML to be served. [Adam] used an HTML5 website template for this.

Next you also need a way to resolve the address of the phone. In this case it’s assigned a static IP from the router, and a dynamic DNS service provides a link that maps to the router’s location. But since these phones are running Linux (at least on the lowest level) it should be pretty easy to add a cron job which will send IP address updates to the service if you want to take the ‘webserver’ out in the world with you. You can watch the entire video after the break.

Ironically this is a big hardware upgrade for [Adam’s] webserver. The previous version was running from an Evalbot.

Continue reading “Using An Android As A Webserver”

A Closer Looks Helps You Build Your Own DiWire Bender

Whether or not you’re actually going to build this CNC wire bender, we think you’ll love getting a closer look at how it’s put together. The team over at PENSA got such a strong response from a look at the original machine that they decided to film a video (embedded after the break) showing how the thing was put together. They’ve also posted a repository with code, bom, etc.

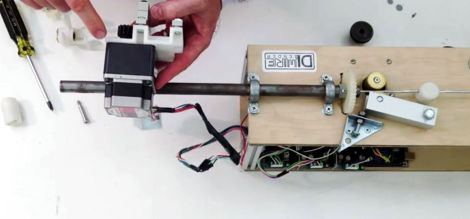
In the image above [Marco] shows off the portion that actually does the bending. It’s designed to mount on the pipe through which the straightened wire is fed. The 3d printed mounting bracket really makes this a lot easier. The assembly provides a place to attach the solenoid which moves a bearing in and out of position. That bearing presses against the wire to do the bending, but must be moved from one side of the wire to the other depending on the direction of the next bend. This is a lot easier to understand after watching the demo video which is also embedded after the break.

Continue reading “A Closer Looks Helps You Build Your Own DiWire Bender”

Cheap ARM Netbooks Have Linux Forced Upon Them

[Doragasu] got his hands on one of these WM8650 Netbooks for around 50 euros (~$63.50) delivered. They come with a version of Android preinstalled, but he wanted to use them more like a computer and less like an Android device. So he set out to load Arch Linux on the ARM-based Netbook.

This is possible because the hardware inside is actually pretty good. The 800 MHz SoC is accompanied by 256 megs of RAM. There’s 2 gigs of internal storage, a 7″ display, USB, Ethernet, WiFi, and an audio system. This is comparable to what you’d get with a Raspberry Pi (without video acceleration) but also includes all of those peripherals, a case, a touchpad and keyboard… you get the point. There are several patches that need to be applied to the kernel to get it working with the hardware. [Doragasu] covers each of them in the post linked above. You can also hear his presentation in the video after the break.

Continue reading “Cheap ARM Netbooks Have Linux Forced Upon Them”

Revolight Clone

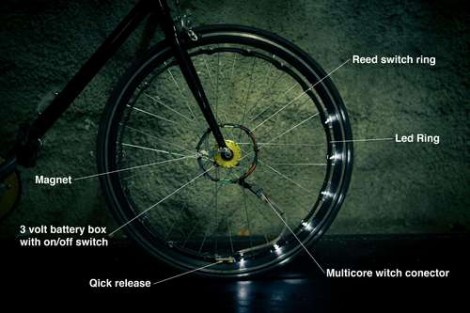
[Fabian.E] wanted to light up the rims on his bike, but didn’t want to shell out a bunch of clams to get it done. He came up with this system which uses magnets and reed switches to light up one arc or each bicycle wheel.

He calls it the lightrider and it’s based on the revolights concept. That design uses a microcontroller which is capable of animating patterns when the wheels aren’t spinning. [Fabian’s] version can’t do that, but the effect while moving is basically the same. The ring of LEDs around the rim is connected to a battery via a set of reed switches. When these switches move past a magnet on the fork it completes the circuit and switches on that segment of LEDs. The clip after the break gives a demonstration of the finished product, and includes a fast-motion video of the fabrication process.

Continue reading “Revolight Clone”

More DIY Solder Flux

[GuShH] wrote a guide for making your own rosin-based solder flux. According to [Stephen] — who sent in the tip and tried this method himself — is works well, it’s cheap, but you will need to clean up a bit after using it on a PCB.

Only two ingredients are necessary to make your own liquid or paste flux: rosin and a solvent. The rosin being weighed in the image above, can be found from several sources. We looked in on the same method quite recently where flux was sourced from a music store. But [GuShH] suggests that if you can find some from a hardware store it is better because the music store variety tends to be ‘molten’ and doesn’t work quite as well.

Proportions are listed on his guide for light, medium, and heavy concoctions. He recommends isopropyl alcohol as the solvent, and has stored the flux in a clear dropper bottle. We’re fans of needle bottles and asked about sourcing them in a previous post (linked in the paragraph above) so check that comments section if you don’t know where to get one.

Communicating From Inside Your Dreams

Over the last few years, [Michael] has been working on the Lucid Scribe project, an online sleep research database to document lucid dreams. This project uses a combination of hardware and software to record rapid eye movements while sleeping. Not only is [Michael] able to get his computer to play music when he starts dreaming (thus allowing him to recognize he’s in a dream), he can also communicate from within a dream by blinking his eyes in Morse code.

According to the Lucid Scribe blog, [Michael] and other researchers in the Lucid Scribe project have developed motion-sensing hardware capable of detecting heartbeats. This equipment is also sensitive enough to detect the Rapid Eye Movements associated with dreaming. This hardware feeds data into the Lucid Scribe app and detects when [Michael] is dreaming. Apparently, [Michael] has been practicing his lucid dreaming; he’s actually been able to move his eyes while dreaming to blink our Morse code. The first message from the dreamworld was, of course, “first post”. [Michael] used ‘first post’ to debug his system, but he has managed to blink ‘S’ from a dream. That should improve after he works on his Morse and lucid dreaming skills.

You may now begin referencing Inception in the comments.