Pumpkin Tetris Inspired By Our Own LED Jack-o-lantern

The kids (or maybe their parents) are going to be lined up at [Nathan’s] front porch to get their turn at playing pumpkin Tetris. That’s right, he built a game of Tetris into a real pumpkin. We thought this looked quite familiar when we first saw it and indeed he was inspired by our own LED Matrix Pumpkin from two Halloweens ago. We love seeing derivative works and [Nathan] definitely make few great improvements to the process.

The matrix itself was wired in very much the same way we used, but he added an additional 58 LEDs to nearly double the size of the display. He used a paper grid and power drill to make room for the holes, but improved the visibility of the lights by sculpting square pixels in the skin of the fruit. But how does one control the game? The stem of the pumpkin is actually a joystick. One of the most innovative parts of the physical build was to use drywall anchors on the inside to mount the joystick hardware.

Don’t miss a demo video after the jump.

Continue reading “Pumpkin Tetris Inspired By Our Own LED Jack-o-lantern”

Halloween Props: Ghoul In The Box Puts On A Pretty Good Show

[Tim’s] ghoul in the box project has all the elements of a classic Halloween prop. He built it for last year’s display but we’re sure it will be a perennial favorite.

As the name implies, it’s modeled after a Jack-in-the-box toy. Fittingly, it’s decorated with bright, happy colors and includes a crank on the right side of the box. But you don’t need any man-power to make it work. Hidden in the red circle at the center of the front panel is a motion sensor. Walk in front of the box and one of two modes will be triggered. The crank may start up and a happy rendition of Pop Goes the Weasel plays. But as it nears the end of the song the tempo slows and the pitch drops as if running out of steam. It’s perfect foreshadowing for the vigorous bursting forth of the ghoul inside.

The demo after the break gives you a look at the operation, as well as the components used in the build.

Continue reading “Halloween Props: Ghoul In The Box Puts On A Pretty Good Show”

How NOT To Make Ground-hugging Fog

Poor [Todd Harrison] spent all of Saturday and Sunday trying to make some ground-hugging fog for his Halloween decor. His fog machine hack turned out to be an utter failure. But he admits it and reports that he still had a lot of fun. Don’t feel bad [Todd], this happens to everyone from time to time. And anyone that has doubts about [Todd’s] skills need not look very far to find out that he does know what he’s doing.

The project started off with a theater-style fog machine. The problem is that this fills a room with a thin foggy-haze that doesn’t take shape outdoors. He wanted that ankle-deep graveyard effect and had seen several examples online that use a fog-machine with a bucked of dry ice. He though he’d just use his own bucket full of regular ice and salt water. Inside the bucket seen above there is a 15′ coil of copper tubing through which the fog machine’s output is passed. On the other side of the bucket there’s a plastic tube that goes to a sheet of plastic meant to distribute the cooled fog.

The problem here is that the fog machine puts out a hot mist. When it hits the ice bath the mist condenses into liquid form and that’s the end of the fog. As he attests in the video after the break, the dry-ice fog hack isn’t pumping out fog. It’s just using the heated steam to pump out carbon-dioxide vapor boiling off of the dry ice.

Continue reading “How NOT To Make Ground-hugging Fog”

Semi-professional Board Assembly For Your Workshop

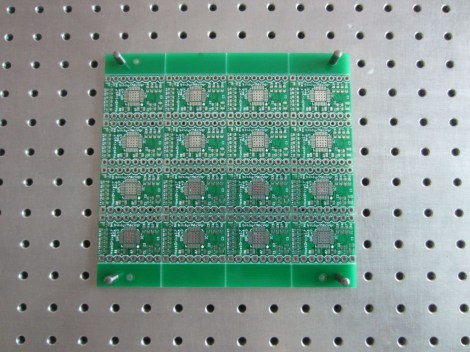
[Zach Hoeken] has the answer to assembling multiple surface mount PCBs in the home workshop. It’s certainly not for everyone. But if you’ve ever thought of marketing your own small runs he has the equipment and methodology you need.

He had tried using hacked together equipment, but after encountering a range of issues he finds the investment in a few key items saves time and money in the long run. The first is a precision tooling fixture block; that metal plate with a grid of holes that makes up the background of the image above. It comes with machined pegs which fit the holes perfectly, and as you can see, his panel of 16 boards include tooling holes that line up with the fixture. Once in place, a steel solder stencil is aligned with the board using its own tooling holes. The alignment of the stencil and its uniformed thickness ensure that the perfect amount of solder paste is easy to apply with a squeegee. [Zach] hand places his components but he did invest in a proper reflow oven to make the soldering a set and forget process.

A Collection Of Hands To Inspire Your Halloween Animatronics

Jump scares are a lot of fun, but if you want to hold the attention of all those trick-or-treaters we’d suggest a creepy prop. One of the best choices in that category is a ghoulishly lifelike hand. You can draw some inspiration from this roundup of robot hands which Adafruit put together.

We’ve chosen four examples for the image above but there are more to be had than just these. In the upper left there is a laser-cut acrylic hand that actually features some force sensitive resistors on the fingertips to help implement some haptic feedback. This project was inspired by the hand seen in the lower right which uses flex sensors on a glove to control the bot’s movement. If you’re looking for something more realistic the 3D printed parts on the lower left are the best bet. But if you’re looking to put something together by Halloween night the offering in the upper right is the way to go. It’s hacked together using cardboard templates to cut out plastic parts and using polymorph to form joints and brackets.

DIY Pick And Place Builds Boards, Is Awesome

In what can probably be attributed to the pains of placing a lot of SMD components, [gravelrash] built his own home-made pick and place machine.

Instead of being frustrated with tweezers, stereo microscopes, and having an inordinate amount of concentration, [gravelrash] built a pick and place machine from a Chinese CNC router. The build doesn’t use automated feeders for its reels of parts. Instead,[gravelrash] picked up five manual feeders from eBay, allowing his pick and place to hold 25 different reels of components.

There is, of course, a vacuum pump for sucking up SMD parts and a two-axis gantry capable of moving components from reel to board. The software is Mach3, a program normally used with spinning cutters to mill away wood, metal and plastic. [gravelrash] replaced this motor with a few vacuum controlled needles to pick up, move, and drop components onto the board.

While the build may not be as fast as some other pick and place machines we’ve seen, it’s almost as fast as hand-placing components with the added bonus of not tearing your hair out over very tiny parts.

Tip ‘o the hat to [Alexander] for sending this one in.

Continue reading “DIY Pick And Place Builds Boards, Is Awesome”

QR Clock Is Unreadable By Humans And Computers Alike

The clock is a perfect technology. For just a few dollars, you can buy a digital wristwatch and chronometer able to keep extremely accurate time for years without winding a spring or replacing a battery. Anything ‘improvement’ on the design of a clock only makes it harder to read, a feature exploited by the very 1337 binary clocks we see from time to time. [Ch00f] decided it was time to give way to the march of progress and build a completely unreadable clock. He came up with a QR code clock that is unreadable by humans and cellphones alike.

The hardware is built around nine 8×8 LED matrix panels resulting in a 24 x 24 pixel display, perfect for displaying a 21 pixel square QR code. The LED drivers are a standard multiplexed affair, but this project really shines in the firmware department.

The microcontroller [Ch00f] used – an ATMega328 – is far too small to store the 1440 QR codes for every minute of the day. No, this project would have to dynamically generate QR codes on the fly, not exactly an easy problem.

After looking over the official QR code standard, [Ch00f] wrote a rather large program that turns alphanumeric sequences into QR code. This runs on the microcontroller every minute, generating a new QR code for every minute of the day.

It’s nigh impossible for a human to read a QR code, but [Ch00f] figured he could make his project even less useful. By multiplexing the LEDs at a very low duty cycle [Ch00f] made it impossible for a camera to capture the entire QR code, even though the pattern of pixels is still visible to the human eye. A fabulously useless build that really steps up the game for unreadable clocks.

Video after the break.

Continue reading “QR Clock Is Unreadable By Humans And Computers Alike”