Robotic Light Painting In 3D

For the last few months, [Ben] has been building a 3D light painting robot. Instead of a couple Arduino-controlled LEDs that a person moves around the Lightplot, as [Ben] calls it, uses a robotic arm to move a LED in 3D space.

The build started with [Ben] testing his idea by putting a laser pointer on an altitude and azimuth mount made out of LEGO. Eventually [Ben] decided to build a 3D plotter rig for a more impressive show. The 3D plotter sits in on a tripod with three axes of motion – up and down, clockwise and counterclockwise, and ‘in’ and ‘out’. A small RGB LED at the end of the robotic arm is controlled along with the servos and motors, making it possible to plot vector lines in 3D space.

There are a whole bunch of demo videos after the break. They look fantastic, but we’d really like to see the Lightplot be used outside on a dark, starry night.

Continue reading “Robotic Light Painting In 3D”

Hackaday Links May 9th 2012

Homecut – CNC Cutting Directory

homecut

So you have a CNC machine that you use as a hobby, but would like to do some actual work on the side? Or maybe you have an idea you’d like made. Homecut is a map directory where you can maybe hook up with the right person.

The Curta Mechanical Calculator

curta calculator

As [leehart] mentioned in our comments section, the Curta mechanical calculator is a truly ingenious piece of engineering. A quick Google search should find all kinds of information on it, but this article could be a good place to start for some mechanical hacking inspiration!

Luxman Amplifier DAC Upgrade

nand-dac

[R. Barrios] wasn’t happy with using the sound card for his HTPC setup, so decided to add a DAC module onto his reciever. The resulting audio quality was very good, and the build came out quite clean.  Check it out if you’re thinking of a hack-upgrade to your stereo equipment.

3D Printable Tilt-Shift Adapter

tilt-shift-lens

A tilt-shift lens a neat piece of equipment that is used to make a large scene look like they were miniatures. It’s a cool effect, but professional lenses to do this can cost thousands of dollars. This Instructable tells you how to go about printing your own. For more info on the technique itself, check out this Wikipedia article.

New 3D Printer on the Block

3d-printer

If you would like to take the plunge into 3D printing, but are looking for somewhere to get a parts kit, the [ORD Bot Hadron 3D Printer] may be worth a look.  The build quality looks great, and the price for the mechanical components is quite reasonable at $399. You’ll need to provide the electronics and extruder. Thanks [comptechgeek]!

[Phil Torrone] Interviews [Bunnie Huang] About Chumby And More

Over at Make, [Phil Torrone] has done an interview with [Bunnie Huang]. [Bunnie] has been a major contributor to the pages of Hackaday as far back as we can remember. He started in 2002 hacking X-boxes and sharing his findings with the world. It is this sharing that makes [Bunnie] stand out. He has always shared all his findings and pushed for open source wherever it would fit. We recently discussed how Chumby, a project to which [Bunnie] contributed is coming to an end. In this interview, he talks about what the future holds for himself and how he plans to spend his time. Most interestingly, he plans on spending a year just building things he’s wanted to see built. Be sure to check out the interview to see what he’s already accomplished.

Making Laser Adjustments With An SNES Gamepad

Gaming has infiltrated everything around us. It seems that any time a control interface is needed, the first thought to many current hacker’s minds are the familiar controls from the video games we grew up with. In this example, [eljaywasi] needed a way to control the wavelength of light coming out of a laser. We don’t know exactly how he’s actually changing the wavelength, but we do know he’s using an SNES gamepad as his interface. You can see a red and a blue LED located on the front of the pad, so it may be that two buttons would have sufficed. We don’t care, we like the SNES pad better.

Tilt Sensor Toy Is Simple And Mesmerizing

[Eiki] found himself in need of a project for his “simple machines” class. Another project had brought him in contact with some relatively cheap MEMS accelerometers and gyroscopes.  He had the idea to create a simple tilt sensor based circuit that would light whatever LED was at the bottom.

He’s using an Analog Devices ADXL202E accelerometer chip to sense tilt and an  LM3914 bar-graph driver to light the displays. He’s taking the voltage-proportional-to-accelleration output of the accelerometer, filtering it through a capacitor, then feeding it to the bar-graph driver. It may not be the most technically difficult project, but the result is mesmerizing and elegant.

An Excellent Introduction To Transmission Lines

[Bertho] sent in a great tutorial on terminating transmission lines. If you’ve ever tried to send a high frequency signal a long way down a wire, you know the problems that can crop up due to electronic strangeness. Luckily [Bertho]’s tutorial explains just about everything, from where and when to terminate a cable and why signals get screwed up in long wires.

[Bertho] begins his lesson by taking two oscilloscopes and 20 m of CAT5 cable with the twisted pairs wired in series to make an 80 meter long transmission line. A ~100kHz square wave was sent down the cable after being displayed on the first oscilloscope, and picked up on the other end by the second oscilloscope. It’s a great way to show the changes in a signal over a long cable run, and how small changes in the circuit (just adding a simple resistor) can affect the signal coming out of a cable.

It’s a great post that demystifies the strange electrical gremlins that pop up when you’re running a length of wire. Great job, [Bertho].

Metal Detection Using An Inductor Instead Of A Clock Crystal.

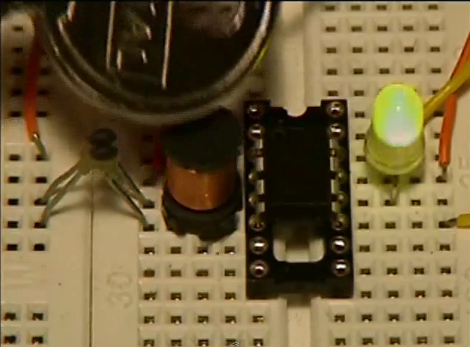
This project from a few years back is an interesting take on a metal detector. Instead of building a detection circuit, [Bruno Gavand] replaced the external clock crystal with an inductor. Here you can see the inductor coil next to the PIC 12F683. You can see two components jumping from one breadboard to the other. These are smoothing capacitors on the inductor lines.

The watchdog timer for the chip is run by the internal RC oscillator. When the external crystal receives a pulse due to metal inducing a current in the coil, the value of the watchdog timer is compared to it. This data is filtered and if the proper parameters are present the green LED blinks. This is bicolor LED. If the inductor circuit is functioning properly it will blink red at power up. [Bruno] says that results will vary based on that inductor so you may need to try a few to get the calibration light to blink.

We’re thinking this would make a simple stud finder (by detecting where the nails/screws are in the wall). Check out the demo after the break, then let us know what you would use this for by leaving a comment.

Continue reading “Metal Detection Using An Inductor Instead Of A Clock Crystal.”