A Pair Of Briefcase Boombox Builds

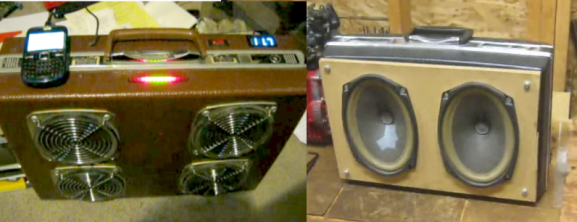
Here are two different briefcase speaker projects. [Dale] built the offering on the right back in high school and the upgraded version 2.0 more recently. He was inspired to send in a tip for the projects after seeing yesterday’s suitcase full of tunes.

The first version uses a pair of speakers pulled out of a car at the junkyard. They’re mounted on some particle board which beefs up the side of the plastic briefcase. The amplifier that drives it is mounted inside the case along with a battery to power the system. [Dale] included a crude storage bracket for the input cable and since the amp can drive four speakers there are connectors on the outside for two more.

Version two has quite a bit more polish. He doesn’t show that one off quite as much, but you can see there is a LED strip on the case that serves as a VU meter, as well as a numeric display which might be battery voltage? He mentions that this blows away any commercially available systems his coworkers have brought to the job site.

Video of both rigs can be found after the break.

Continue reading “A Pair Of Briefcase Boombox Builds”

Art Installation Plots Every Game Of Lunar Lander That Is Played

This art installation makes a video game from the 1970’s popular again. It can be found at the Dublin Science Gallery’s GAME exhibition. Museum goers step up to the coin-op style game cabinet and the onlookers will see how they’re doing as the landing is plotted on this board.

Hardware details are a bit hard to come by but we hear that there will me more on the build posted soon. For now the Flickr set is the best source of information. From reading the captions we know that a set of three Mac minis run everything. There are also a few close-ups and a video overview of the drive hardware which you can see mounted on the upper left of the image above. We can tell you that this is a string plotter similar to builds we’ve seen in the past. The telemetry data from the Lunar Lander game is converted to instructions and fed directly to that device. See it in action in the clip after the break.

Continue reading “Art Installation Plots Every Game Of Lunar Lander That Is Played”

Wireless Speaker Made Using Arduinos And 2.4 GHz Tranceivers

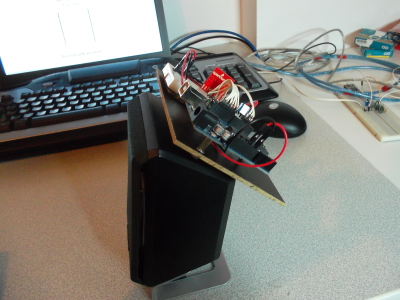
[Texane] picked up a 2.4 GHz transmitter/receiver pair for transmitting sensor data wirelessly. After using them in a project he wanted to try pushing them a bit to see what the limits are when it comes to higher bandwidths. He ended up building a wireless speaker that transmits audio at about 90 KB/s. That link leads to a subfolder of his git repository. The code for this project is in the RX and TX folders, with images and video in the DOC folder.

The radio hardware that he’s using is a Nordic nRF24L01P chip which is available on a breakout board from Sparkfun. [Texane] mentioned to us that the chip includes error checking, packet ACK, and automatic retransmission. But these add overhead that can slow things down. The chip does offer the option to disable these features to get lower level access to the hardware. That’s exactly what he did and he mentions that the example code he wrote for the transmitter and receiver make every cycle count. This makes us wonder if it’s the speed of the ATmega328 chip that is the bottleneck, or the transceivers themselves?

Quick And Easy Personal Evaporative Cooler

This quick and easy evaporative cooler might be just the thing the next time the air conditioning goes on the fritz. [Stephen] saw an eBay listing for a personal air conditioner that used a moist sponge and fan to send some cool relief your way. But he wanted to run his own test to see if it really did anything before laying down the cash.

The idea is to run air past a moisture source. Some of the heat energy in the air is reduced through evaporation resulting in the exhaust air feeling a bit cooler. It’s the same concept used in swamp coolers (an evaporative type of air conditioning). To build his device [Stephen] grabbed a refrigerator deodorizer which uses a hinged plastic cage to hold a packet of baking soda. He attached a small PC fan to the cage, then inserted a damp sponge. This is so easy to put together you could hit the dollar store on your lunch break and have some relief for the second half of the work day.

If you’re looking for a technique that cools just a bit better consider leveraging a beer fridge as a personal cooler.

Continue reading “Quick And Easy Personal Evaporative Cooler”

Arduino Data Logger Maps Out The Potholes On Your Morning Commute

Now you can prove that you have the bumpiest commute in the office by measuring how rough your ride actually is. [Techbitar] calls the project the Bump-O-Meter. It uses an Arduino, GPS, and accelerometer to map out rough roads.

The hardware was built on a breadboard and [Techbitar] goes into detail about connecting and communicating with each module used. Once it’s running, the logger will read up to six sensors and record them to an SD card. In the video after the break he shows the method used to dump and graph the data. He starts by looking at the data in a spreadsheet. There are many fields included in the file but only three of them are needed to graph what is seen above. After narrowing down the number of columns he heads over to GPS Visualizer and uploads the data set which is then automatically plotted on the map.

In a Utopian society all city owned vehicles would have a system like this and the bad sections of road would automatically appear on the road crew’s repair list.

Continue reading “Arduino Data Logger Maps Out The Potholes On Your Morning Commute”

MonoPong: A CMOS 1-D Pong

We’ve seen a few 1-D pong games recently, and they’ve all be controlled using microcontrollers. Inspired by some of these hacks, [mischka] built the monoPong using a handful of logic chips.

The monoPong has four major components. A 555 timer in astable mode provides a clock source which is fed into a 4510 decade counter, which connects to a 4028 BCD to decimal decoder to drive the LEDs. Finally, a 4011 NAND gate IC is used to deal with the button presses. Two of the NAND gates form a RS flip-flop, and the other two NAND each player’s button with the last LED on the player’s side of the strip. If the player hits the button when their LED is on, the RS flip-flop toggles and changes the decade counter from count up to count down mode. This makes the ball bounce back.

[mischka] finished the project off by putting it in a wooden box and drilling holes for the LEDs, buttons, and a power switch. The final product looks pretty good, and is a great example of how you can use a couple logic chips instead of a microcontroller.

After the break, watch a quick game of monoPong.

Continue reading “MonoPong: A CMOS 1-D Pong”

A Suitcase Full Of Tunes

Take the party with you by building your own boomcase. It’s an amplifier and set of speakers built into luggage. It uses an audio jack to connect to your favorite music player, and with a bit of  added protection — like grills for those speakers — it could still be gently used to transport your wardrobe.

A 1960’s suitcase was mutilated for this build. [Jay] must have already had it on hand because combined with some used parts he claims to have only spent $50 total. After trying out a few different speaker orientations on a piece of cardboard he covered the outside of the case in blue painter’s tape and started cutting holes. The amp he chose has a nice face plate which happens to  fit nicely on the top side of the case. For now he’s powering it with a 10,000 mAh (ie: 10 Ah) portable device recharging battery. But as you can hear in the demo after the break this seems to have no problem supplying the system with enough power.

Continue reading “A Suitcase Full Of Tunes”