3D Scanning By Calculating The Focus Of Each Pixel

calculating-focus-to-generate-depth-map

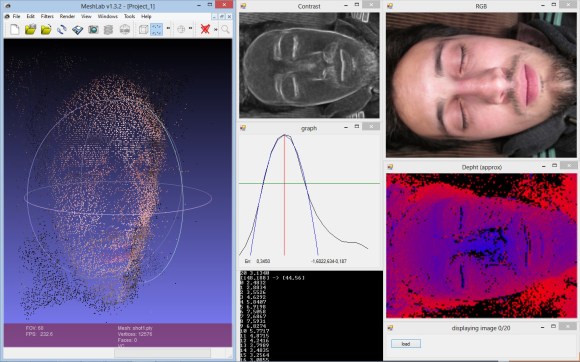
We understand the concept [Jean] used to create a 3D scan of his face, but the particulars are a bit beyond our own experience. He is not using a dark room and laser line to capture slices which can be reassembled later. Nope, this approach uses pictures taken with several different focal lengths.

The idea is to process the photos using luminance. It looks at a pixel and it’s neighbors, subtracting the luminance and summing the absolute values to estimate how well that pixel is in focus. Apparently if you do this with the entire image, and a set of other images taken from the same vantage point with different focal lengths, you end up with a depth map of pixels.

What we find most interesting about this is the resulting pixels retain their original color values. So after removing the cruft you get a 3D scan that is still in full color.

If you want to learn more about laser-based 3D scanning check out this project.

[Thanks Luca]

Giving A Crank Flashlight A Super Capacitor Overhaul

crank-flashlight-supercap-overhaul

[Caleb] was given a tiny LED flashlight which has a crank used to charge it. Unfortunately it wasn’t holding a charge, and constant cranking didn’t work very well either. He cracked it open to find a single lithium button cell. Instead of using a drop-in replacement he soldered in his own super capacitor.

The stock device is remarkably simple. It uses a standard DC motor as the generator. It’s connected to the crank using a set of gears, with the two red wires seen above connecting it to the control board. Four diodes make up a bridge rectified and apparently feed directly into the battery. No wonder that cell went kaput!

But this orientation isn’t bad for using capacitors. They can be charged directly and the switch which attaches the LEDs to voltage doesn’t interfere with their operation. The last problem was making room for them in the case. [Caleb] considered a few different approaches, but ended up just heating the plastic enclosure until it could be deformed to make room for the additional parts.

An Arduino Power Inverter

If you’ve got a few solar panels lying around, or even if you want some 120/230 V AC power from a few 12 Volt batteries, you’ll need a power inverter. Sure, you can drop on down to any big box store and pick one of these up, or you can be like [Michael] and build your own (Danish, translation).

[Michael] found himself in the possession of a few halogen light transformers and decided to make use of them by building a DC to AC power inverter. The inverter is fairly simple – just the transformer, a few MOSFETS, and an ATMega0168 for software control that includes a ‘soft start’ feature that prevents power surges on startup.

The circuit is simple enough to etch at home, although a soldermask and a nice insulated enclosure would probably be ideal for this application.

Building A Synth On A Breadboard

synth

Building an analog synth is a challenge, but with the [Tymkrs] protosynth, it’s easier than ever. It’s a 25-key keyboard attached to a stack of solderless breadboards to make analog synth prototyping a snap.

Earlier, [Tymkrs] acquired a whole bunch of solderless breadboards and decided to put them to use by making a component-level modular synth. The earlier incarnation tied each key on the keyboard to a few wires behind the breadboard and tied them in to a shift register so they could be read with a Propeller dev board loaded up with a Commodore SID emulator. The new version keeps the very clean through-the-back keyboard connector, but this time the [Tymkrs] are adding a few more components that add a sequencer setup and a rotary encoder.

The eventual goal for this really cool breadboard synth is to explore the world of Moogs, Arps, and other analog synths easily on a breadbaord. The [Tymkrs] have already put together a breadboard-compatible low pass and high pass filter. While there’s still a lot of work to be done to make an analog synth a reality, the [Tymkrs] are off to a great start.

Continue reading “Building A Synth On A Breadboard”

Hacking A Medion WiFi Streaming Radio Found At Aldi

hacking-medion-streaming-wifi

On a shopping trip at Aldi [Aaron Christophel] came across this Medion streaming device which connects to your home network via WiFi and works as an Internet radio. He couldn’t resist buying one, and managed to do quite a bit of hacking on the device (translated) once he got it home.

His first order of business was a hardware teardown. An inspection of the board showed what was obviously an unpopulated footprint for a USB mini jack. He added the component, thinking it would allow him to connect it to a computer, but that didn’t work. To investigate the issue further he connected to the device’s serial port using the hard-to-guess credentials root and password. It’s running a Linux kernel and the lsusb command revealed that the USB is enabled as host mode. This mean you can attach mass storage… sweet!

He also did some firmware hacking. Above is the confirmation screen for flashing his altered image file. This resulted in a custom splash screen when it boots up.

A Folding Knife Made From Scratch

thisisaknife


[bobasaurus] over on reddit had a go at making a knife from scratch. It was his first attempt, but we’re thinking the result is fabulous and a wonderful example of what can be done with minimal tools at home.

The blade and folding mechanism was crafted out of an O1 tool steel bar. [bob] didn’t have any fancy machines like a bandsaw to cut these metal parts out; he used a jeweler’s saw and went through many blades in the process.

After the basic shape of the metal parts took form, [bob] turned to the scales. They’re made of a beautiful figured wood, bocote, native to Central America.

One interesting part of [bob]’s knife is the electrochemical etching he did on the blade. After applying a mask for the etching with the toner transfer process, the blade was grounded to a battery charger and a paintbrush wired up to the positive side was dipped in salt water. It’s certainly an easy way to engrave metal without investing in expensive tools or a CNC router.

Finally, the scales were shaped and oiled and the blade and bolster mechanism installed. A lot of work went into this knife, especially with the bare minimum of tools [bob] used. The results are worth it, though, and he ended up with a beautiful knife.