Parametric Press Unravels The JPEG Format

This is the first we’ve heard of Parametric Press — a digital magazine with some deep dives into a variety of subjects (such as particle physics, “big data” and such) that have interactive elements or simulations of various types embedded within each story.

The first one that sprung up in our news feed is a piece by [Omar Shehata] on the humble JPEG image format. In it, he explains the how and why of the JPEG encoding process, allowing the reader to play with the various concepts along the way, in real time, within the browser.

RGB colour-space subsampling doesn’t affect each component to the same degree due to the human eye cone cell response. Also, the chroma components are much less affected than the luminance.

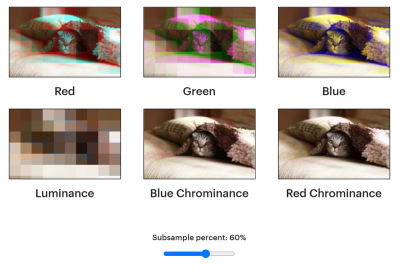
For those not familiar with the format, the first step (which is actually optional) to JPEG encoding is to transform the image from the RGB color space, into a YCbCr (luminance, chrominance) color space. Since the human eye is far more sensitive to luminance (brightness) differences than it is to Cb (chroma relative blueness) and Cr (chroma relative redness) differences, these latter two components can be subsampled by only storing a single value for each, in every 2×2 pixel matrix. JPEG allows other matrix sizes, but 2×2 is the most common.

This sets the scene for the clever bit, that comes next and allows more of that harder-to-perceive chroma information to be discarded. It’s fun to play with the chroma sub-sampling slider and see how the different colours are not equally affected, due to the relative sensitivities of the human eye cone cells.

Next, the three YCbCr components are treated independently to a discrete cosine transform and quantization. This transforms each 8×8 pixel block into 64 discrete spatial frequencies. The JPEG compression level (which you can change) affects how many of the upper-frequency components get discarded, and thus how much of the fine spatial detail gets discarded. This is the main source of JPEG image quality loss. Finally, the compressed blocks are delta encoded, where each subsequent block is coded as the difference from the previous one. Like chroma subsampling, this doesn’t offer any compression on its own but allows the subsequent run-length encoding to be more effective, giving more (lossless) compression. Finally, the whole lot is then Huffman compressed with a unique table stored in the JPEG header. So want to play with JPEGs some more? here’s the GitHub source.

If all of this theoretical stuff is a bit useless to you, perhaps you just want to decode some JPEGs, then here is a speedy library for just that.

A PIC And A Few Passives Support Breakout In Glorious NTSC Color

“Never Twice the Same Color” may be an apt pejorative, but supporting analog color TV in the 1950s without abandoning a huge installed base of black-and-white receivers was not an option, and at the end of the day the National Television Standards System Committee did an admirable job working within the constraints they were given.

As a result of the compromises needed, NTSC analog signals are not the easiest to work with, especially when you’re trying to generate them with a microcontroller. This PIC-based breakout-style game manages to accomplish it handily, though, and with a minimal complement of external components. [Jacques] undertook this build as an homage to both the classic Breakout arcade game and the color standard that would drive the home version of the game. In addition to the PIC12F1572 and a crystal oscillator, there are only a few components needed to generate the chroma and luminance signals as well as horizontal and vertical sync. The game itself is fairly true to the original, although a bit twitchy and unforgiving judging by the gameplay video below. [Jacques] has put all the code and schematics up on GitHub for those who wish to revive the analog glory days.

Think NTSC is weird compared to PAL? You’re right, and it’s even weirder than you might know. [Matt] at Stand Up Maths talked about it a while back, and it turns out that a framerate of 29.97 fps actually makes sense when you think it through.

Continue reading “A PIC And A Few Passives Support Breakout In Glorious NTSC Color”

3D Scanning By Calculating The Focus Of Each Pixel

calculating-focus-to-generate-depth-map

We understand the concept [Jean] used to create a 3D scan of his face, but the particulars are a bit beyond our own experience. He is not using a dark room and laser line to capture slices which can be reassembled later. Nope, this approach uses pictures taken with several different focal lengths.

The idea is to process the photos using luminance. It looks at a pixel and it’s neighbors, subtracting the luminance and summing the absolute values to estimate how well that pixel is in focus. Apparently if you do this with the entire image, and a set of other images taken from the same vantage point with different focal lengths, you end up with a depth map of pixels.

What we find most interesting about this is the resulting pixels retain their original color values. So after removing the cruft you get a 3D scan that is still in full color.

If you want to learn more about laser-based 3D scanning check out this project.

[Thanks Luca]