DIY Bench PSU Looks Like A Million Bucks But Is Easy On The Budget

As one becomes more and more involved in hobbies that involve electronics of almost any kind, it becomes necessary to graduate from wall warts and USB power breakout boards and move up to something more substantial. One great way to do this is to repurpose an old computer PSU, and that’s exactly what the excellent writeup by [Mukesh Sankhla] shows us how to do.

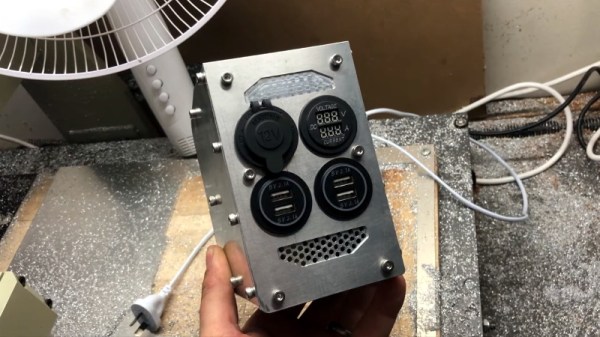
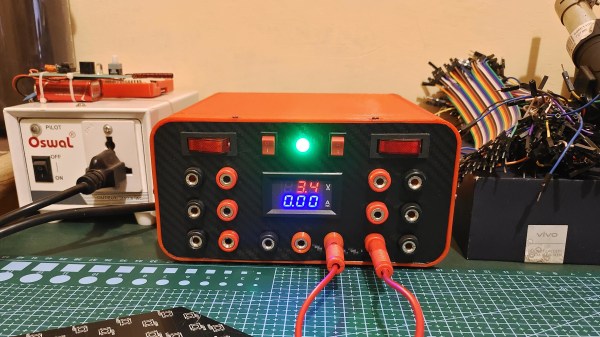
Starting with an ATX power supply from a derelict computer that was otherwise heading to to the bin, [Mukesh] walks us through the teardown of the power supply as well as how we can rebuild it in a snazzy 3d printed case complete with a voltage readout.

Now it’s easy to say “Sure, this is just another ATX PSU project” but the care that went into making a nice case adds a lot to build. There’s another element that is extremely important: The power resistor across the 5 Volt power bus. There are cheap kits online that will break out an ATX PSU into banana plugs, but they omit this vital piece. Depending on the ATX power supply being used, they may be unstable without the load.

The project also leaves a lot of room for adding your own hacks such as variable voltage and current limiting. We think this PSU would be a great (and great looking) addition to any hacker’s workbench. If ATX Power Supply get your electrons flowing, check out this entire computer built into a gutted ATX PSU.

Heavy Metal Power Bank Uses Tool Batteries

At one time or another, most of us have seen a gadget for sale and thought we could build something similar for cheaper. Of course, we’re almost always wrong. Not about being able to build it, mind you. But when you add up the cost of the materials, the tool or two you almost inevitably end up buying, and the time spent chasing perfection, you’re lucky if you haven’t doubled the original price.

We’re not sure how much money [Taylor Hay] ended up saving by building his own portable power bank. But we do know it’s a gorgeous piece of hardware that’s certainly built far better than the average consumer gadget. The CNC-cut aluminum side panels look like something pulled out of a tank, and while we know some might balk at the 3D printed internal frame, we’re confident you could use this thing as an impromptu step stool without a problem.

Inside there’s 150 watt 240 VAC inverter, complete with a temperature-controlled fan to keep it cool under load. There are also four USB ports providing 2.1 A each, a standard 12 VDC accessory port, and a LED display that shows battery voltage and current being drawn. Rather than come up with his own battery pack, [Taylor] used a 3D printed interface that accepts an 18 V Milwaukee cordless tool battery. Naturally, the design could be adapted to take another brand’s cells if you were so inclined.

Around these parts, we know that a good project doesn’t have to be cheaper or even more practical than what’s already on the market. There’s an inherent value in building something exactly the way you want it that you simply can’t put a monetary price on.

Continue reading “Heavy Metal Power Bank Uses Tool Batteries”

DIY Magsafe Charger Feeds Off 12 V Solar Battery

[Steve Chamberlin] has a spiffy solar-charged 12 V battery that he was eager to use to power his laptop, but ran into a glitch. His MacBook Pro uses Apple’s MagSafe 2 connector for power, but plugging the AC adapter into the battery via a 110 VAC inverter seemed awfully inefficient. It would be much better to plug it into the battery directly, but that also was a problem. While Apple has a number of DC power adapters intended for automotive use, none exist for the MagSafe 2 connector [Steve]’s mid-2014 MacBook Pro uses. His solution was to roll his own MagSafe charger with 12 VDC input.

Since MagSafe connectors are proprietary, his first duty was to salvage one from a broken wall charger. After cleaning up the wires and repairing any frayed bits, it was time to choose a DC-DC converter to go between the MagSafe connector and the battery. The battery is nominally 12 volts, so the input of the DC-DC converter was easy to choose, but the output was a bit uncertain. Figuring out what the MagSafe connector expects took a little educated guesswork.

The original AC adapter attached to the charger claimed an output of 20 volts, another Apple adapter claimed a 14.85 V output, and a third-party adapter said 16.5 volts. [Steve] figured that the MagSafe connectors seemed fine with anything in the 15 to 20 V range, so it would be acceptable to use a 12 V to 19 V DC-DC boost converter which he had available. The result worked just fine, and [Steve] took measurements to verify that it is in fact much more efficient than had he took the easy way out with the inverter.

MagSafe has been displaced by USB-C nowadays, but there are plenty of MagSafe devices still kicking around. In a pinch, keep in mind that a little bit of filing or grinding is all that’s needed to turn MagSafe 1 into MagSafe 2.

Disabling Under/over Voltage Protection On ATX Power Supplies

voltage

[C] just recently put together a RepRap. Not wanting to spend the money on a dedicated power supply, he looked around for a cheaper solution and found one in an off-the-shelf ATX computer power supply. These ATX supplies are actually a little finicky when not used in a computer, as [C] found, with voltage drops on the +12 line even when a load is connected to the supply. Undeterred, [C] eventually solved this problem by cutting some traces and grounding a few pins on the protection circuit.

The ATX supply [C] used could supply 25 amps on the 12 volt rail, more than enough for a simple RepRap. There was only one problem: the supply would randomly shut itself off, ruining the print. After a little googling, [C] found some people powering 12 volt amplifiers that were running into the same problem. Their solution was to ground a few pins on the protection circuit. Their supply wasn’t quite like [C]’s so he had to do a little experimentations.

It took a few iterations to get right, but [C] managed to figure out exactly which pins on the “power supply supervisor” IC must be grounded to disable the undervoltage protection. With these pins grounded, the protection circuit of the supply is completely disabled, giving him and uninterrupted 25 amps at 12 volts. If you’re looking for a cheap source of power, it would be hard to go wrong with [C]’s tutorial and his power supply of choice.

An Arduino Power Inverter

If you’ve got a few solar panels lying around, or even if you want some 120/230 V AC power from a few 12 Volt batteries, you’ll need a power inverter. Sure, you can drop on down to any big box store and pick one of these up, or you can be like [Michael] and build your own (Danish, translation).

[Michael] found himself in the possession of a few halogen light transformers and decided to make use of them by building a DC to AC power inverter. The inverter is fairly simple – just the transformer, a few MOSFETS, and an ATMega0168 for software control that includes a ‘soft start’ feature that prevents power surges on startup.

The circuit is simple enough to etch at home, although a soldermask and a nice insulated enclosure would probably be ideal for this application.