A Different Type Of Arduino Internet Shield

different-arduino-internet-shield

The cost of an Ethernet shield for an Arduino isn’t horrible; generally between $17 and $32 depending on which one you buy. But have you seen the cost of a WiFi shield? Those are running North of $70! [Martin Melchior] has a solution that provides your choice of Ethernet or WiFi at a low-cost and it’ll work for most applications. He’s using a WiFi router as an Arduino Internet shield.

This is the TP-Link WR703N which has been very popular with hackers because of its combination of low price (easy to find at $25 or less) and many features: the USB is super hand and, well, it’s a WiFi router! The Arduino Pro Mini shown dead-bug style is talking to the router using its serial port. [Martin] wires a pin socket to the router, which makes the rest of assembly as easy as plugging the two together. The rest of his post deals with handling bi-directional communications with Arduino code.

If you really just need that direct Ethernet pipe consider building an ENC28J60 chip into your designs.

Adding A Digital Timer To A Cable Release Camera

slr-cable-release-timer

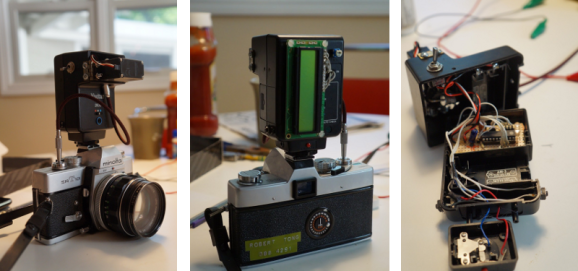
Here’s a completely non-invasive hack for a classic Minolta SLR camera. [Robby] wanted to add to the options available when it comes to remote shutter release. He ended up building a cable release add-on that mounts on the hot shoe.

He drew some of his inspiration from a similar project we saw back in March. He took the engineering example from that project which uses a small servo motor to actuate the cable release. But along the way added his own features.

The system centers around an ATtiny4313 microcontroller. It provides feedback using the character LCD on the back of the auxiliary flash body. That flash body also offers a battery compartment which provides power for the control circuitry as well as the servo motor. Right now it functions as a count-down timer, and also can hold the shutter a specified amount of time. But we could see this extended to work with external sensors to trigger at a set light level, when sensing motion, or from a remote control.

The Most Advanced Microwave You’ll Ever Own

raspberry-pi-microwave

Voice activation, one-touch cooking, web controls, cooking settings based on UPC… have you ever seen a microwave with all of these features? We sure haven’t. We thought it was nice that ours have a reheat button with three different settings. But holy crap, what if you could actually program your microwave to the exact settings of your choice? You can, if you let a Raspberry Pi do the cooking.

This hack run deep and results in a final product with a high WAF. Nathan started by taking apart his old microwave. He took pictures of the flexible sheets that make up the control button matrix in order to reverse engineer their design. This led him to etch his own circuit board to hook the inputs up to a Raspberry Pi board and take command of all the appliance’s other hardware. Because it also drives the seven segment display you’ll never see the wrong time on this appliance again. It’s set based on NTP.

We mentioned you can tweak settings for a specific food. The best way of doing this is shown in the demo video. The web interface is used to program the settings. Recalling them is as simple as using the barcode reader to scan the UPC. Amazing.

Now you can keep that old microwave working, rather than just scraping it for parts.

Continue reading “The Most Advanced Microwave You’ll Ever Own”

Galaxy Note 2 Gets Three And A Half Months Of Standby Time

bat

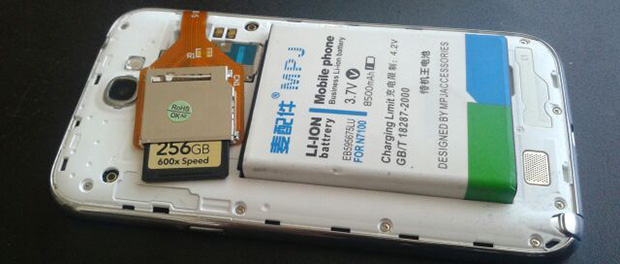
In the quest for the ultimate Android device, [白い熊] on the XDA developers forum created an awe-inspiring monstrosity that gives his Galaxy Note II 288 Gigs of storage and enough battery to theoretically last three and a half months.

First, the storage: the phone can now store movies, videos, apps, and music on an incredibly capacious 256 Gig SD card. Yes, this card currently sells for about $500, but having that much storage space effectively turns the Note into a portable hard drive running Android.

The battery comes direct from an eBay listing that advertises 8500 mAh inside a huge Li-ion battery. It’s extremely doubtful this battery will live up to the stated rating, but even if the new battery has twice the capacity as the stock battery [白い熊] is looking at about 10 weeks of standby time.

Yes, it’s just parts bought online and thrown together, but you really have to admire the sheer ostentatiousness of this phone.

Electro-permanent Magnets For Quadcopters

electromagnet

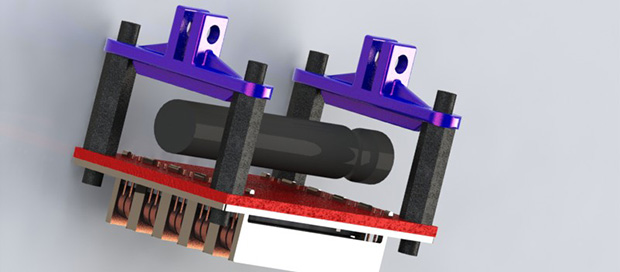
Imagine a quadcopter hovering above a payload – a can of beans, perhaps. The ‘copter descends onto the payload, activates an electromagnet, and flies away with a hobo’s dinner. Right now, this is a bit of an impossibility. A normal electromagnet that powerful would consume an amazing amount of power, something quads don’t usually have in abundance. With the OpenGrab project, the dream of a remote-controlled skycrane is within reach, thanks to some very clever applications of magnetics.

The tech behind the OpenGrab is an electro-permanent magnet, basically an electromagnet you can turn on and off, but doesn’t require any power to stay on. OpenGrab was heavily influenced by a PhD thesis aimed at using these devices for self-assembling buildings.

This project had a very successful Kickstarter campaign and has seen some great progress in the project. While beer doesn’t come in steel cans anymore, we can imagine a whole lot of really cool applications for this tech from infuriating electronic puzzles to some very cool remote sensing applications.

Web Based Automation Courtesy Of Raspberry Pi

web-based-automation-via-rpi

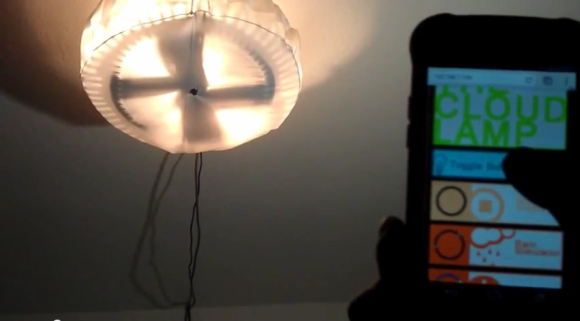
This project is a great example of the Raspberry Pi’s ability to eclipse Arduino when it comes to interaction. [Fall Deaf] mentions that he used to use an Arduino board with an Ethernet shield to add extensible interactivity to his project. But this one, which is a home automation lamp project, uses a Raspberry Pi instead. The concepts end up being very similar. But the cost of the hardware is less and the coding work is arguably orders of magnitude easier.

Don’t get us wrong, the hardware is fundamentally different. When you move from Arduino to RPi you lose some I/O pins and the low level control of them isn’t quite as straight-forward. But you also don’t have to program the thing in C. The Linux kernel handles the low level control which means you can write your scripts using Python. Because Python is an interpreted language the testing and debugging is much faster — no need to flash new code, just run the script again.

This project used the RPi GPIO to drive a strip of LEDs which use the WS2801 protocol. The board includes a NIC which makes it a snap to use as a web server. The smart phone controls seen above are served up from the Pi using jQuery. Right now there’s a cord running out of the lamp. But there should be plenty of room to use a screw-in outlet adapter and to hide the RPi and its PSU inside.

The board still has enough juice to drive other automation features too, like acting as a web radio server.

Continue reading “Web Based Automation Courtesy Of Raspberry Pi”

Ghostly Images Captured Only On Camera

is that a logo

A while back our good buddy [Ch00f] built a QR code clock, unreadable to both humans and computers. A human couldn’t read the clock because of the digital nature of a QR code, and because the clock used persistence of vision in driving the LEDs, a digital camera can’t capture all the pixels in the QR code at the same time. It’s a highly useless but impressive art piece. Now, [Ch00f] is turning that build on its head. He created a rudimentary display that is invisible to the human eye, but easily detected with a digital camera.

This build exploits a basic property of CMOS digital cameras – the rolling shutter. Because it takes time to get pixels off a modern digital image sensor, each picture is actual a composite of many different strips, each taken slightly out of sequence. You can see this for yourself by taking a picture of something rotating very fast with your camera phone; a picture of an airplane propeller will make the blades appear curved, or look like [Dr. Seuss] has an aeronautical engineering degree.

To create his display, [Ch00f] found a few inexpensive fiber optic lights. By aligning a few of these into columns and lighting them up in a precise sequence, he can exploit the rolling shutter and make an image appear. To the human eye, it looks like a solid wall of illuminated fiber optics.

As for how practical this build is, [Ch00f] says not much. For cell phone cameras, you’d need to have a very, very short exposure time for this to work. The only way to do that is to make this display unbelievably bright, or just put it out in the sun. We can’t see that being practical for any potential use case, but we’d be more than happy to see a large-scale attempt at displaying images with this technique.