Leap Motion Controls Hexapod With Hand Signals

leap-motion-hexapod-hand-control

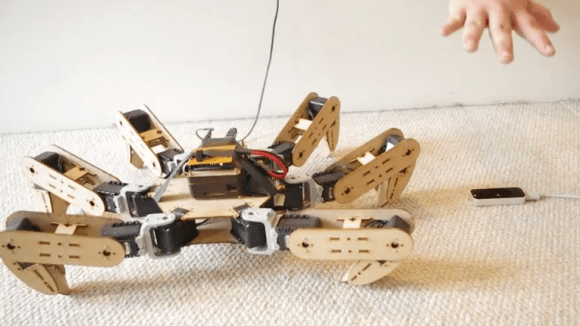
Moving your hand makes this hexapod dance like a stringless marionette. Okay, so there’s obviously one string which is actually a wire but you know what we mean. The device on the floor is a Leap Motion sensor which is monitoring [Queron Williams’] hand gestures. This is done using a Processing library which leverages the Leap Motion API.

Right now the hand signals only affect pitch, roll, and yaw of the hexapod’s body. But [Queron] does plan to add support for monitoring both hands to add more control. We look at the demo after the break and think this is getting pretty close to the manipulations shown by [Tom Cruise] in Minority Report. Add Google Glass for a Heads Up Display and you could have auxiliary controls rendered on the periphery.

While you’re looking at [Queron’s] project post click on his ‘hexapod’ tag to catch a glimpse the build process for the robot.

Continue reading “Leap Motion Controls Hexapod With Hand Signals”

Avalanche Pulse Generator Design

avalanche-pulse-generator

This avalanche pulse generator is a great way to test your mettle as an Electronics Engineer. The challenge is to truly understand how each part of the design works. We certainly got a failing grade when first studying the schematics more than a week ago. But we’re slowly beginning to understand what’s going on under the hood.

The concept of an avalanche transistor is some wicked voodoo from the analog side of the street which leverages a transistor’s breakdown voltage to achieve a predictable result. In laymen’s terms it (mis)uses a transistor to produce a really fast pulse. The write-up linked above references several previous avalanche pulse generator designs, but this one is a bit different in how it produces about 50V from a pair of AAA batteries using a multivibrator circuit.

Even if you have no idea what’s going on here you may be interested in the last few paragraphs where the circuit is measured using a cutting-edge Teledyne LeCroy Wavemaster 820Zi-A. That’s a 20 GHz scope with a 15.3″ screen which you’ll never ever own.

Replacing Knurled Thumb Screws

Screw

[Pete] bought himself an old South Bend lathe, but unfortunately some of the thumb screws were missing from this fine old machine. Originally, the lathe had knurled thumbscrews, and with a thumbscrew from Ace hardware the lathe itself was functional, but by no means looking its best. With a lathe you can make just about anything, so [Pete] decided he would make his own knurled thumbscrews and bring this lathe back to life.

Knurling is a diamond or linear pattern of indentations usually found on fancy metal knobs, flashlights, and other equipment that needs a good grip. While there are knurling tools for lathes, [Pete] decided to use his knurlmaster – a handheld device that looks like a pipe cutter – to cut a few knurls into a steel bar.

As for making this knurled bar into a proper thumbscrew, [Pete] shows us two methods: the first is tapping the knurled steel, putting in the right screw for the job, and securing the parts with Loctite. The second method involves cutting the threads on the lathe, an excellent example of how a lathe can make just about anything, even parts for itself.

Bench Equipment Tip: Screenshot Of Old Oscilloscopes

oscillocam-oscilloscope-camera-accessory

Here’s a quick tip on capturing the output of oscilloscopes that don’t have that native feature. [Paulo Renato] used a cookie tin as a camera cowl for capturing CRT oscilloscope screenshots.

We figure if you’ve got any kind of functioning oscilloscope you’re lucky. And although it’s nice to pull down the measurements to your PC on the newer models, the results [Paul] gets with this rig are still satisfactory. The plastic cookie box he used blocks out ambient light while holding the camera at a consistent focal length. He used some flat black spray paint to make sure the obnoxious yellow plastic didn’t interfere with the image, then drilled a hole which fits tightly around his camera lens.

You’ll need to monkey with the exposure settings to get the best image. But once you’ve got it dialed in it should be the same every time you want to take a picture of the screen.

Making Digi-Key Much, Much Prettier

digi

We all love Digikey, but of all the major component retailers out there, their web interface really isn’t that great. A lot of online sources for parts are much, much prettier, but nothing a good Greasemonkey script can’t fix. This is all the work of [Ben], and adds a ton of really, really useful features to the Digikey web interface.

First up is a whole bunch of pictures right at the top of the search results. If you’re looking for pin headers or weird connectors, this is an astonishing useful feature that will help you select the right part faster. After that is a ‘helper’ button for voltages. As you know, selecting a part with a 5V input requires clicking multiple options including 3.3-5V, 2.3-6V, and 5-40V. Clicking on the helper button and entering 5 V will select all the entries in the filter that contain a 5V part.

[Ben]’s project has been tested with Firefox and Chrome with Greasemonkey extensions. Head on over to his project page for a much better demo of all the features for this really great tool.

Turning A Rubidium Standard Into A Proper Tool

Rb

You can find rubidium frequency standards all over eBay and various surplus dealers. They’re actually quite interesting devices, able to generate a 10 MHz sine wave with enough precision to be a serviceable atomic clock. While these standards can find themselves very useful in a lab, they’re only a component, and not a working-out-of-the-box device. [Gerry] decided he would fix that, turning his rubidium standard into a proper piece of bench equipment, all in a single afternoon.

[Gerry]’s first step was finding a proper enclosure for his new piece of equipment. Most of the time, choosing an enclosure is practice in the art of compromise. This time, though, [Gerry] found the perfect enclosure: an old piece of video distribution equipment. On the back of this box, there are a ton of BNC plugs, perfect for attaching to random lab equipment and feeding them a signal from the rubidium standard.

After going through the video circuit and changing the 75 Ohm outputs to 50 Ohms, [Gerry] wired up an eBay power supply, fan, and a small circuit with an 8-pin PIC to complete his new tool. The rubidium standard does get freakishly hot, but hopefully mounting it to a large aluminum box with a bit of cooling will keep all the added electronics in working order.

[Gerry] did all this in just under 5 hours. An impressive feat, given that he probably spent that much time editing the video, available below.

Continue reading “Turning A Rubidium Standard Into A Proper Tool”

Raspberry Pi Camera Built As Part Of Advertising Campaign

the-rpi-camera

Here’s yet another example of well targeted advertising. This camera built around a Raspberry Pi is a giveaway from Sprite. The “lucky” winner of the camera will have the pleasure of seeing the Sprite logo as a watermark on all of the images they snap with it. But in the right hands it’s a simple hack to remove that “feature” (they published the Python script that adds the watermark) or to just scrap the parts for another project. Either way, Sprite got us to say their name three times in this paragraph so the campaign worked.

The most obvious part of this build is the custom cast resin case that they came up with which is a gaudy cartoon-like monstrosity. It protects the case-less Raspberry Pi board, and mounts the Pi Camera board so that the lens is positioned correctly. The lipstick-sized module mounted in the lower back half of the case is a 2400 mAh portable power supply with a USB charging port sticking out the side. This makes us wonder, do you have to wait for the RPi to power up before snapping a picture? If the size and color didn’t get you noticed by everyone the shutter sound will. it shouts the name of the soda company whenever you press the shutter release button.

If you’re more of a high-end photography enthusiast this DSLR wedded with an RPi will be of more interest.