Turning A Rubidium Standard Into A Proper Tool

Rb

You can find rubidium frequency standards all over eBay and various surplus dealers. They’re actually quite interesting devices, able to generate a 10 MHz sine wave with enough precision to be a serviceable atomic clock. While these standards can find themselves very useful in a lab, they’re only a component, and not a working-out-of-the-box device. [Gerry] decided he would fix that, turning his rubidium standard into a proper piece of bench equipment, all in a single afternoon.

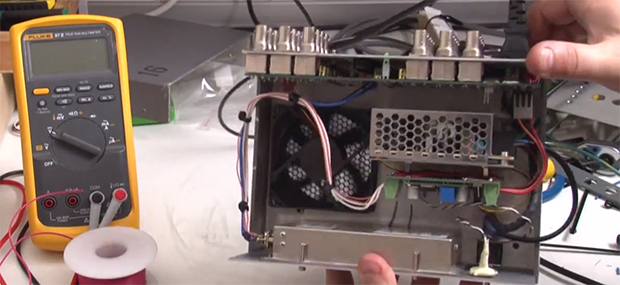
[Gerry]’s first step was finding a proper enclosure for his new piece of equipment. Most of the time, choosing an enclosure is practice in the art of compromise. This time, though, [Gerry] found the perfect enclosure: an old piece of video distribution equipment. On the back of this box, there are a ton of BNC plugs, perfect for attaching to random lab equipment and feeding them a signal from the rubidium standard.

After going through the video circuit and changing the 75 Ohm outputs to 50 Ohms, [Gerry] wired up an eBay power supply, fan, and a small circuit with an 8-pin PIC to complete his new tool. The rubidium standard does get freakishly hot, but hopefully mounting it to a large aluminum box with a bit of cooling will keep all the added electronics in working order.

[Gerry] did all this in just under 5 hours. An impressive feat, given that he probably spent that much time editing the video, available below.

Continue reading “Turning A Rubidium Standard Into A Proper Tool”

Raspberry Pi Camera Built As Part Of Advertising Campaign

the-rpi-camera

Here’s yet another example of well targeted advertising. This camera built around a Raspberry Pi is a giveaway from Sprite. The “lucky” winner of the camera will have the pleasure of seeing the Sprite logo as a watermark on all of the images they snap with it. But in the right hands it’s a simple hack to remove that “feature” (they published the Python script that adds the watermark) or to just scrap the parts for another project. Either way, Sprite got us to say their name three times in this paragraph so the campaign worked.

The most obvious part of this build is the custom cast resin case that they came up with which is a gaudy cartoon-like monstrosity. It protects the case-less Raspberry Pi board, and mounts the Pi Camera board so that the lens is positioned correctly. The lipstick-sized module mounted in the lower back half of the case is a 2400 mAh portable power supply with a USB charging port sticking out the side. This makes us wonder, do you have to wait for the RPi to power up before snapping a picture? If the size and color didn’t get you noticed by everyone the shutter sound will. it shouts the name of the soda company whenever you press the shutter release button.

If you’re more of a high-end photography enthusiast this DSLR wedded with an RPi will be of more interest.

Have You Failed Hard Enough To Be On Hackaday?

hackaday-fail-announcement

There’s so much more to be discovered when your projects just don’t want to work. Grinding out the bugs, getting past roadblocks, and discovering gotchas is where real hacking know-how comes from. But most people aren’t motivated to document their failures. We want to change that.

We want to roll out a new weekly feature that showcases failure… well documented failure. But we need YOU to give up the goods. Write about your failed experience on your blog, post it to our project forums with [FAIL] in the title, or you can just write everything in an email and send it to us. Which ever way you choose, you’ll need to tip us off that you’d like to make it to the front page (come on, it’s not bragging since it didn’t even work!). If you already know of well documented project fails send in those links too even if they’re not your projects.

Make sure you include at least one descriptive image — snapshots, diagrams, schematics, screencaps, anything that tells the story is fair game. To show you what we’re after here’s a few of our favorite failed projects:

We’d like to point out that all of these projects are interesting ideas that show off missteps along the way. We will not be trashing on your skills as a hacker, but instead celebrating the lessons learned and hearlding the sharing of ideas from otherwise doomed projects.

Centimeter-level Precision GPS For $900

[Colin] and [Fergus] have been working with GPS for years now, and like most builders of really cool things, they’re often limited by the precision of off-the-shelf GPS units. While a GPS receiver is usually good for meters of accuracy,  this just isn’t good enough for a lot of projects. What you need is centimeter-level accuracy, something the guys have managed to do with their Piksi GPS receiver.

Where most GPS receivers only look at the data coming from the GPS satellites orbiting overhead, the Piksi uses another technique, real-time kinematics (RTK), to determine the receiver’s location with exacting precision. The basic idea behind RTK is to look at the carrier frequency of the GPS signals at 1575.42 MHz. This frequency has a wavelength of 19 cm, compared to the alternating 1s and 0s of the that are transmitted at around 1 MHz, or about 300 meters between each bit. While centimeter-level precision isn’t possible with only one receiver, two of these Piksi boards – one base station and one on a vehicle, connected via radio link – can make for a very exacting high-accuracy GPS receiver.

Previously, commercial RTK GPS systems have cost thousands of dollars – making a quadcopter or other homebrew project that relies on this level of precision nonsensical. [Colin] and [Fergus] have built hardware that can bring the price of this setup to under $1000. As a bonus, the Piksi board can also receive from other constellations such as Galileo and GLONASS. A very impressive piece of hardware, and we can’t wait to see the applications.

No Computer Ambilight Clone Uses A Computer

It may seem confusing that you’re looking at a Raspberry Pi when this hack is about an Ambilight clone system that doesn’t need a computer. The point here is that this system works no matter what your video source is, where many projects in the past have required the video to be playing from a computer.

This hack follows in the same path of the ARM based custom job we was almost a month ago. Just like that project you use an HDMI splitter to gain access to the feed going to your television. The split signal is fed into an HDMI to composite video adapter. The composite signal is captured by a USB video encoder. The GPIO header drives a strip of addressable RGB LEDs. The whole thing is powered as one using a bit of cable hacking.

It’s slightly convoluted. But all of the components are easy to source and relatively cheap. The one caveat is that it works best if you are already using a hardware HDMI source selector instead of the one build into your TV. That way there is just one HDMI cable going to the television, and this can siphon off of that feed.

Continue reading “No Computer Ambilight Clone Uses A Computer”

Overclocking Your Bitcoin Miner

The name of the game in mining Bitcoins isn’t CPUs, GPUs, or even FPGAs. Now, hardcore miners are moving on to custom ASIC chips like the Block Erupter, For around $100 USD, you too can mine Bitcoins at 300 MH/s with 2.5 Watts of power and a single USB port. This speed isn’t enough for some people, like [Jeremy] who overclocked his Block Erupter to nearly twice the speed.

[Jeremy] begins his tutorial with a teardown of the Block Erupter hardware. Inside, he found a custom ASIC chip, an ATTIny2313, a USB UART converter, and a voltage regulator for the ASIC. By changing out the 12 MHz crystal connected to the ASIC and fiddling with the voltage with a trim pot, [Jeremy] was able to overclock the ASIC core from 336 MHz to 560 MHz. Effectively, he’s running two Block Eruptors for the price of one with the potential to actually make back the purchase price of his hardware.

It must be noted the 560 MHz figure comes from replacing the 12 MHz crystal with a 20 MHz one, and this mod only lasted about 20 minutes on [Jeremy]’s bench until the magic blue smoke was released. He recommends a 14 or 16 MHz crystal, netting a new speed of either 392 MHz or 448 MHz for a stable mod.

Android Hack Adds Missing Chromecast Button To Netflix App

We finally got our hands on a Chromecast over the weekend and we love it! But it wasn’t without a bit of a speed bump. Including a quick initial setup, we had a YouTube video playing in our living room about three minutes after the package hit our mailbox. But we spent the next twenty minutes feeling like a moron because we couldn’t get the Netflix app on an Android phone to cast the video. Turns out there is a bug in the Netflix app that doesn’t add the Chromecast icon for all devices.

The issue is that the newest version of the Netflix app isn’t pushed to all devices. A fix is on the way, but we’re not good at waiting. We used this technique to trick Netflix into thinking we have different hardware. Notice from the screenshots above that one lists our device as an LG-P769 manufactured by LGE. That’s how our /system/build.prop file originally looked. By using the BuildProp Editor app we changed those settings to Nexus S by samsung. After rebooting several of our apps were missing from the app drawer, including Netflix. But they all still worked hitting the Play Store for reinstallation and we now have no problem casting Netflix.