European Hackerspace Tour

Eurotrip

Wow! What a response we received on our Calling European Hackerspaces post! First off, thank you for such a warm welcoming to your hackerspaces. It looks like HaD is going to have to be way more active in touring and profiling hackerspaces!

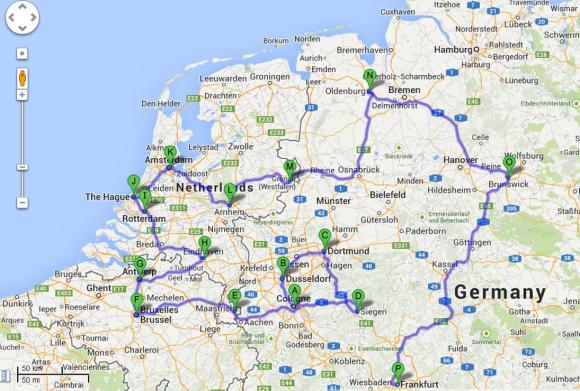
Now unfortunately we’re just not going to have time to visit all of the ones suggested, but we’ve outlined a few of the ones we definitely want to check out!

We created a Google spreadsheet to help do this, so if your hackerspace has been mentioned, OR if it happens to be very close to the others and you really want us to come, please fill out some contact info on the spreadsheet so we can setup a time to visit! If you don’t want to put contact info in a shared document, send an email to the tips line instead with the subject [European Hackerspace Tour]. Because its unlikely our trip will coincide with any open nights, we’d love (need) to have someone to show us the space at potentially odd hours!

I will be writing an individual post for each hackerspace tour with lots of photos and details on all the juicy projects you guys are working on. And if we have time, we might even film the tour!

Once again, thank you for the amazing response and we can’t wait to meet all of you in person!

Build An FPGA Microbee In Three (Not So) Easy Steps

Microbee,_Melbourne_Museum

[Brad Robinson] was feeling a bit nostalgic for his Microbee, so he rebuilt it in an FPGA. Not once, but three times. For the uninitiated, the Applied Technology Microbee was a Z80 based computer 1980’s. Designed in Australia, the Microbee did not see much popularity outside its home continent. Even so, the introduction to home computers many Australians was on a Microbee. [Brad] actually wrote several programs for the Microbee, including some games sold by Applied Technology themselves.

Fast forward to 2012, [Brad] is learning FPGAs, and wants to build a Microbee in VHDL. The FPGAbee was born. The first iteration of the FPGAbee began with the CPU, which came from the T80 open source VHDL Z80 core. Around this core [Brad] added the video controller, keyboard, and sound. When he started adding disk functionality, [Brad] ran into some problems. He wanted to use a FAT formatted SD card for cassette and hard disk emulation.

The relative complexities of the FAT format meant he would have to use some custom software to make this work. [Brad] decided to run this software on a second Z80 core. Both cores would need access to memory, and this is where [Brad] learned what he calls “a hard lesson in cross domain clocks” on FPGAs. Multiple clock nets can cause major propagation delay issues. [Brad] was able to work through the problems, but it caused him to step back and re-evaluate the entire design. This was the start of FPGABee2.

Continue reading “Build An FPGA Microbee In Three (Not So) Easy Steps”

Testing DRAM From A Commodore 64

dram

A few months ago, [Josh] was given an old Commodore 64. He needed to make an AV cable and find a new power supply, and even after testing these new parts out, [Josh] found it still wouldn’t boot. Not one to look a gift horse in the mouth — or perhaps he enjoys the challenge — he set out on restoring a thirty year old circuit board.

He replaced a few chips and the caps, but found he had no way to test the DRAM chips. Compared to SRAM or Static RAM used by other computers of the era, DRAM is a bit harder to interface, requiring a capacitor in each memory cell to be refreshed a few dozen times every second. With a bit of help from his good friend [CNLohr], [Josh] figured out a circuit to read and write to his chips and build a small board based on the ATmega8U2 microcontroller for testing purposes.

CNC Software Toolchain Using Only Open Source Software

For hobbyists, there are two types of machines that can make parts at home. The first type is matter-adding machines (3D printers) and the other is matter-subtracting machines (like CNC milling machines).  [Mario] recently tipped us about an article he made detailing which free software can be used to design and produce parts on CNC machines.

The first step of the process is obviously designing the part you want to make using a Computer-Aided Design (CAD) application. [Mario] suggests Heeks or Freecad for which you can find plenty of tutorials on YouTube. The next step consists in converting the part you just designed to machine tool paths using a Computer-Aided Manufacturing (CAM) application. Fortunately, Heeks can do both so it may be the best option for beginners. [Mario] also mentions the pcb2gcode  application, which allows you to manufacture printed circuit boards at home for the prototypes you may want to produce. Finally, the well known LinuxCNC (previously Linux EMC2) software is used to control the CNC machine using the GCode that the CAM software produced.

At Hackaday, we’d really like knowing what our readers currently use for their CNCs so don’t hesitate to leave us a comment below.

DIY HHO Mini Torch

Fascinated by hydrolysis apparatuses? Me too. Here’s a cool how-to that might convince you to make one! It’s a very simple and easy to build HHO torch using plumbing parts from the hardware store.

The entire build uses almost all standard readily available parts — except for the nozzle assembly. It’s an easy modification though, under the copper pipe endcap is a brass M6 nut that has been soldered in place – this allows you to switch out the MIG welding tips at any time.

[Peter] also shows off another useful tip that allows you to reduce the orifice size of the MIG welding tip – simply hammer a ball bearing into it. Seriously, check out the Instructable and see for yourself! This allows him to reduce the orifice size down to non-standard sizes which in turn allows him to increase the intensity of his HHO flame.

Now all you need is a source of HHO — but don’t worry, we’ve covered that before too!

[via Reddit]

An Open Source GPU

Unless you’re bit-banging a CRT interface or using a bunch of resistors to connect a VGA monitor to your project, odds are you’re using proprietary hardware as a graphics engine. The GPU on the Raspberry Pi is locked up under an NDA, and the dream of an open source graphics processor has yet to be realized. [Frank Bruno] at Silicon Spectrum thinks he has the solution to that: a completely open source GPU implemented on an FPGA.

Right now, [Frank] has a very lightweight 2D and 3D engine well-suited for everything from servers to embedded devices. If their Kickstarter meets its goal, they’ll release their project to the world, giving every developer and hardware hacker out there a complete, fully functional, open source GPU.

Given the difficulties [Bunnie] had finding a GPU that doesn’t require an NDA to develop for, we’re thinking this is an awesome project that gets away from the closed-source binary blobs found on the Raspberry Pi and other ARM dev boards.

An Homemade 48cc V8 Engine With Injection

A few months ago we mentioned [Keith]’s first project in the works, a 1/4 scale V8 engine. Today, we are amazed to see that his engine is finished and running really smoothly. What is even more impressive is that the entire project has been completed on manual mills and lathes. The thread on the Home Model Engine Machinist forum contains his build log in which he details how all the different parts were made. The engine has an electric starter, uses a fuel injection system and [Keith] even made his own injection molds for several plastic parts. The ECU is based on the Megasquirt-II, we guess it must have taken [Keith] many tries before correctly setting its parameters. A video of the engine in action can be viewed after the break.

You can find our previous coverage of this project as well as other miniature engines on this feature from last April.

Continue reading “An Homemade 48cc V8 Engine With Injection”